Share your love
Set up Apache Kafka on Centos 7: Best Setup Guide

In this guide on the Orcacore website, we want to teach you to Set up Apache Kafka on Centos 7. Kafka is used for real-time streams of data, to collect big data, or to do real-time analysis (or both). Kafka is used with in-memory microservices to provide durability and it can be used to feed events to CEP (complex event streaming systems) and IoT/IFTTT-style automation systems.
Table of Contents
Steps To Set Up Apache Kafka on Centos 7
To complete this guide, you must log in to your server as a non-root user with sudo privileges and set up a basic firewall. To do this, you can follow our guide on Initial Server Setup with Centos 7. And, you can visit this guide on Setting Up a Firewall with firewalld on Centos 7.
1. Install Required Packages For Kafka
First, you need to prepare your Centos server for installing Kafka. Update and upgrade your local package index with the command below:
sudo yum update -y && sudo yum upgrade -yThen, use the command below to install the required packages, and JDK on Centos 7:
sudo yum install wget git unzip java-11-openjdk -y2. Install Apache Kafka on Centos 7
At this point, you need to download and get the latest release of Kafka.
Download Kafka Centos 7
Visit the Apache Kafka downloads page and look for the Latest release and get the sources under Binary downloads. Get the one that is recommended by Kafka with the wget command:
sudo wget https://downloads.apache.org/kafka/3.3.2/kafka_2.13-3.3.2.tgzThen, make a directory for your Kafka under /usr/local directory and switch to it with the following commands:
sudo mkdir /usr/local/kafka-server && sudo cd /usr/local/kafka-serverNext, extract your downloaded file in this directory:
sudo tar -xvzf ~/kafka_2.13-3.3.2.tgz --strip 1Create Zookeeper Systemd Unit File
At this point, you need to create a Zookeeper systemd unit file for helping in performing common service actions such as starting, stopping, and restarting Kafka on Centos 7.
Zookeeper is a top-level software developed by Apache that acts as a centralized service and is used to maintain naming and configuration data and to provide flexible and robust synchronization within distributed systems. Zookeeper keeps track of the status of the Kafka cluster nodes and it also keeps track of Kafka topics, partitions, etc.
To create the zookeeper systemd unit file, you can use your favorite text editor, here we use vi editor:
sudo vi /etc/systemd/system/zookeeper.serviceAdd the following content to the file:
[Unit]
Description=Apache Zookeeper Server
Requires=network.target remote-fs.target
After=network.target remote-fs.target

[Service]
Type=simple
ExecStart=/usr/local/kafka-server/bin/zookeeper-server-start.sh /usr/local/kafka-server/config/zookeeper.properties
ExecStop=/usr/local/kafka-server/bin/zookeeper-server-stop.sh
Restart=on-abnormal

[Install]
WantedBy=multi-user.target
When you are done, save and close the file.
Create Systemd Unit File for Kafka
Now you need to create a systemd unit file for Apache Kafka on Centos 7. To do this, use your favorite text editor, here we use vi:
sudo vi /etc/systemd/system/kafka.serviceAdd the following content to the file:
Note: Make sure your JAVA_HOME configs are well inputted or Kafka will not start.
[Unit]
Description=Apache Kafka Server
Documentation=http://kafka.apache.org/documentation.html
Requires=zookeeper.service
After=zookeeper.service

[Service]
Type=simple
Environment="JAVA_HOME=/usr/lib/jvm/jre-11-openjdk"
ExecStart=/usr/local/kafka-server/bin/kafka-server-start.sh /usr/local/kafka-server/config/server.properties
ExecStop=/usr/local/kafka-server/bin/kafka-server-stop.sh
Restart=on-abnormal

[Install]
WantedBy=multi-user.target
When you are done, save and close the file.
At this point, you need to reload the systemd daemon to apply changes and then start the services by using the commands below:
# sudo systemctl daemon-reload
# sudo systemctl enable --now zookeeper
# sudo systemctl enable --now kafka
Verify your Kafka and Zookeeper services are active and running on Centos 7:
# sudo systemctl status kafkaOutput
● kafka.service - Apache Kafka Server
Loaded: loaded (/etc/systemd/system/kafka.service; enabled; vendor preset: disabled)
Active: active (running) since Tue 2023-02-07 03:23:23 EST; 6s ago
Docs: http://kafka.apache.org/documentation.html
Main PID: 9077 (java)
CGroup: /system.slice/kafka.service
└─9077 /usr/lib/jvm/jre-11-openjdk/bin/java -Xmx1G -Xms1G -server
...# sudo systemctl status zookeeperOutput
● zookeeper.service - Apache Zookeeper Server
Loaded: loaded (/etc/systemd/system/zookeeper.service; enabled; vendor pres: disabled)
Active: active (running) since Tue 2023-02-07 03:23:16 EST; 23s ago
Main PID: 8685 (java)
CGroup: /system.slice/zookeeper.service
└─8685 java -Xmx512M -Xms512M -server -XX:+UseG1GC -XX:MaxGCPauseM.
...3. Install CMAK on Centos 7
CMAK (previously known as Kafka Manager) is an open-source tool for managing Apache Kafka clusters developed by Yahoo. At this point, you need to clone the CMAK from GitHub by using the command below:
# cd ~
# sudo git clone https://github.com/yahoo/CMAK.git
Output
Cloning into 'CMAK'...
remote: Enumerating objects: 6542, done.
remote: Counting objects: 100% (266/266), done.
remote: Compressing objects: 100% (143/143), done.
remote: Total 6542 (delta 150), reused 196 (delta 111), pack-reused 6276
Receiving objects: 100% (6542/6542), 3.96 MiB | 0 bytes/s, done.
Resolving deltas: 100% (4211/4211), done.4. Configure CMAK on Centos 7
At this point, you need to make some configuration changes in the CMAK config file. Open the file with your favorite text editor, here we use vi:
sudo vi ~/CMAK/conf/application.confChange cmak.zkhosts=”my.zookeeper.host.com:2181″ and you can also specify multiple zookeeper hosts by comma delimiting them, like so: cmak.zkhosts=”my.zookeeper.host.com:2181,other.zookeeper.host.com:2181“. The host names can be ip addresses too.
cmak.zkhosts="localhost:2181"When you are done, save and close the file.
At this point, you need to create a zip file that can be used to deploy the application. You should see a lot of output on your terminal as files are downloaded and compiled. This will take some time to complete.
# cd ~/CMAK/
# ./sbt clean dist
When it is completed, you will get the following output:
Output
[info] Your package is ready in /root/CMAK/target/universal/cmak-3.0.0.7.zip
Change into the directory where the zip file is located and unzip it by using the commands below:
# cd /root/CMAK/target/universal
# unzip cmak-3.0.0.7.zip
# cd cmak-3.0.0.7
Access CMAK Service
When you are finished with the previous step, you can run the Cluster Manager for Apache Kafka service on Centos 7 by using the command below:
bin/cmakBy default, it will choose port 9000, so open your favorite browser and point it to http://ip-or-domain-name-of-server:9000. In case your firewall is running, kindly allow the port to be accessed externally:
sudo firewall-cmd --zone=public --permanent --add-port 9000/tcpYou should see the following interface:
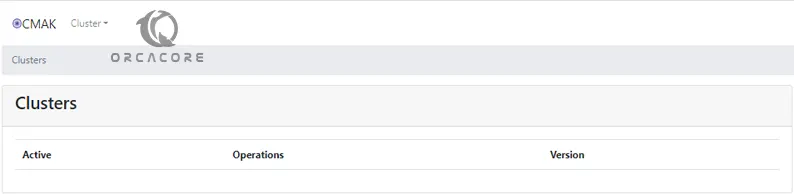
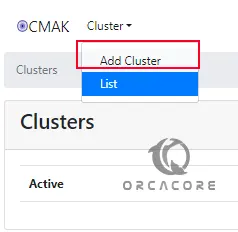
Add Cluster From the CMAK
From Kafka manager on Centos 7, you can easily add the clusters. To do this, click cluster, and add the cluster.
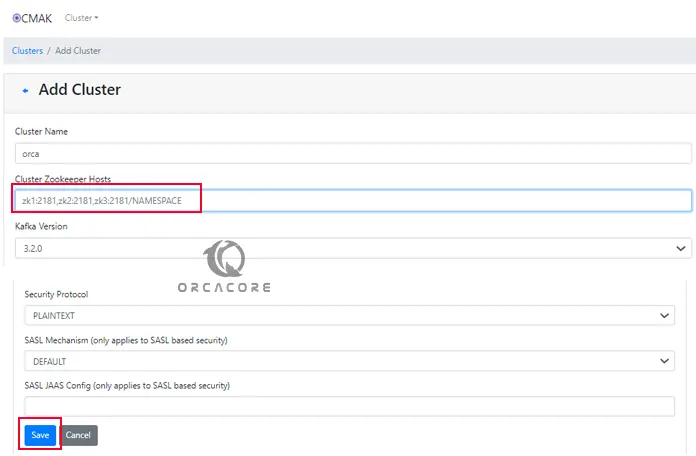
You will be presented with a page as shown below. Fill in the form with the details being requested (Cluster Name, Zookeeper Hosts, etc). In case you have several Zookeeper Hosts, add them delimited by a comma. You can fill in the other details depending on your needs.
Create a Topic in the CMAK interface
From your newly added cluster, you can click on Topic, and create. You will be required to input all the details you need about the new Topic (Replication Factor, Partitions, and others). Fill in the form then click “Create”.
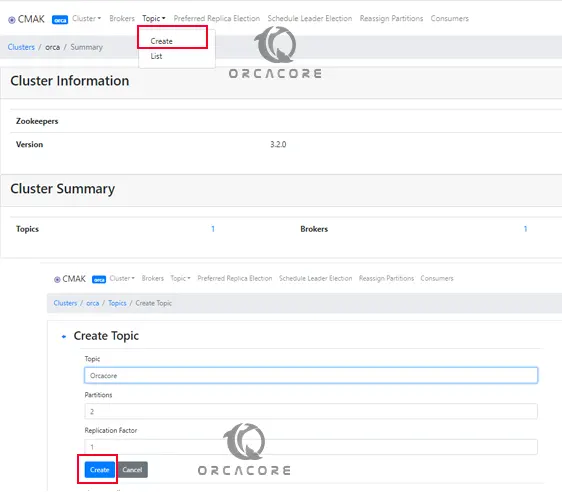
Then, click on Cluster view to see your topics.
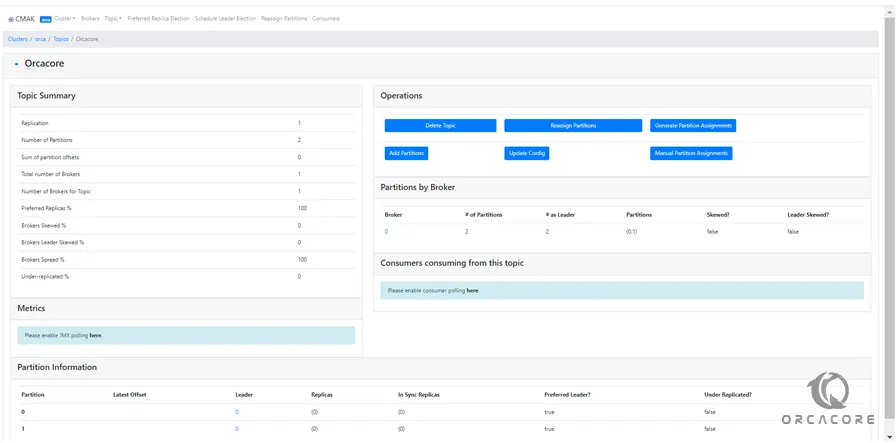
From there you can add topics, delete them, configure them, etc.
Conclusion
There are a number of benefits that you get with Kafka. First, it’s easy to understand how it works. Secondly, it’s reliable, fault-tolerant, and scales well.
Hope you enjoy this guide on Setting up (Installing and Configuring) Apache Kafka on Centos 7, you may also like these articles:
Install OpenJDK 19 on Centos 7
How to Install CMake on Fedora 40 or 39