Share your love
Set up Elasticsearch on Debian 12 Bookworm: Comprehensive Guide

In this guide, we want to teach you to Set up Elasticsearch on Debian 12 Bookworm. Elasticsearch is a distributed, open-source search and analytics engine. It is written in Java and built on Apache Lucene. By using Elasticsearch you can store, search, and analyze huge volumes of data quickly and in near real-time and give back answers in milliseconds.
Now follow the steps below on the Orcacore website to start your Elasticsearch installation and configuration on Debian 12.
Table of Contents
Steps To Set up Elasticsearch on Debian 12 Bookworm
Before you start to Set up Elasticsearch on Debian 12 Bookworm, you need some requirements.
Requirements for Elasticsearch Setup
First, you must have access to your server as a non-root user with sudo privileges and set up a basic firewall. To do this, you can follow this guide on Initial Server Setup with Debian 12 Bookworm.
Because Elasticsearch is developed by Java, you must have Java installed on your server. To do this, you can check this guide to install the default JDK, Install Default JDK on Debian 12. And Remember to set up your Java_Home Environment path.
Now follow the steps below to Set up Elasticsearch on Debian 12 Bookworm.
Step 1 – Install APT Transport HTTPS on Debian 12
To Set up Elasticsearch on Debian 12 Bookworm, you must run the system update and install the apt transport HTTPS on your server. To do this, run the commands below:
# sudo apt update
# sudo apt install apt-transport-https -yNote: APT transport allows the use of repositories accessed via the HTTP Secure protocol (HTTPS), also referred to as HTTP over TLS.
Step 2 – Download and Install Elasticsearch on Debian 12
To Set up Elasticsearch on Debian 12 Bookworm, you must visit the Elasticsearch Official page and get the latest stable version by using the following wget command:
sudo wget https://artifacts.elastic.co/downloads/elasticsearch/elasticsearch-8.8.1-amd64.debWhen your download is completed, you can install your Elasticsearch deb package by using the following command:
sudo dpkg -i elasticsearch-8.8.1-amd64.debOutput
Selecting previously unselected package elasticsearch.
(Reading database ... 43423 files and directories currently installed.)
Preparing to unpack elasticsearch-8.8.1-amd64.deb ...
Creating elasticsearch group... OK
Creating elasticsearch user... OK
Unpacking elasticsearch (8.8.1) ...
Setting up elasticsearch (8.8.1) ...
--------------------------- Security autoconfiguration information ------------------------------
Authentication and authorization are enabled.
TLS for the transport and HTTP layers is enabled and configured.
The generated password for the elastic built-in superuser is : YMAUA7Kgtw0vbqzADW70
....Note down the password that is generated for the superuser from your output.
Step 3 – How To Start Elasticsearch on Debian 12 Bookworm?
First, you must reload the system daemon with the command below:
sudo systemctl daemon-reloadThen, use the following commands to start and enable your service to start on boot:
# sudo systemctl start elasticsearch.service
# sudo systemctl enable elasticsearch.service
Verify your Elasticsearch service is active and running on your Debian 12 server:
sudo systemctl status elasticsearch.serviceOutput
● elasticsearch.service - Elasticsearch
Loaded: loaded (/lib/systemd/system/elasticsearch.service; enabled; preset>
Active: active (running) since Tue 2023-06-27 04:23:13 EDT; 1min 14s ago
Docs: https://www.elastic.co
Main PID: 14849 (java)
Tasks: 70 (limit: 4653)
Memory: 2.3G
CPU: 1min 10.322s
CGroup: /system.slice/elasticsearch.service
...Step 4 – Configure Elasticsearch on Debian 12 Bookworm
At this point, you need to make some basic configuration changes to the Elasticsearch config file.
Open the Elasticsearch configuration file with your favorite text editor, we use vi editor:
sudo vi /etc/elasticsearch/elasticsearch.yml At the file, search for the network.host directive and uncomment it by removing the hashtag and setting it to 0.0.0.0 to listen on all interfaces and make it available publicly. You can use your LAN address for LAN access only:
network.host: 0.0.0.0 0r internal-ip-addressAlso, find the lines below uncomment them, and replace the names with your own:
cluster.name: myCluster1node.name: myNode1Then, find the discovery.seed_hosts directive, uncomment it, and set it to your Node name:
discovery.seed_hosts: ["myNode1"]When you are done, save and close the file.
Now restart Elasticsearch on Debian 12 with the following command:
sudo systemctl restart elasticsearch.service Step 5 – Configure Firewall for Elasticsearch
Here we assumed that you have enabled the UFW firewall. Elasticsearch listens on port 9200. You must allow port 9200 through the UFW firewall. To do this, run the command below:
sudo ufw allow 9200/tcpThen, reload the firewall to apply the new rules:
sudo ufw reloadNote: To get more information about the UFW firewall, you can visit this guide on UFW Firewall configuration on Debian 12.
Step 6 – Test Elasticsearch Installation on Debian 12
At this point, you can test your installation by sending an HTTPs request by attaching the certificate using the below command. To do this, run the following command:
Take note of the password you received earlier, you will need to use that while prompted.
# sudo su
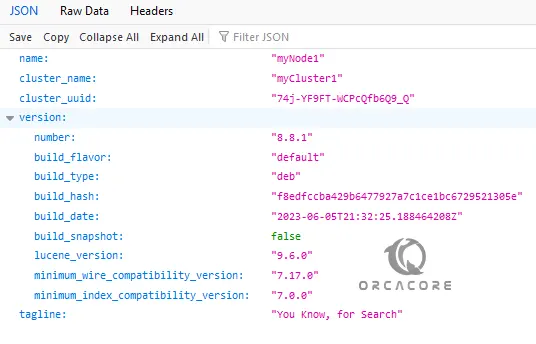
# curl --cacert /etc/elasticsearch/certs/http_ca.crt -u elastic https://INTERNAL_IP:9200You will get the following output:
Enter host password for user 'elastic': enter-your-elastic-password
{
  "name" : "myNode1",
  "cluster_name" : "myCluster1",
  "cluster_uuid" : "74j-YF9FT-WCPcQfb6Q9_Q",
  "version" : {
    "number" : "8.8.1",
    "build_flavor" : "default",
    "build_type" : "deb",
    "build_hash" : "f8edfccba429b6477927a7c1ce1bc6729521305e",
    "build_date" : "2023-06-05T21:32:25.188464208Z",
    "build_snapshot" : false,
    "lucene_version" : "9.6.0",
    "minimum_wire_compatibility_version" : "7.17.0",
    "minimum_index_compatibility_version" : "7.0.0"
  },
  "tagline" : "You Know, for Search"
}
As you can see from the output, your Elaticsearch is working correctly.
Step 7 – Connect Elasticsearch from the Web Interface
Here you can connect to your Elasticsearch by typing your server’s IP address in your web browser followed by 9200:
https://server-ip-address:9200You should enter your Elastic user and password and click sign in:
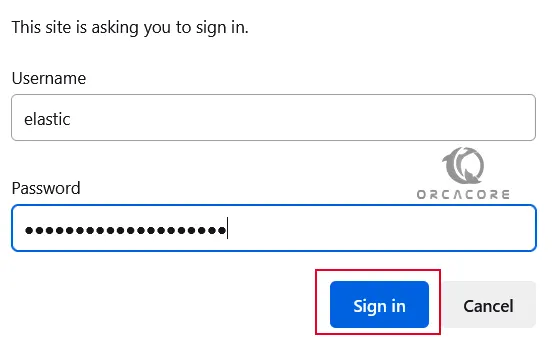
Then, you should see:
For more information, you can visit Elasticsearch Docs.
Conclusion
At this point, you have learned to Set up Elasticsearch on Debian 12 Bookworm. You have downloaded the latest deb package, configured your cluster and node, and tested your Elasticsearch to see if it is working correctly.
Hope you enjoy it. You may like these articles too:
Install Elasticsearch on Ubuntu 22.04
Install and Configure Elasticsearch on AlmaLinux 8
Set up ElasticSearch on Centos 7
FAQs
What is the default port for Elasticsearch?
By default, Elasticsearch listens on port 9200.
Where is the Elasticsearch config file in Linux?
The main configuration file for Elasticsearch is under the /etc/elasticsearch/elasticsearch directory.