Share your love
Set up Nginx Password Authentication on Ubuntu 20.04
In this guide, we want to teach you to Set up Nginx Password Authentication on Ubuntu 20.04.
When it comes to protecting your information online, passwords are the most-used form of authentication for websites and applications alike.
Upon registration, users create a unique ID and key (typically a username and password) that are then stored securely on the website’s server. Ideally, the user is the only person with knowledge of their password, making it so that they’re the only one able to access the account. When the user re-enters their credentials, they are checked against those stored in the web server and, if they are a match, the user is verified.
How To Set up Nginx Password Authentication on Ubuntu 20.04
To set up password authentication with Nginx, you need some requirements.
Requirements
First, you must log in to your server as a non-root user with sudo privileges. To do this, you can follow Initial Server Setup with Ubuntu 20.04.
Also, you must have Nginx installed on your server. To do this, you can visit the installation step of this guide How To Install Nginx on Ubuntu 20.04.
Now follow the steps below to complete this guide.
Create a Password File on Ubuntu 20.04
In the first step, you must create a file that will hold your username and password combinations. There are two ways that you can use it.
- OpenSSL utility
htpasswdincluded in theapache2-utilspackage (Nginx password files use the same format as Apache).
In this guide, we will show both ways, you can choose the one that is best for you.
Create Password File with OpenSSL Utilities
In this case, if you have OpenSSL installed on your server, you can create a password file with no additional packages.
In this way, you will create a hidden file called .htpasswd in the /etc/nginx configuration directory to store your username and password combinations.
First, add a username to the file with the following command, here we named it Olivia you can choose your desired name:
sudo sh -c "echo -n 'olivia:' >> /etc/nginx/.htpasswd"
Then, use the following command to add an encrypted password for your user:
sudo sh -c "openssl passwd -apr1 >> /etc/nginx/.htpasswd"
You can repeat this way for additional users.
Also, you can list the usernames and encrypted passwords stored within the file by running the following command:
cat /etc/nginx/.htpasswd
Output
olivia:$apr1$wI1/T0nB$jEKuTJHkTOOWkopnXqC1d1
Create a Password File with Apache Utilities
Many users think that it is easier to use an Apache utility instead of OpenSSL. To do this, follow the steps below.
First, update your local package index with the following command:
sudo apt update
Then, use the following command to install apache2-utils package on Ubuntu 20.04:
sudo apt install apache2-utils
With this, you have access to the htpasswd command. You can use this to create a password file that Nginx can use to authenticate users on Ubuntu 20.04. Create a hidden file for this purpose called .htpasswd within your /etc/nginx configuration directory.
Next, use the following command to create your user, here we named it Olivia:
sudo htpasswd -c /etc/nginx/.htpasswd olivia
You will be asked to enter a password:
Output
New password:
Re-type new password:
Adding password for user olivia
If you want to add more users, run the above command without the -c option:
sudo htpasswd /etc/nginx/.htpasswd another_user
List your username and the encrypted password for each record with the command below:
cat /etc/nginx/.htpasswd
Output
olivia:$apr1$2XrXswta$oB1H.aw1XE1RUZmP9Ef010
Configure Nginx Password Authentication on Ubuntu 20.04
At this point, you have a file with your users and passwords in a format that Nginx can read on Ubuntu 20.04.
Now you must configure Nginx to check this file before serving your protected content. To do this, you need to open a server block configuration file if you wish to add a restriction.
For your example, you’ll be using the default server block file installed through Ubuntu’s Nginx package:
sudo vi /etc/nginx/sites-enabled/default
This example will be for a server-level restriction. The auth_basic directive turns on authentication and a realm name is displayed to the user when prompting for credentials. You will use the auth_basic_user_file directive to point Nginx to the password file you created:
server {
    listen 80 default_server;

     . . .

    auth_basic "Restricted Content";
    auth_basic_user_file /etc/nginx/.htpasswd;
}
Note: Depending on which block you place the restrictions on, you can control the granularity of which parts of your site require a password. This alternative example restricts only the document root with a location block, and you can even modify this listing to only target a specific directory within the web space:
server {
    listen 80 default_server;

     . . .

    location / {
    try_files $uri $uri/ =404;
    auth_basic "Restricted Content";
    auth_basic_user_file /etc/nginx/.htpasswd;
    }
}
When you are done, save and close the file.
Restart Nginx to apply the changes:
sudo systemctl restart nginx
To confirm that your content is protected, try to access your restricted content in a web browser:
http://your-server-ip
You should be presented with a username and password prompt:
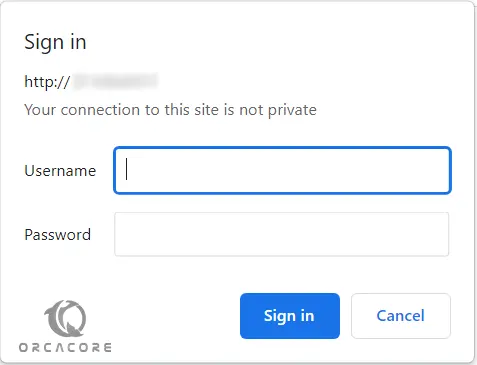
If you enter the correct credentials, you will be allowed to access the content.
Conclusion
At this point, you learn to Set up Nginx Password Authentication on Ubuntu 20.04. However, passwords are also one of the most insecure forms of user authentication out there. It is recommended to use TLS encryption. You can visit our guide on Secure Nginx with Let’s Encrypt on Ubuntu 20.04.
I hope you enjoy it.