Share your love
Varnish Cache Setup with Nginx on Debian 12 with Best Steps

This guide will teach you a step-by-step Varnish Cache Setup with Nginx on Debian 12. Varnish Cache with Nginx is commonly used to speed up web content delivery, improve scalability, reduce server load, and increase web applications’ overall performance and reliability, making them essential components of modern web infrastructure. The common usage of Varnish Cache with Nginx includes:
- Speed Up Web Content Delivery
- Load Balancing and High Availability
- Improving Scalability
- Reducing Server Load and Bandwidth Usage
- Customizable Caching Policies
Now, follow the steps below from the Orcacore website to start your Varnish Cache Setup with Nginx on Debian 12.
Table of Contents
A Complete Guide For Varnish Cache Setup with Nginx on Debian 12
To start, you must log in to your server as a non-root user with sudo privileges and set up a basic firewall. For this purpose, you can check the Initial Server Setup with Debian 12.
Also, you must install Nginx on your server. To do this, you can check the Install Nginx Web Server on Debian 12.
Now proceed to the following steps to complete Varnish Cache Setup with Nginx on Debian 12.
Step 1 – Nginx Configuration For Varnish Cache
At this point, you must change the Nginx default port from 80 to 8080. To do this, you can use the following command:
sudo find /etc/nginx/sites-enabled -name '*.conf' -exec sed -r -i 's/\blisten ([^:]+:)?80\b([^;]*);/listen \18080\2;/g' {} ';'This will edit your /etc/nginx/sites-enabled directory and change the Nginx default port.
Then, you need to open the default Nginx site and change the listen port to 8080. To do this, you can use your desired text editor like Vi editor or Nano editor:
sudo vi /etc/nginx/sites-enabled/defaultAt the file, change the port to 8080 and comment on the second line as shown below:
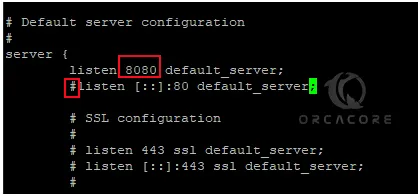
When you are done, save and close the file.
Restart the Nginx web server to apply the changes:
sudo systemctl restart nginxNow you can use the following command to verify Nginx is listening on port 8080:
sudo netstat -pnlt | grep 8080Example Output
tcp 0 0 0.0.0.0:8080 0.0.0.0:* LISTEN 1177/nginx: masterStep 2 – Set up Varnish Cache on Debian 12
At this point, you need to install some required packages. To do this, run the command below:
sudo apt install debian-archive-keyring curl gnupg apt-transport-https -y
Then, visit the official releases page and check for the latest version of Varnish Cache.
Next, add the Varnish GPG key to Debian 12 with the following curl command:
curl -fsSL https://packagecloud.io/varnishcache/varnish74/gpgkey | sudo gpg --dearmor -o /etc/apt/trusted.gpg.d/varnish.gpgNow add the Varnish Cache repository to your server:
sudo tee /etc/apt/sources.list.d/varnishcache_varnish74.list > /dev/null <<-EOF
deb https://packagecloud.io/varnishcache/varnish74/debian/ bookworm main
deb-src https://packagecloud.io/varnishcache/varnish74/debian/ bookwoorm main
EOF
Update your APT repository with the command below:
sudo apt updateFinally, use the command below to install Varnish on Debian 12:
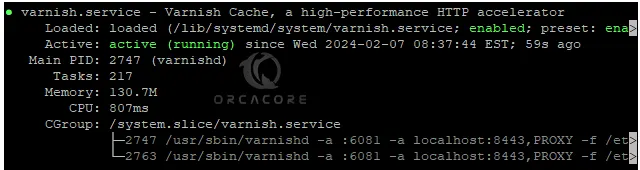
sudo apt install varnish -yTo check your Varnish cache is active and running, run the following command:
sudo systemctl status varnish.serviceIn your output, you should see:
Step 3 – Varnish Cache Configuration on Debian 12
At this point of Varnish Cache Setup with Nginx on Debian 12, you need to open the Varnish config file and check the default address and port configuration:
sudo vi /etc/varnish/default.vclYour backend default must look like this:

When you are done, close the file.
Then, you must change the default Varnish port from 6081 to 80. To manage Varnish Cache like other system services, you need to adjust the systemd service with the command below:
sudo cp /lib/systemd/system/varnish.service /etc/systemd/system/Then, open your Varnish cache service file:
sudo vi /etc/systemd/system/varnish.serviceAt the file, change the default port to port 80 and the cache size to 2GB:
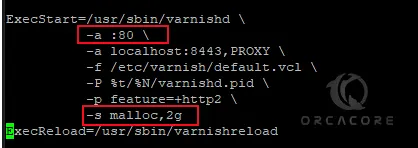
When you are done, save and close the file.
Restart systemd and Varnish service to apply the changes:
# sudo systemctl daemon-reload
# sudo systemctl restart varnish
Verify that Varnish is listening on port 80 with the following command:
sudo netstat -ltnp | grep ':80'In your output you will see:

Step 4 – Test Varnish Cache with Nginx
Now you can use the curl command to test the Varnish Cache Setup with Nginx on Debian 12:
curl -I http://localhost/In the output, you should see:

Be sure that the X-Varnish: 2 and Via: 1.1 (Varnish/7.4) headers appear in the output.
Conclusion
Varnish Cache, when used in conjunction with Nginx, serves as a powerful combination for improving the performance and scalability of web applications. At this point, you have learned Varnish Cache Setup with Nginx on Debian 12. Hope you enjoy it.
Also, you may like to read the following articles:
Nginx Proxy Manager Setup on Debian 12
Configure Nginx Password Authentication on Debian 12