Share your love
Install and Secure Nginx on AlmaLinux 10 Comprehensive Guide

This guide intends to teach you how to install and secure Nginx on AlmaLinux 10. You can easily set up Nginx server blocks and secure your setup by generating SSL certificates from Let’s Encrypt. You can use Nginx on AlmaLinux 10 as a web browser and reverse proxy.
If you are looking for the installation steps for AlmaLinux 10 on VMware, you can check this guide on AlmaLinux 10 Setup on VMware Workstation. Or if you use AlmaLinux 9 and want to upgrade your system, you can check this guide on Elevate AlmaLinux 9 to 10.
Now, proceed to the guide steps below on the Orcacore website to complete the Nginx web server setup on AlmaLinux 10.
Table of Contents
Steps To Install and Secure Nginx on AlmaLinux 10
Before you start, you must log in to your server as a non-root user with sudo privileges and set up a basic firewall. For this purpose, you can check the Initial Server Setup with AlmaLinux 10. Also, you need a valid domain name that points to your server’s IP address.
Then, follow the steps below to install Nginx on AlmaLinux 10.
Step1. Install Nginx Web Server on AlmaLinux 10
First, run the system update with the following command:
sudo dnf update -yThen, use the command below to install Nginx on AlmaLinux 10:
sudo dnf install nginx -y
Start and Enable Nginx Web Service
After installation, start and enable your Nginx web service on AlmaLinux 10 by using the commands below:
# sudo systemctl enable nginx
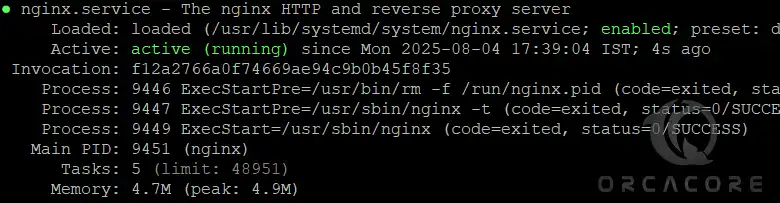
# sudo systemctl start nginxThen, verify Nginx is active and running by using the following command:
sudo systemctl status nginxIn your output, you should see:
Allow Nginx HTTP Connection Through FirewallD
We assume that you have enabled FirewallD from the initial settings. At this point, you must allow an HTTP connection through your firewall by using the command below:
sudo firewall-cmd --permanent --add-service=httpThen, reload the firewall to apply the new rules:
sudo firewall-cmd --reloadYou can verify the HTTP connection is allowed by using the command below:
sudo firewall-cmd --permanent --list-all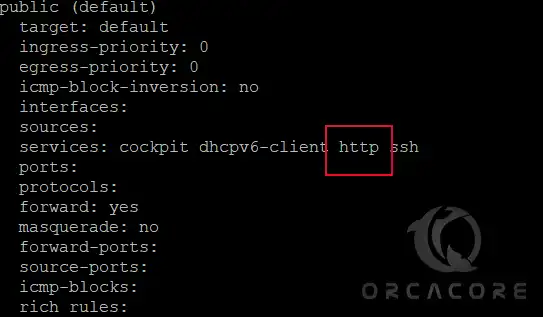
Access Nginx Web Server Test Page
Additionally, you can verify that your Nginx web server is functioning correctly by accessing your server’s public IP address. You can get your public IP address by using one of the following commands:
# sudo hostname -I
# sudo curl -4 icanhazip.com
Then, type your IP address in your desired web browser to access the default Nginx page:
http://your_server_IP_addressYou should see the following page. It means Nginx is working correctly on AlmaLinux 10.

Step 2. Set Up Nginx Server Blocks (Virtual Hosts) on AlmaLinux 10
Like an Apache virtual host, an NGINX server block allows you to host multiple domains or websites on your server. In this step, we will show you how to set up an Nginx server block on AlmaLinux 10.
First, you must create a directory for your domain with the following command:
sudo mkdir -p /var/www/your-domain/htmlThen, you need to set the correct ownership of the directory with the $USER environment variable, which should reference your current system user with the following command:
sudo chown -R $USER:$USER /var/www/your-domain/htmlAt this point, create a sample index.html page to test the server block configuration by using your desired text editor, like Vi Editor or Nano Editor:
sudo vi /var/www/your-domain/html/index.htmlAdd the following HTML code to the file:
<html>
<head>
<title>Welcome to your-domain</title>
</head>
<body>
<h1>Success! Your Nginx server is successfully configured for <em>your-domain</em>. </h1>
<p>This is a sample page.</p>
</body>
</html>
Once you are done, save and close the file.
Next, you must create a server block with the correct directives that point to your custom webroot. Create a new server block at /etc/nginx/conf.d/your-domain.conf:
sudo vi /etc/nginx/conf.d/your-domain.confAdd the following configuration block to the file:
server {
 listen 80;
 listen [::]:80;

 root /var/www/your-domain/html;

  index index.html index.htm index.nginx-debian.html;
  server_name your-domain www.your-domain;

 location / {
  try_files $uri $uri/ =404;
 }
}
Once you are done, save and close the file. Then, run the following command to make sure that there are no syntax errors in any of your Nginx files on AlmaLinux 10:
sudo nginx -tIn your output, you should see:

Finally, restart the Nginx web service to apply the changes:
sudo systemctl restart nginxAlso, you must allow your custom document root to be served as HTTP content. To do this, run the following command:
chcon -vR system_u:object_r:httpd_sys_content_t:s0 /var/www/your-domain/
At this point, you can verify your Nginx server block setup by accessing your domain name:
http://your-domainIf you see the page below, it means that your Nginx server is correctly configured to serve your domain.

Step 3. Install Certbot Let’s Encrypt Client on ALmaLinux 10
For more security, it is recommended to secure your Nginx web server by using the Let’s Encrypt SSL Certificates on Almalinux 10. First, install the EPEL repo and Certbot Let’s Encrypt Client by using the following commands:
# sudo dnf install epel-release -y
# sudo dnf install certbot python3-certbot-nginx -y
At this point, you must update firewall settings and allow HTTPS connections through your firewall. To do this, run the command below:
sudo firewall-cmd --permanent --add-service=httpsThen, reload the firewall to apply the changes:
sudo firewall-cmd --reloadStep 4. Generate SSL Certificate for Nginx From Let’s Encrypt
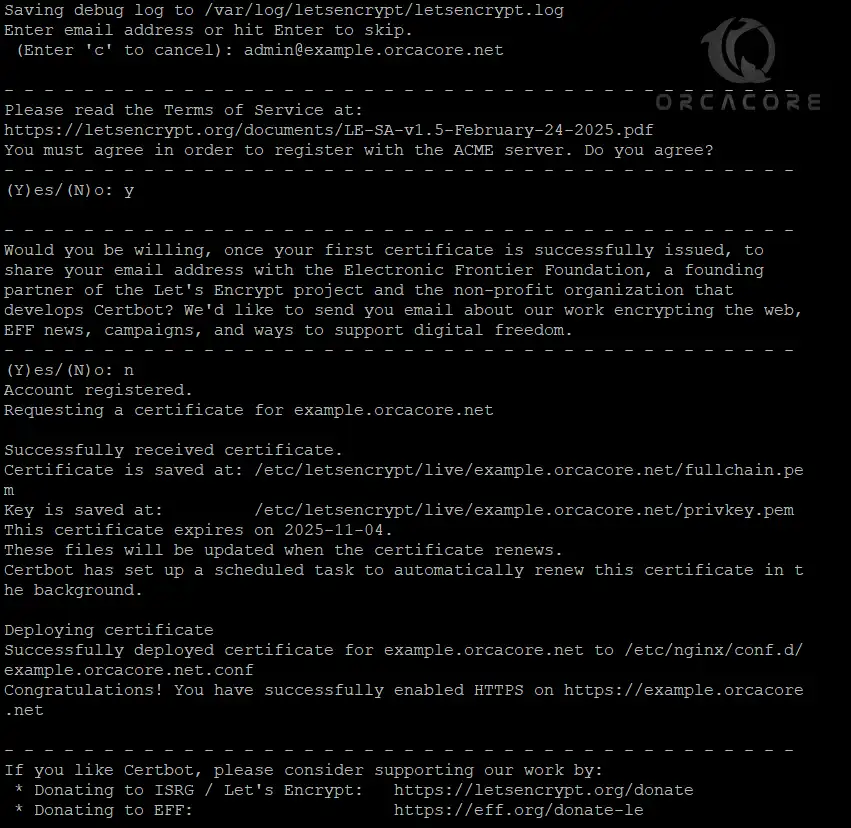
At this point, you can request an SSL certificate for your domain from Let’s Encrypt. For multiple domains and subdomains, you can use the following command:
sudo certbot --nginx -d your-domain -d www.your-domainFor the single domain, you can run the following command:
sudo certbot --nginx -d your-domainYou will be asked to enter your email address and then agree to the terms of service.
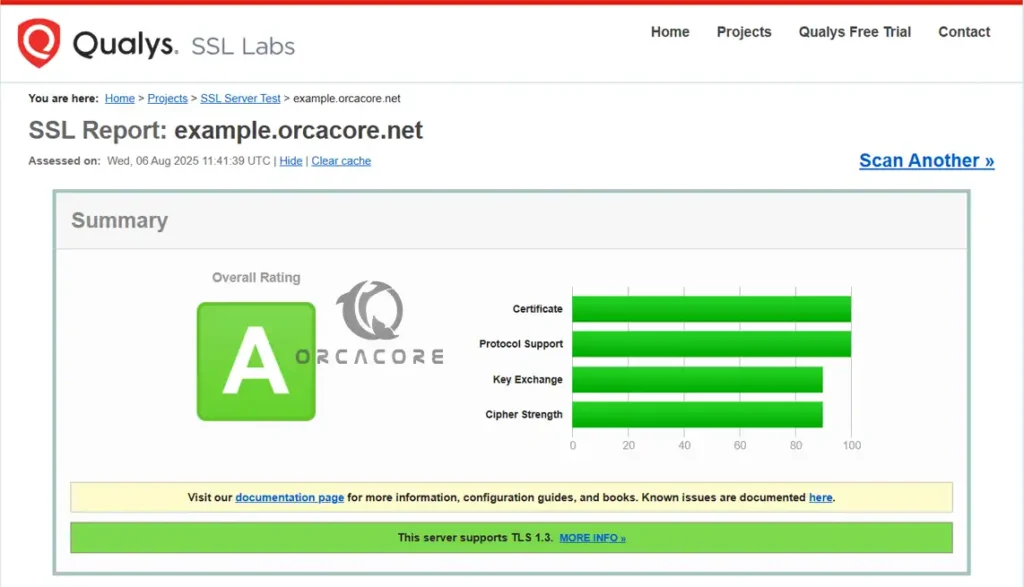
Once you are done, you can check your SSL certificate status from Let’s Encrypt on AlmaLinux 10. Type the following link into your web browser:
https://www.ssllabs.com/ssltest/analyze.html?d=your-domainYou should see the following screen:
Also, you can access your website using the HTTPs prefix.
Set up Auto-renewal for SSL Certificates
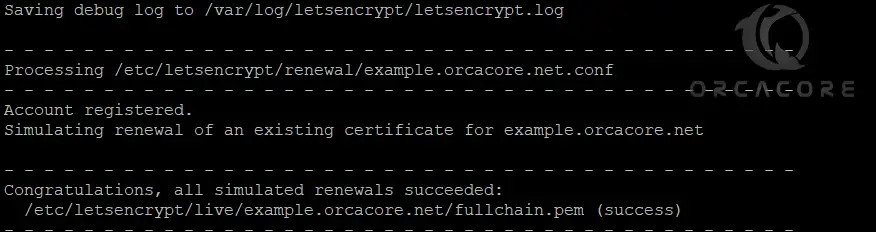
Let’s Encrypt certificates are valid for 90 days, but it’s recommended that you renew the certificates every 60 days. To do this, run the command below:
sudo certbot renew --dry-runIn your output, you should see:
Also, you can create a cron job that runs every week or even every day. To edit the crontab for the root user, run the following command:
sudo crontab -eThen, add the following line to the empty file:
0 0,12 * * * python -c 'import random; import time; time.sleep(random.random() * 3600)' && certbot renew --quietOnce you are done, save and close the file. This will renew your SSL certificates.
FAQs
Is AlmaLinux 10 compatible with Let’s Encrypt and Certbot?
Yes. AlmaLinux 10 supports the installation and use of Certbot, which is the recommended tool for generating and renewing Let’s Encrypt certificates.
How can I check if my SSL certificate is working correctly?
You can visit your site using https://your-domain or use SSL testing tools like SSL Labs Test.
How do I force HTTPS on all requests?
Certbot usually updates your Nginx config to redirect HTTP to HTTPS. If not, you can add this manually:server {
listen 80;
server_name yourdomain.com www.yourdomain.com;
return 301 https://$host$request_uri;
}
Conclusion
At this point, you have learned to install and secure Nginx on AlmaLinux 10. By following the guide steps, you can easily learn to install the Nginx web server, set up Nginx server blocks, and generate SSL certificates for your domain from Let’s Encrypt. Hope you enjoy it. Please subscribe to us on Facebook, YouTube, and X.
For more information and guides, you can check the official AlmaLinux website.