Share your love
Configure Apache on an Ubuntu or Debian VPS

In this article, we want to teach you How to configure Apache on an Ubuntu or Debian VPS. You can use all of the versions of Ubuntu and Debian like Ubuntu 22.04, Ubuntu 20.04, Debian 12, Debian 11, etc.
What is an Apache webserver?
Apache HTTP Server is a free, cross-platform, and open-source web server that delivers web content through the internet. Now you can follow the steps below to see how you can do Apache configuration setup on Ubuntu or Debian VPS.
Ultimate Guide To Configure Apache on an Ubuntu or Debian VPS
To configure Apache on an Ubuntu or Debian VPS you need to install it on your server. You can follow the rest of the article to complete this guide.
Note: To run commands you need to use sudo before each command if you are a non-root user with sudo privileges. You can also visit the Orcacore website and check for the Debian and Ubuntu initial server setup guides.
Step 1 – Install Apache on Ubuntu or Debian VPS
First of all, you should install Apache. If you don’t install it yet, follow these commands below:
sudo apt update
sudo apt install apache2 -y
After the installation is completed, type your server IP address in your web browser then you will see the default Apache index page.
Note: If you didn’t see a page like the below picture, check your VPS firewall and open port 80 and 443. You can check the UFW configuration guide to get more information.

Step 2 – Apache Configuration Setup on Debian or Ubuntu VPS
At this point, you can configure the Apache. You can see configuration files in /etc/apache2. Run the following command:
# cd /etc/apache2
# ls –F
Output
apache2.conf envvars mods-enabled/ sites-enabled/
conf-available/ magic ports.conf
conf-enabled/ mods-available/ sites-available/
Here are some configuration files in your output. Let’s look at apache2.conf file.
Apache2.conf file setting
This is the main configuration file for the server. Almost all configuration can be done from within this file, although it is recommended to use separate, designated files for simplicity. This file will configure defaults and be the central point of access for the server to read configuration details.
This file is divided into three main parts:
1) Configuration for the global Apache server process.
2) Configuration for the default server.
3) Configuration of Virtual Hosts.
We want to look at the global Apache server process and learn how Apache defines its global settings.
Global configuration part for Apache
At this point, there are some options that control how Apache works as a whole.
Let’s see some of them that you may want to modify.
Timeout: The number of seconds before receiving and sending time out. By default, it is set to 300.
KeepAlive: If it is set to “On” it means that allows persistent connections (more than one request per connection).
You can deactivate it by setting it to “off”.
MaxKeepAliveRequests: The maximum number of requests to allow during a persistent connection. If it is set to “0” it means that allows an unlimited amount. We recommend you leave this number high, for maximum performance.
KeepAliveTimeout: The number of seconds to wait for the next request from the same client on the same connection.
Apache MPM Configuration
In this part, you can see the multi-processing module options. Run the following command:
apache2 -lIn your output, you can see compiled modules.
Output
Compiled in modules:
core.c
mod_so.c
mod_watchdog.c
http_core.c
mod_log_config.c
mod_logio.c
perfork.c
mod_version.c
mod_unixd.c
As you can see, in this server, “prefork.c” is a module that was compiled in and is also in the “apache2.conf” file. Your installation may have multiple to choose from, but only one can be selected.
You can adjust the configuration of the prefork MPM in the appropriate part.
Apache Explore the Default Virtual Host File
The default virtual host annunciation is in a file named “default” in the sites-available directory.
At this point, you can open the file with your desired text editor like vi editor or nano editor:
sudo nano /etc/apache2/sites-available/000-default.confAs you can see the default virtual host is configured on the standard HTTP port 80.
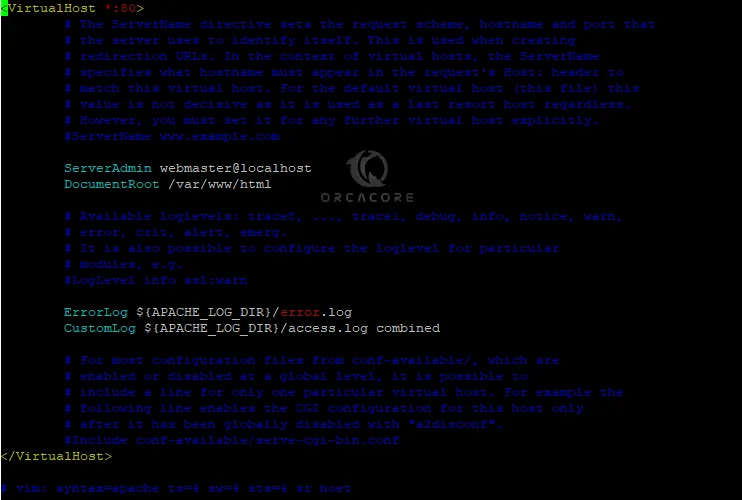
Virtual host top-level configuration
Also, there are some options that apply to the whole virtual host:
ServerAdmin: It uses a contact email if there are server problems. If you were using this as a template for other virtual host definitions you can add the “ServerName” definition that specifies a domain name or IP address.
You can also make the Virtual Host apply to more than one name by using the “ServerAlias” definition.
The “DocumentRoot” option specifies where the content that is requested for this Virtual Host will be located. The default Virtual Host is set up to serve content out of the “/var/www” directory on Ubuntu.
Directory definitions
Also, there are some definitions for how the server handles different directories.
The first directory definition applies rules for the “/” or root, directory.
Alias and ScriptAlias statements
Alias is a map of a URL path to a directory path.
ScriptAlias is like the Alias but it defines directories that have executable components in them.
Enable Sites and Modules in Apache
At this point, you can enable a site with the following command:
sudo a2ensite virtual_host_file_nameThen, you should reload the Apache with the following command:
sudo service apache2 reloadAlso, you can disable your virtual host with the following command:
sudo a2dissite virtual_host_file_nameOr you can use a2enmod for disabling your virtual host. Then, reload the Apache again.
Note: Do not forget after any changes you should reload your Apache.
Conclusion
At this point, you have learned to Configure Apache Web serve on Ubuntu or Debian VPS and get familiar with the Apache configuration file. Hope you enjoy it.
Also, you may be interested in these articles:
Top 5 Alternatives To Apache HTTP Server on Linux