Share your love
Secure Apache with Let’s Encrypt on CentOS 7
In this article, we want to teach you How to secure Apache with Let’s Encrypt on CentOS 7. Let’s Encrypt is a free, automated, and open certificate authority (CA), run for the public’s benefit. It is a service provided by the ISRG which stands for (Internet Security Research Group). You can follow the steps below to get the Apache SSL certificates with Let’s Encrypt on Centos 7.
Steps To Secure Apache with Let’s Encrypt on CentOS 7
Before starting to secure Apache with Let’s Encrypt, you need some requirements.
Requirements
First, you need to log in as a non-root user with root privileges. To do this, follow our article about the Initial server setup with CentOS 7.
Also, You need a basic firewall configuration and install the Apache webserver. For this purpose, you can visit this article on the Install Apache on Centos 7.
Then, you need to set up an Apache virtual host file. To do this, you can check out our article on Set up an Apache virtual host on Centos 7.
When you are done with these requirements, you can start to install the Let’s Encrypt client software.
Step 1 – Install the Certbot Let’s Encrypt Client on Centos 7
To install the certbot Let’s Encrypt you need to enable Epel-repository because it isn’t available by default. On Centos 7, you can add Epel-repository with the following command:
sudo yum install epel-releaseAfter you add Epel-repository, you are ready to install the certbot with the following command:
sudo yum install certbot python2-certbot-apache mod_sslWhen you enter the above command during the installation you will be asked to accept the GPG key or not, accept it by typing “y” and then press Enter to continue.
Here you are finished installing the certbot Let’s Encrypt client. Now you are ready to run certbot and fetch certificates.
Step 2 – Get an SSL Certificate From Let’s Encrypt for Apache
At this point, you can use the certbot to request an SSL certificate for your domain.
If you want to get a certificate that covers a single domain run the following command:
sudo certbot --apache -d stack.orcacore.netNote: instead of stack.orcacore.net put your domain name.
If you want to install a single certificate that is valid for multiple domains or subdomains you can use the following command:
sudo certbot --apache -d stack.orcacore.net -d www.stack.orcacore.netCustomize SSL Certificate Options on Centos 7
To customize the certificate options, run certbot without any domains:
sudo certbot --apacheYou will be asked some questions and answer them to continue. When your installation is finished successfully, you will see a message in your output like this:
Output
Congratulations! You have successfully enabled https://stack.orcacore.net
- - - - - - - - - - - - - - - - - - - - - - - - - - - - - - - - - - - - - - - -
Subscribe to the EFF mailing list (email: olivia@orcacore.cm).
Starting new HTTPS connection (1): supporters.eff.org
IMPORTANT NOTES:
 - Congratulations! Your certificate and chain have been saved at:
   /etc/letsencrypt/live/stack.orcacore.net/fullchain.pem
   Your key file has been saved at:
   /etc/letsencrypt/live/stack.orcacore.net/privkey.pem
   Your certificate will expire on 2021-11-21. To obtain a new or
   tweaked version of this certificate in the future, simply run
   certbot again with the "certonly" option. To non-interactively
   renew *all* of your certificates, run "certbot renew"
 - If you like Certbot, please consider supporting our work by:
   Donating to ISRG / Let's Encrypt:   https://letsencrypt.org/donate
   Donating to EFF:                    https://eff.org/donate-le
Now you can check your SSL certificate status to make sure that everything is working.
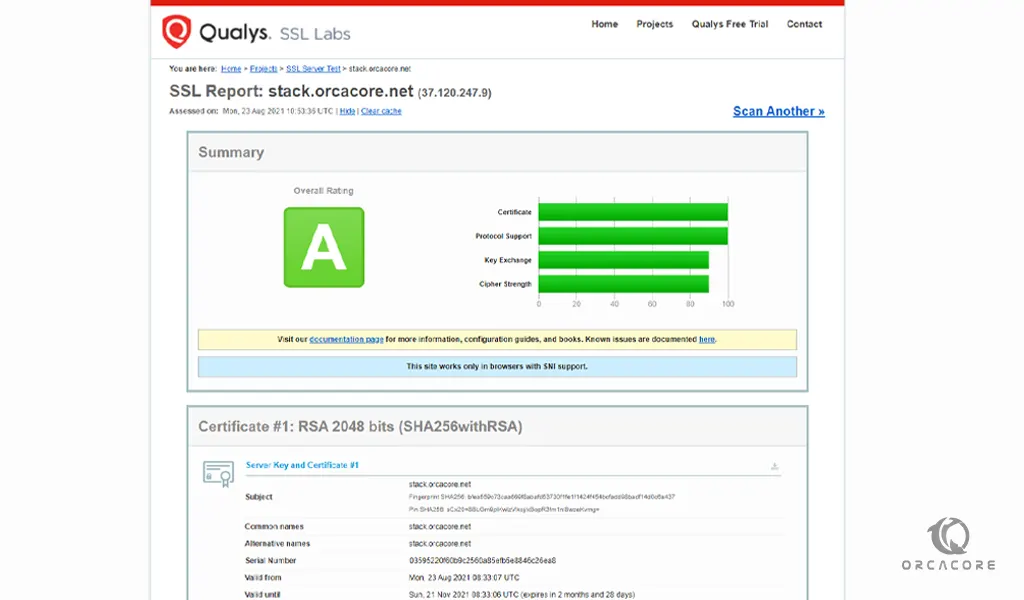
Step 3 – Check SSL status on Apache with Let’s Encrypt
Copy the following link with your domain to begin the SSL test connection to your server:
https://www.ssllabs.com/ssltest/analyze.html?d=stack.orcacore.netNote: This will take a little time to complete.
You will see this page if you do the steps correctly.
Step 4 – Set up Auto-Renewal Of the Lets Encrypt Certifications
Ok! In this article, we learn How to Secure Apache with Let’s Encrypt on CentOS 7 and configure it. Now, you should know, that Let’s Encrypt certificates are valid for 90 days, but it’s better to renew them every 60 days automatically.
To do this, run the following command:
sudo certbot renew --dry-runYour output should be similar to this:
Output
Saving debug log to /var/log/letsencrypt/letsencrypt.log
- - - - - - - - - - - - - - - - - - - - - - - - - - - - - - - - - - - - - - - -
Processing /etc/letsencrypt/renewal/stack.orcacore.net.conf
- - - - - - - - - - - - - - - - - - - - - - - - - - - - - - - - - - - - - - - -
Cert not due for renewal, but simulating renewal for dry run
Plugins selected: Authenticator apache, Installer apache
Starting new HTTPS connection (1): acme-staging-v02.api.letsencrypt.org
Account registered.
Simulating renewal of an existing certificate for stack.orcacore.net
Performing the following challenges:
http-01 challenge for stack.orcacore.net
Waiting for verification...
Cleaning up challenges
- - - - - - - - - - - - - - - - - - - - - - - - - - - - - - - - - - - - - - - -
new certificate deployed with reload of apache server; fullchain is
/etc/letsencrypt/live/stack.orcacore.net/fullchain.pem
- - - - - - - - - - - - - - - - - - - - - - - - - - - - - - - - - - - - - - - -
Congratulations, all simulated renewals succeeded:
  /etc/letsencrypt/live/stack.orcacore.net/fullchain.pem (success)
- - - - - - - - - - - - - - - - - - - - - - - - - - - - - - - - - - - - - - - -
At this point, you are done with renewing certifications.
Conclusion
In this article, you have learned what Lets Encrypt is and you can easily Install Apache and Set up its virtual host on Centos 7 by following the articles that we mentioned in the article. After these, you have learned to Secure your Apache server with Let’s Encrypt SSL Certificates on Centos 7.
Hope you enjoy it. Also, you may interested in these articles: