Share your love
Secure Nginx with Let’s Encrypt on CentOS 7
In this article, we want to teach you How To Secure Nginx with Let’s Encrypt on CentOS 7.
Let’s Encrypt is a free, automated, and open certificate authority (CA), run for the public’s benefit. It is a service provided by the ISRG.
NGINX is open-source software for web serving, reverse proxying, caching, load balancing, media streaming, and more.
You can follow the steps below to get your free SSL certificates by using Let’s Encrypt on Centos 7.
Complete Guide To Secure Nginx with Let’s Encrypt on CentOS 7
Before we start to Secure Nginx with Let’s Encrypt on Centos 7, you need some requirements.
Requirements
You need to log in as a non-root user with sudo permissions by visiting this article about the Initial server setup with Centos 7.
Install Nginx on Centos 7. Before starting to read this article, if you don’t know about Nginx installation, you can read this article “Install Nginx on CentOS 7“
You need your domain name for both DNS records like our domains: www.nginx.orcacore.net, and nginx.orcacore.net.
When you are finished with these requirements, you can start to install the Let’s Encrypt client software.
Install Certbot Nginx on Centos 7
To install the certbot to get an SSL certification you need to install the Epel-repository on Centos 7. Run the following command:
sudo yum install epel-releaseHere you can get the “certbot-nginx” package with the following command:
sudo yum install certbot-nginxAt this point, If you haven’t installed Nginx yet, you should install and set up Nginx on Centos 7.
Install Nginx on Centos 7
In the previous step, the Epel-repository is installed you can install Nginx on Centos 7 with the following command:
sudo yum install nginxThen, start the Nginx on Centos 7 with the command below:
sudo systemctl start nginxCertbot needs to be able to find the correct server block in your config. If you install a fresh Nginx you can update the default file config with the following command:
sudo vi /etc/nginx/nginx.confWhen you are getting into the file, find the server name line and put your domain name instead of “_” in that.
server_name nginx.orcacore.net www.nginx.orcacore.net;Save and close the file.
Check the syntax of your Nginx configurations edit on Centos 7 with the following command:
sudo nginx -tIf you have no errors, reload the Nginx on Centos 7 with the following command:
sudo systemctl reload nginxAt this point, certbot can find the correct server block and update it.
You need to update the firewall on Centos 7 to allow HTTPS traffic.
Configure Firewall Rules On Centos 7
If you have a firewalld firewall running on Centos 7, you need to be sure that ports 80 and 443 are open for incoming traffic.
If you haven’t installed firewalld you can run the following command to install it:
sudo yum install firewalldThen, start the firewalld with the command below:
sudo systemctl start firewalldHere you can open those ports with the following commands:
sudo firewall-cmd --add-service=http
sudo firewall-cmd --add-service=https
sudo firewall-cmd --runtime-to-permanent
If you have an iptables firewall running, run these commands instead:
sudo iptables -I INPUT -p tcp -m tcp --dport 80 -j ACCEPT
sudo iptables -I INPUT -p tcp -m tcp --dport 443 -j ACCEPT
At this point, you can get an SSL certification from Let’s Encrypt.
Get an Nginx SSL certification from Let’s Encrypt on Centos 7
You can get the SSL certification for Nginx on Centos 7 with the command below:
sudo certbot --nginx -d nginx.orcacore.net -d www.nginx.orcacore.netYou will be asked some questions like your email address, agree with the terms of services, and answer them to complete the installation.
Output
Congratulations! You have successfully enabled https://nginx.orcacore.net and
https://www.nginx.orcacore.net
- - - - - - - - - - - - - - - - - - - - - - - - - - - - - - - - - - - - - - - -
IMPORTANT NOTES:
 - Congratulations! Your certificate and chain have been saved at:
  /etc/letsencrypt/live/nginx.orcacore.net/fullchain.pem
  Your key file has been saved at:
 /etc/letsencrypt/live/nginx.orcacore.net/privkey.pem
  Your certificate will expire on 2021-11-23. To obtain a new or
tweaked version of this certificate in the future, simply run
certbot again with the "certonly" option. To non-interactively
  renew *all* of your certificates, run "certbot renew"
 - If you like Certbot, please consider supporting our work by:
 Donating to ISRG / Let's Encrypt:   https://letsencrypt.org/donate
 Donating to EFF:                    https://eff.org/donate-le
At this point, your certificates are downloaded, installed, and loaded. You can reload your website with “https://” in your web browser, you should see the lock icon in your address bar.
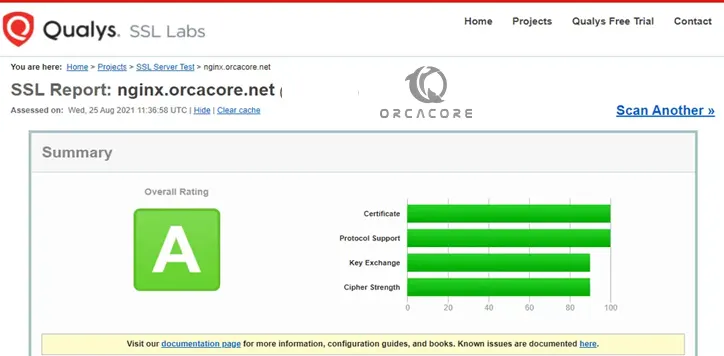
Update Diffie-Helman parameters on Centos 7
If you use the SSL Lab Server Test to test your server, you will get a B grade. It is because of the weak Diffie-Helman parameters. You need to update them to get an A grade for better security. Follow the steps:
First, Create a file with openssl on Centos 7:
sudo openssl dhparam -out /etc/ssl/certs/dhparam.pem 2048It will take a few minutes to complete.
2. Open the Nginx config file on Centos 7:
sudo vi /etc/nginx/nginx.conf3. Copy and paste the following line into the server block in the Nginx config file on Centos 7.
Note: The certbot may be made on that line, just search the line if you don’t have this line paste it.
ssl_dhparam /etc/ssl/certs/dhparam.pem;Save and close the file.
4. Verify the configuration
sudo nginx -tIf you have no errors reload the Nginx:
sudo systemctl reload nginxAt this point, you will get an A grade.
Renew SSL Certifications from Let’s Encrypt on Centos 7
You learn how to secure Nginx with Let’s Encrypt on Centos 7.
Here, you should renew the certification automatically because Let’s Encrypt certifications are valid for 90 days. Follow the command below:
sudo certbot renew --dry-runConclusion
At this point, you have learned to install the certbot Let’s Encrypt client, set up the Nginx, and update the firewall on Centos 7 and you learn How to get an SSL certification from Let’s Encrypt and its auto-renewal.
Hope you enjoy this guide. You may like these articles: