Share your love
Best practices to Install Apache Guacamole on Ubuntu 22.04
Here we try to provide a step-by-step guide to install Apache Guacamole on Ubuntu 22.04. As you may know, Apache Guacamole is an open-source remote desktop gateway. It provides you with remote access to your computers and servers via the web browser. You can easily connect to your systems via the web interface without any additional requirements and plugins.
Now you can follow the steps below on the Orcacore website to install Apache Guacamole on Ubuntu 22.04.
Table of Contents
Full Steps to Install Apache Guacamole on Ubuntu 22.04
Before you start your Apache Guacamole installation, you must log in to your server as a root or non-root user with sudo privileges. For this purpose, you can check the Initial Server Setup with Ubuntu 22.04.
Then, follow the steps below to install Apache Guacamole on Ubuntu 22.04.
Step 1 – Install Required Packages and Dependencies For Apache Guacamole
First, you must run the system update by using the command below:
sudo apt updateThen, use the following command to install the required packages and dependencies for Guacamole installation:
sudo apt install build-essential libcairo2-dev libjpeg-turbo8-dev \
    libpng-dev libtool-bin libossp-uuid-dev libvncserver-dev \
    freerdp2-dev libssh2-1-dev libtelnet-dev libwebsockets-dev \
    libpulse-dev libvorbis-dev libwebp-dev libssl-dev \
    libpango1.0-dev libswscale-dev libavcodec-dev libavutil-dev \
    libavformat-dev
Once you’re done, proceed to the next step to download and install Apache Guacamole on Ubuntu 22.04.
Step 2 – Download and Install Apache Guacamole From the Source
At this point, you must visit the official downloads page and use the following wget command to download the latest source package of Apache Guacamole:
sudo wget https://downloads.apache.org/guacamole/1.5.4/source/guacamole-server-1.5.4.tar.gzThen, extract your download package and navigate to the Apache Guacamole directory with the following commands:
sudo tar -xvf guacamole-server-1.5.4.tar.gz

sudo cd guacamole-server-1.5.4
Now you can build and install Apache Guacamole on Ubuntu 22.04. To do this, you can run the following commands:
sudo ./configure --with-init-dir=/etc/init.d --enable-allow-freerdp-snapshots
sudo make
sudo make install
The build and installation process may take some time to complete. Once you are done, update the installed library cache with the command below:
sudo ldconfigStart and Enable Apache Guacamole Server on Ubuntu 22.04
At this point, you have learned to build and install Apache Guacamole on Ubuntu 22.04. Now you must reload the systemd to apply the changes:
sudo systemctl daemon-reloadThen, start and enable the Guacamole server with the following commands:
sudo systemctl start guacd
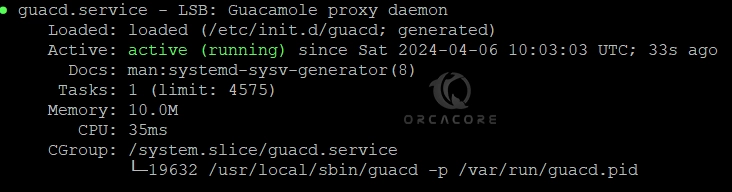
sudo systemctl enable guacdAlso, you can verify Guacamole server is active and running on Ubuntu 22.04 with the following command:
sudo systemctl status guacdIn your output, you should see:
Note: You should create the Guacamole configuration files and extensions. These files will used in the later steps. To do this, you can run:
sudo mkdir -p /etc/guacamole/{extensions,lib}Step 3 – Install the Guacamole Web App on Ubuntu 22.04
At this point, you must install the Guacamole Web App on your Ubuntu 22.04. It is the frontend interface of Apache Guacamole. To do this, you must install the Tomcat 9 by using the command below:
sudo apt install tomcat9 tomcat9-admin tomcat9-common tomcat9-user -yThen, download the Guacamole Web App client by using the following command: You should note that download the version with the Guacamole version you have installed.
sudo wget https://downloads.apache.org/guacamole/1.5.4/binary/guacamole-1.5.4.warNow you must move the Guacamole Web client to the Tomcat web directory. To do this, run the command below:
sudo mv guacamole-1.5.4.war /var/lib/tomcat9/webapps/guacamole.warTo apply the changes, restart Apache Guacamole and Tomcat services:
sudo systemctl restart tomcat9 guacdStep 4 – Configure Apache Guacamole Database Authentication
At this point, you have learned to install Apache Guacamole on Ubuntu 22.04 and set up the client Web app. As you may know, Guacamole supports basic user authentication that is used for testing. In this guide, we want to use production-ready database authentication through MariaDB.
First, install MariaDB on Ubuntu 22.04 with the command below:
sudo apt install mariadb-server -yThen, run the following command to secure your MariaDB installation and set up a password for it.
sudo mysql_secure_installationOnce you are done, you need to install the MySQL Connector/J library and Guacamole JDBC authenticator plugin. To do this, you can download the Java connector with the command below:
sudo wget https://dev.mysql.com/get/Downloads/Connector-J/mysql-connector-java-8.0.26.tar.gzThen, you must extract the downloaded file and copy it to the /etc/guacamole/lib/ directory:
sudo tar -xf mysql-connector-java-8.0.26.tar.gz

sudo cp mysql-connector-java-8.0.26/mysql-connector-java-8.0.26.jar /etc/guacamole/lib/
Next, you must download the Apache Guacamole JDBC AUTH Plugin. To do this, you can run the command below:
sudo wget https://downloads.apache.org/guacamole/1.5.4/binary/guacamole-auth-jdbc-1.5.4.tar.gzYou should note that download the version with the Guacamole version you have installed.
Now extract the downloaded file and copy it to /etc/guacamole/extensions/ directory:
sudo tar -xf guacamole-auth-jdbc-1.5.4.tar.gz

sudo mv guacamole-auth-jdbc-1.5.4/mysql/guacamole-auth-jdbc-mysql-1.5.4.jar /etc/guacamole/extensions/
Create a Guacamole Database and User
At this point, you must log in to your MariaDB shell and create a user and database for Apache Guacamole on Ubuntu 22.04.
First, log in to the MariaDB shell with the password you have configured it for:
sudo mysql -u root -pFrom your MariaDB shell, run the commands below to create the user and database, and grant the privileges:
MariaDB [(none)]> CREATE DATABASE guac_db;
MariaDB [(none)]> CREATE USER 'guac_user'@'localhost' IDENTIFIED BY 'password';
MariaDB [(none)]> GRANT SELECT,INSERT,UPDATE,DELETE ON guac_db.* TO 'guac_user'@'localhost';
MariaDB [(none)]> FLUSH PRIVILEGES;
Once you are done, exit from your MariaDB shell:
MariaDB [(none)]> EXIT;Import SQL Schema Files and Create Properties Files For Guacamole
At this point, you must navigate to the MySQL Schema directory with the command below:
cd guacamole-auth-jdbc-1.5.4/mysql/schemaFrom there, run the command below to import the SQL schema files to the MySQL database:
cat *.sql | mysql -u root -p guac_dbThen, use your favorite text editor like Vi editor or Nano editor to create the properties file for Apache Guacamole:
sudo vi /etc/guacamole/guacamole.propertiesAdd the following configuration settings to the file with your database credentials:
# MySQL properties
mysql-hostname: 127.0.0.1
mysql-port: 3306
mysql-database: guac_db
mysql-username: guac_user
mysql-password: password
Once you are done, save and close the file.
Finally, restart the services to apply the changes:
sudo systemctl restart tomcat9 guacd mysqlStep 5 – Access Apache Guacamole From the Web Interface
At this point, you have completed the steps to install Apache Guacamole on Ubuntu 22.04. Now you can access your Guacamole dashboard by following the URL below from your Web browser:
http://server-ip:8080/guacamoleYou will see the Apache Guacamole Login screen. Enter the following credentials to log in:
username: guacadmin
password: guacadmin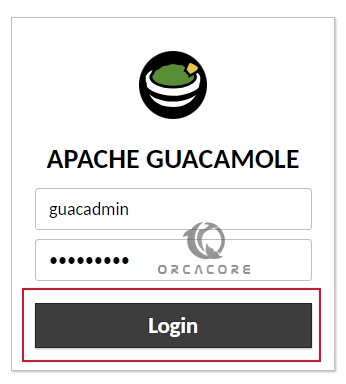
Create a New Admin User and Password For Apache Guacamole
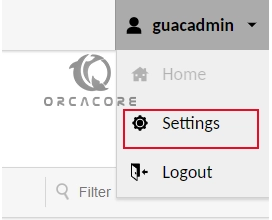
At this point, it is strongly recommended to create a new admin user and password and delete the default credentials. To do this, from the guacadmin profile click on Settings.
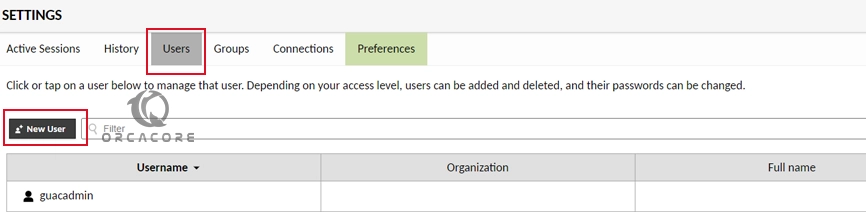
Then, switch to the Users tab and click on New User.
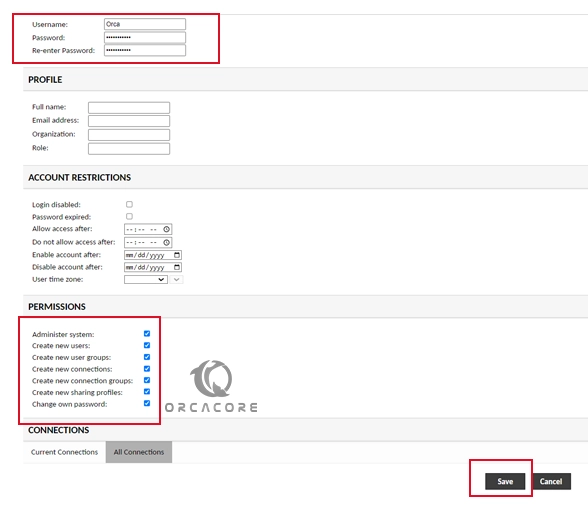
Under the Edit User section, enter your new username and password. Then, under the Permissions section check the all boxes. When you are done, click Save.
Now log out from the default user and log in back to Apache Guacamole with your new user created. Then, navigate to the settings, and users tab, and delete the guacadmin user.
That’s it, you are done. From there, you can securely access your servers and computers.
Conclusion
At this point, you have learned the full steps to download and install Apache Guacamole on Ubuntu 22.04 and access the dashboard via the Web interface. Also, you have learned to create a new admin user and delete the default credentials for more security. Hope you enjoy using it.
Also, you may like to read the following articles:
Full Steps To Install Ghost CMS on Ubuntu 22.04
Best Way To Install NoMachine on Ubuntu 22.04