Share your love
Nginx Proxy Manager on Ubuntu 22.04 – Best Setup with Docker
This guide intends to teach you to Install and Configure Nginx Proxy Manager on Ubuntu 22.04 by using Docker. Nginx Proxy Manager is a simple GUI tool for reverse proxy to web hosts with free TLS termination by using Nginx and Let’s Encrypt. With this tool, you can do many tasks including creating proxy hosts, encrypting web traffic, redirecting hosts, setting up basic HTTP authentication, etc.
Now you can follow the steps below from the Orcacore website to install Nginx Proxy Manager on Ubuntu 22.04 by using the Docker.
Table of Contents
Steps To Install Nginx Proxy Manager on Ubuntu 22.04 with Docker
Before you start your Nginx Proxy Manager setup on Ubuntu 22.04, you need some requirements. Let’s see what we need.
First, you must log in to your server as a non-root user with sudo privileges and set up a basic firewall. To do this, you can check the Initial Server Setup with Ubuntu 22.04.
Then, you must install Docker and Docker Compose on your server. For this purpose, you can visit the following guides:
Install Docker on Ubuntu 22.04
Set up Docker Compose on Ubuntu 22.04
Once you are done, follow the steps below to install Nginx Proxy Manager on Ubuntu 22.04.
Step 1 – Set up Firewall Rules for Nginx Proxy Manager on Ubuntu 22.04
At this point, we assumed that you have enabled the UFW firewall on your server. Now you must allow the following ports through your UFW firewall:
# sudo ufw allow 80
# sudo ufw allow 81
# sudo ufw allow 443
Then, reload the firewall to apply the new rules:
sudo ufw reloadTips: To get more UFW firewall tips and rules, you can check the following guide:
Essential UFW Firewall Commands and Rules with Examples
Step 2 – Docker Compose YAML File for Nginx Proxy Manager
At this point, you must create a Docker compose YAML file for Nginx Proxy Manager on Ubuntu 22.04. First, you must create a directory for the Nginx proxy manager with the command below:
sudo mkdir ~/nginx-proxyThen, switch to your directory and create the data and SSL directors with the following commands:
# sudo cd ~/nginx-proxy
# sudo mkdir {data,letsencrypt}
Now you can use your desired text editor like Vi editor or Nano editor to create the YAML file:
sudo vi docker-compose.ymlAdd the following content to the file:
version: "3"
services:
  npm-app:
    image: 'jc21/nginx-proxy-manager:latest'
    container_name: npm-app
    restart: unless-stopped
    ports:
      - '80:80' # Public HTTP Port
      - '443:443' # Public HTTPS Port
      - '81:81' # Admin Web Port
      # Add any other Stream port you want to expose
      # - '21:21' # FTP
    environment:
      DB_MYSQL_HOST: "npm-db"
      DB_MYSQL_PORT: 3306
      DB_MYSQL_USER: "npm"
      DB_MYSQL_PASSWORD: "npm"
      DB_MYSQL_NAME: "npm"
      # Uncomment the line below if IPv6 is not enabled on your host
      # DISABLE_IPV6: 'true'
    volumes:
      - ./data:/data
      - ./letsencrypt:/etc/letsencrypt
    depends_on:
      - npm-db
    networks:
      - npm-nw
      - npm-internal

  npm-db:
    image: 'mariadb:latest'
    container_name: npm-db
    restart: unless-stopped
    environment:
      MYSQL_ROOT_PASSWORD: 'npm'
      MYSQL_DATABASE: 'npm'
      MYSQL_USER: 'npm'
      MYSQL_PASSWORD: 'npm'
    volumes:
      - ./data/mysql:/var/lib/mysql
    networks:
      - npm-internal

networks:
  npm-internal:
  npm-nw:
    external: true
Once you are done, save and close the file.
Step 3 – Run Nginx Proxy Manager on Ubuntu 22.04 with Docker
At this point, the internal networks are automatically created. Now you must create the external network which is npm-nw. To do this, you can run the command below:
docker network create npm-nwExample Output
44a18b35c24214bd17d58afe640e3563870a9f1ec3950bd4f1aa74528310b1e4Next, you can run your Nginx Proxy Manager container on Ubuntu 22.04 by using the following command:
docker compose up -dIn your output, you will see:
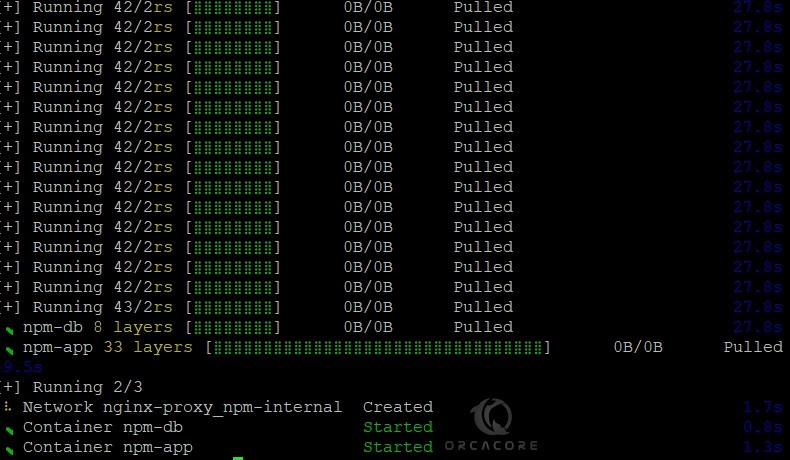
Now you can verify your Nginx Proxy Manager container is up and running with the command below:
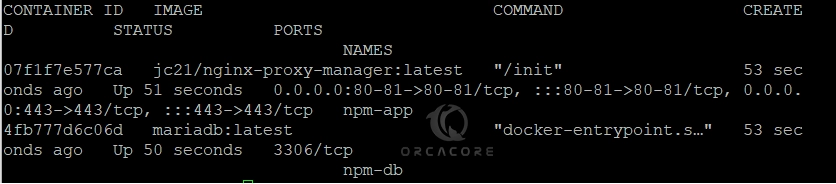
docker psYou should see:
Step 4 – Access Nginx Proxy Manager on Ubuntu 22.04 via the Web Interface
At this point, you can simply access your Nginx proxy manager web UI dashboard by typing your server’s IP address in your web browser followed by 81:
http://server-ip-address:81You will see the Nginx Proxy Manager Login screen. Then, you can use the following credentials to sign in to your app:
Email address: admin@example.com
Password: changeme
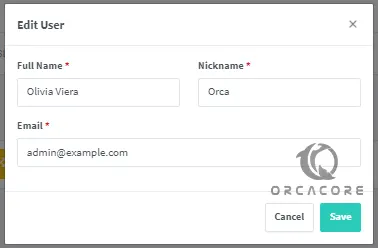
Next, edit your admin user credentials and click Save.
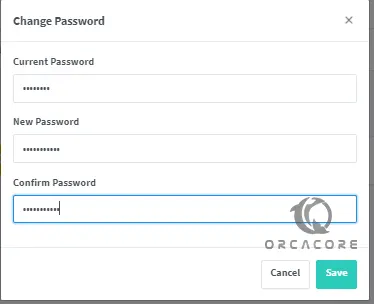
Now you must change the default password and click Save.
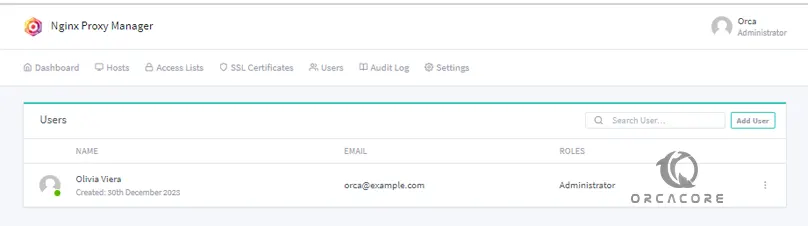
At this point, you will see your Nginx Proxy Manager dashboard on Ubuntu 22.04.
Here you can proceed to the next step to see how you can set up the domain name and SSL from Nginx Proxy Manager on Ubuntu 22.04.
Step 5 – Configure Domain Name and SSL Certificates
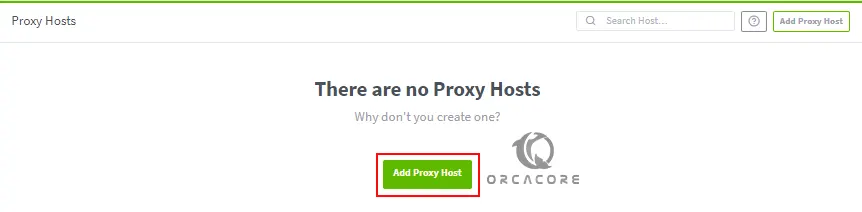
At this point, you can configure your Domain name and SSL certificates for it. To do this, click on Hosts >> Proxy Hosts from the dashboard menu.
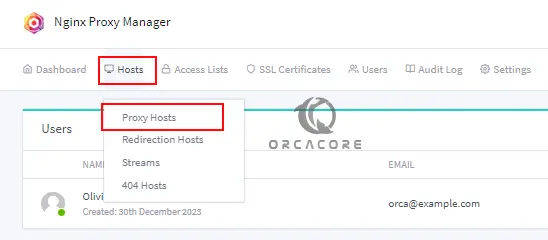
From there, click on Add Proxy Host.
You need to enter your domain name, enter your server’s IP address as the forward hostname, and 81 as the forward port.

Switch to the SSL tab. Select Request a new SSL Certificate from the dropdown menu. Select the options Force SSL and HTTP/2 support. If you want to enable HSTS, you can enable that as well. Enter your email address, agree to the Let’s Encrypt Terms of Service (TOS), and click the Save button to finish.
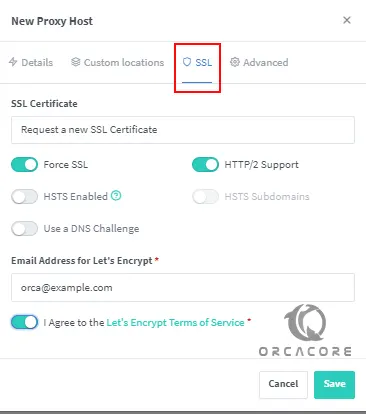
Note: If you have your domain configured via Cloudflare, don’t enable the option Force SSL otherwise, you will be stuck in a redirection loop.
At this point, your SSL certificate for your domain is created and now you can access it through https://your-domain.
For more advanced configuration, you can check the official website.
Conclusion
At this point, you have learned to install and configure Nginx Proxy Manager on Ubuntu 22.04 by using the Docker and Docker Compose. Also, you have access to the web UI dashboard and configure the domain name and SSL certificates.
Hope you enjoy it. Also, you may like to read the following articles:
Installing bmon on Ubuntu 22.04 for Network Monitoring