Share your love
Install and Configure Adminer on Ubuntu 22.04: Best Database Management Tool

In this guide, we want to teach you to Install and Configure Adminer on Ubuntu 22.04. When it comes to lightweight, user-friendly, high-performing MySQL database management tools, Adminer has gained wide popularity and delivers many improvements as compared to phpMyAdmin.
As an open-source database management tool, it also is free to use and is written in PHP. This database management tool is easy to set up and requires simple requirements. To do this, follow the steps below on the Orcacore website.
Table of Contents
Steps To Install and Configure Adminer on Ubuntu 22.04
To complete this guide, you must log in to your server as a non-root user with sudo privileges. To do this, you can follow our guide on Initial Server Setup with Ubuntu 22.04.
Also, you need to have LAMP Stack installed on your server. For this purpose, you can follow our guide on How To Install LAMP Stack on Ubuntu 22.04.
1. Set root Database password for Adminer
When you are done with the requirements, run the command below to install an additional PHP extension:
sudo apt install php-curl libapache2-mod-php php-cli php-mysql php-gd -yThen, you need to set a root database password for Adminer. This will help you to manage all available databases using Adminer. To do this, log in to your MariaDB shell:
sudo mysql -u root -pNow, set the password for the root user with the command below:
MariaDB [(none)]> SET PASSWORD FOR 'root'@'localhost' = PASSWORD("password");Next, flush the privileges and exit from the MariaDB shell:
MariaDB [(none)]> FLUSH PRIVILEGES;
MariaDB [(none)]> exit;
2. Install Adminer on Ubuntu 22.04
Adminer packages are available in the default Ubuntu repository. You can easily install it by using the command below:
sudo apt install adminer -yThen, enable the Apache configuration file for Adminer on Ubuntu 22.04:
sudo a2enconf adminerFinally, restart Apache to apply the changes:
sudo systemctl restart apache23. Access Adminer Web Interface
At this point, you can access the Adminer web interface by typing your server’s IP address in your web browser followed by /adminer:
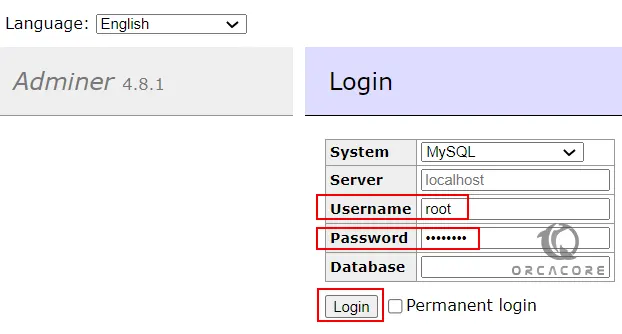
http://server-ip-address/adminerYou will see the Adminer Login screen. You should enter the root as the username and the password that you have configured for the Adminer.
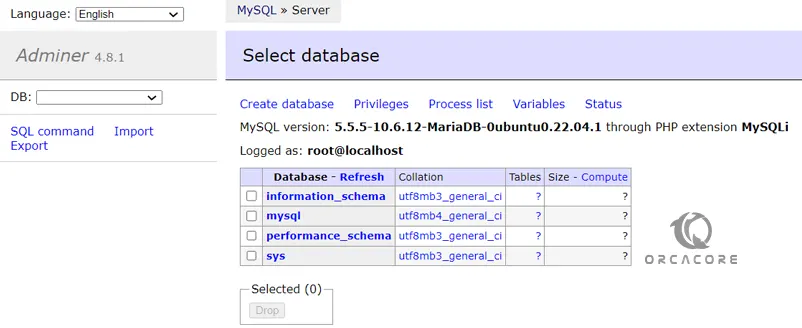
After login, you will have the Dashboard to access all the available databases. You can delete or create a database as well. However, the interface of Amdiner is not rich as that of PhpMyAdmin, yet simple, easy to navigate, understandable, and not confusing.
4. Uninstall Adminer from Ubuntu 22.04
If you don’t want the Adminer Database system manager anymore on your Ubuntu system; then you can remove it completely by using the commands below:
sudo apt autoremove --purge adminerThose who also want to uninstall Apache, MariaDB, and PHP, use the following commands:
sudo systemctl stop apache2 mariadbsudo apt autoremove --purge mariadb-server php* apache2Conclusion
Adminer used for performing various database tasks such as creating, reading, updating, and deleting database records, managing database structure, and users. At this point, you have learned to Install and Configure Adminer on Ubuntu 22.04.
Hope you enjoy it. Please subscribe to us on Facebook, Twitter, and YouTube.
You may also like these articles:
How To Install OpenCV on Ubuntu 22.04
Install and Use Sysdig on Ubuntu 22.04
Ghost CMS Install Ubuntu 22.04
Install OnlyOffice Ubuntu 22.04
SQL Server Setup Without Using Docker Ubuntu 22.04