Share your love
Install and Configure Lighttpd Web Server on Centos 7
In this guide, we intend to teach you How To Install and Configure Lighttpd Web Server on Centos 7.
lighttpd is a secure, fast, compliant, and very flexible web server that has been optimized for high-performance environments. It has a very low memory footprint compared to other webservers and takes care of CPU load. Its advanced feature-set (FastCGI, CGI, Auth, Output-Compression, URL-Rewriting, and many more) makes Lighttpd the perfect webserver software for every server that suffers load problems.
Here you will learn to install Lighttpd with PHP and MariaDB on your server.
Install and Configure Lighttpd Web Server on Centos 7
To set up the Lighttpd web server, you must log in to your server as a non-root user with sudo privileges. To do this, follow our guide on Initial Server Setup with Centos 7.
Also, you need to set up a basic firewall. To do this, check our guide on Set up a Firewall with firewalld on Centos 7.
Set up Lighttpd Web Server on Centos 7
Lighttpd is available in the default Centos repository. First, update your local package index with the following command:
sudo yum update -y
Then, install the Epel repository on your server by using the following command:
# sudo yum -y install epel-release
# sudo yum update -y
Now you can use the following command to install Lighttpd:
sudo yum install lighttpd
Start and enable your Lighttpd service to start on boot with the following commands:
# sudo systemctl start lighttpd
# sudo systemctl enable lighttpd
Verify that your service is active and running on your server:
sudo systemctl status lighttpd
Output
● lighttpd.service - Lightning Fast Webserver With Light System Requirements
Loaded: loaded (/usr/lib/systemd/system/lighttpd.service; enabled; vendor preset: disabled)
Active: active (running) since Sat 2022-07-02 07:43:06 EDT; 36s ago
Main PID: 22209 (lighttpd)
CGroup: /system.slice/lighttpd.service
└─22209 /usr/sbin/lighttpd -D -f /etc/lighttpd/lighttpd.conf
Note: If you see any network errors in the status, open the /etc/lighttpd/lighttpd.conf configuration file and change the line that says server.use-ipv6 from enable to disable.
Then, you need to restart the Lighttpd web server and everything should work fine.
systemctl restart lighttpd
To check which Lighttpd version is installed on your server, run the following command:
lighttpd -v
Output
lighttpd/1.4.54 (ssl) - a light and fast webserver
At this point, we assumed that you have enabled firewalld. So you need to allow HTTP and HTTPS traffic on your firewall with the following commands:
# sudo firewall-cmd --permanent --zone=public --add-service=http
# sudo firewall-cmd --permanent --zone=public --add-service=https
Reload the firewall to apply the new rules:
# sudo firewall-cmd --reload
To check that your Lighttpd web server is working correctly on Centos 7, open your web browser and type your server’s IP address:
http://Your-Domain.com
OR
http://Your-IP-addr

Note: The default document root for Lighttpd is /var/www/lighttpd/ and the main configuration file is at /etc/lighttpd/lighttpd.conf.
Install MariaDB support for Lighttpd on Centos 7
At this point, you need to install the MariaDB on Centos 7. We will install the latest release of MariaDB.
First, create a repository file with your favorite text editor, here we use vi:
sudo vi /etc/yum.repos.d/MariaDB.repo
Add the following content to your file:
[mariadb]
name = MariaDB
baseurl = https://mariadb.mirror.wearetriple.com/yum/10.8/centos7-amd64
gpgkey=https://mariadb.mirror.wearetriple.com/yum/RPM-GPG-KEY-MariaDB
gpgcheck=1
When you are done, save and close the file.
Then, you can use the following command to install MariaDB 10.8 on your server:
sudo yum install MariaDB-server MariaDB-client -y
Once your installation is completed, start and enable your MariaDB service to start on boot, with the following commands:
# sudo systemctl start mariadb
# sudo systemctl enable mariadb
At this point, verify that your MariaDB service is active and running on your Centos 7:
sudo systemctl status mariadb
Output
● mariadb.service - MariaDB 10.8.3 database server
Loaded: loaded (/usr/lib/systemd/system/mariadb.service; enabled; vendor preset: disabled)
Drop-In: /etc/systemd/system/mariadb.service.d
└─migrated-from-my.cnf-settings.conf
Active: active (running) since Sat 2022-07-02 08:13:52 EDT; 12s ago
Docs: man:mariadbd(8)
https://mariadb.com/kb/en/library/systemd/
Main PID: 23196 (mariadbd)
Status: "Taking your SQL requests now..."
CGroup: /system.slice/mariadb.service
└─23196 /usr/sbin/mariadbd
Now you need to secure your MariaDB by setting a root password, disabling remote root login, removing the test database as well as anonymous users, and finally reloading privileges.
To do this, run the following script:
mariadb-secure-installation
Output
Enter current password for root (enter for none):
Switch to unix_socket authentication [Y/n] n
You already have your root account protected, so you can safely answer 'n'.
Change the root password? [Y/n] n
Remove anonymous users? [Y/n] y
Disallow root login remotely? [Y/n] y
Remove test database and access to it? [Y/n] y
Reload privilege tables now? [Y/n] y

All done! If you've completed all of the above steps, your MariaDB
installation should now be secure.

Thanks for using MariaDB!
Finally, you can access your MariaDB shell with the following command:
sudo mysql -u root -p
Output
Enter password:
Welcome to the MariaDB monitor. Commands end with ; or \g.
Your MariaDB connection id is 9
Server version: 10.8.3-MariaDB MariaDB Server

Copyright (c) 2000, 2018, Oracle, MariaDB Corporation Ab and others.

Type 'help;' or '\h' for help. Type '\c' to clear the current input statement.

MariaDB [(none)]>
Install PHP and PHP-FPM with FastCGI
To enable PHP-FPM with FastCGI support, first, you need to install PHP along with the necessary extensions. Here we will install PHP 8.1.
PHP 8.1 is not featured in Centos’s AppStream. So you can install PHP from (Remi) repository that deploys the latest PHP 8.1 builds. To do this, run the following command:
sudo yum -y install yum-utils https://rpms.remirepo.net/enterprise/remi-release-7.rpm
Update your local package index again:
sudo yum update -y
Now disable the Remi repository for PHP with the following command:
sudo yum-config-manager --disable 'remi-php*'
Next, you need to enable the Remi for PHP 8.1 on Centos 7 with the following command:
sudo yum-config-manager --enable remi-php81
At this point, you can install PHP 8.1 and its extensions on Centos 7 with the command below:
sudo yum -y install php php-mysqlnd php-pdo php-gd php-mbstring
Once PHP is installed, now enable PHP-FPM and FastCGI support for Lighttpd, to do this you need to install these packages too:
sudo yum -y install php-fpm lighttpd-fastcgi
Now open the following file with your favorite text editor, here we use vi:
sudo vi /etc/php-fpm.d/www.conf
Find the user and group lines and set them from apache to lighttpd:
user = lighttpd
group = lighttpd
When you are done, save and close the file.
Here, we need to modify three files /etc/php.ini, /etc/lighttpd/modules.conf and /etc/lighttpd/conf.d/fastcgi.conf to enable PHP support for Lighttpd.
Open first file /etc/php.ini:
sudo vi /etc/php.ini
Find the following line and uncomment it by removing the semicolon from the beginning of the line:
cgi.fix_pathinfo=1
When you are done, save and close the file.
Then open second file called /etc/lighttpd/modules.conf:
sudo vi /etc/lighttpd/modules.conf
Uncomment the following line by removing the sharp:
include "conf.d/fastcgi.conf"
When you are done, save and close the file.
Next, open third file called /etc/lighttpd/conf.d/fastcgi.conf:
sudo vi /etc/lighttpd/conf.d/fastcgi.conf
Add the following content at the bottom of the file:
fastcgi.server += ( ".php" =>
        ((
                "host" => "127.0.0.1",
                "port" => "9000",
                "broken-scriptfilename" => "enable"
        ))
)
Save and close the file.
Restart the Lighttpd service to reflect changes and enable PHP support:
sudo systemctl restart lighttpd
Test PHP and PHP-FPM with FastCGI Support in Lighttpd
As we said in the previous steps, the default document root for Lighttpd is /var/www/lighttpd/. So, here you need to create a phpinfo.php file into this directory:
sudo vi /var/www/lighttpd/info.php
Add the following code to it. This small piece of code will display information about PHP installation with their versions.
<?php
phpinfo();
?>
When you are done, save and close the file.
Finally, type your server’s IP address in your web browser followed by info.php:
http://Your-Domain.com/info.php
OR
http://Your-IP-addr/info.php
You will see your PHP installation information.
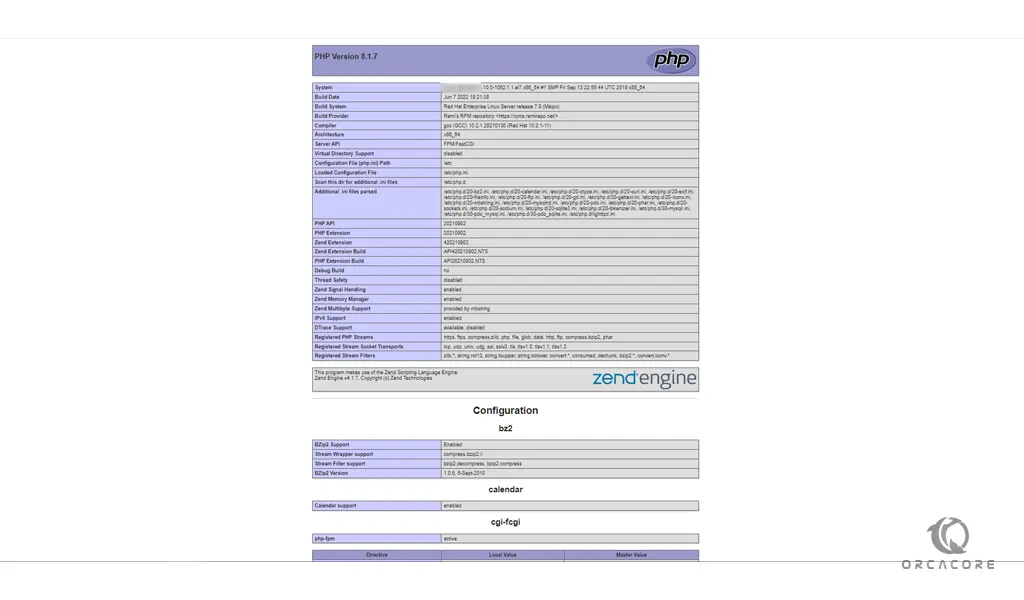
From there, you will see working information of PHP, PHP-FPM, and MySQL with lots of other modules that are already enabled.
For more security, after you read the information, you can remove the file with the following command:
sudo rm -rf /var/www/lighttpd/info.php
Conclusion
At this point, you learn to Install and Configure Lighttpd Web Server with PHP and MariaDB on Centos 7.
Hope you enjoy using it.
You may be interested in these articles:
Install and Configure Caddy on Centos 7