Share your love
Install and Configure Samba Share on Centos 7

This guide intends to teach you to Install and Configure Samba Share on Centos 7.
Samba is a collection of different applications that let a Linux server perform network actions like file serving, authentication/authorization, name resolution, and print services.
Samba implements the SMB protocol, which allows Windows clients to transparently access Linux directories, printers, and files on a Samba server (just as if they were talking to a Windows server).
Crucially, Samba allows a Linux server to act as a Domain Controller. By doing so, user credentials on the Windows domain can be used instead of needing to be recreated and then manually kept in sync on the Linux server.
Step To Install and Configure Samba Share on Centos 7
To complete this guide, you must log in to your server as a non-root user with sudo privileges. To do this, you can follow our guide on Initial Server Setup with Centos 7.
Also, you need to disable the SELinux. For this purpose, you can follow this guide on How To Disable SELinux on Centos.
Install Samba on Centos 7
Samba packages are available in the default Centos repository. First, update your local package index with the command below:
sudo yum update -yThen, use the following command to install Samba:
sudo yum install samba samba-common samba-client This will install the dependencies and required packages.
Then, use the commands below to start and enable the Samba service on Centos 7:
# sudo systemctl start smb.service
# sudo systemctl enable smb.service
Verify your Samba service is active and running:
sudo systemctl status smb.serviceOutput
● smb.service - Samba SMB Daemon
Loaded: loaded (/usr/lib/systemd/system/smb.service; enabled; vendor preset: disabled)
Active: active (running) since Tue 2023-02-07 05:32:21 EST; 15s ago
Docs: man:smbd(8)
man:samba(7)
man:smb.conf(5)
Main PID: 8929 (smbd)
Status: "smbd: ready to serve connections..."
...Configure Samba on Centos 7
You need to make some changes to the Samba config file and create share samba directories. To do these, follow the steps below.
Set Samba Global Settings
At this point, you need to open the Samba configuration file with your favorite text editor, here we use vi editor:
sudo vi /etc/samba/smb.confUnder the Global section, find the line below and make sure it is like this:
workgroup = WORKGROUPWhen you are done, save and close the file.
Create Samba Share Directories on Centos 7
At this point, you can share both public and private directories. So you can create the two directories by using the following commands:
# sudo mkdir /public
# sudo mkdir /private
Now you need to open the Samba config file again and add the shares and authentication methods to the end of the file.
sudo vi /etc/samba/smb.conf[public]
comment = Public Folder
path = /public
writable = yes
guest ok = yes
guest only = yes
force create mode = 775
force directory mode = 775
[private]
comment = Private Folder
path = /private
writable = yes
guest ok = no
valid users = @smbshare
force create mode = 770
force directory mode = 770
inherit permissions = yesWhen you are done, save and close the file.
Create Samba Share User Group
At this point, you need the Samba share user group to access the Private share as specified in the config file above.
Create the group by using the command below:
sudo groupadd smbshareSet the correct permissions for the private share by using the commands below:
# sudo chgrp -R smbshare /private/
# sudo chgrp -R smbshare /public
Next, set the correct permissions for the directories:
# sudo chmod 2770 /private/
# sudo chmod 2775 /publicNote: The value 2 at the beginning of the above commands, stands for the SGID bit. This allows newly created files to inherit the parent group.
Create a no-login Local User
Now you should create a no-login local user to access the private share by using the command below:
sudo useradd -M -s /sbin/nologin sambauserThen, add the user to the Samba share group on Centos 7 with the following command:
sudo usermod -aG smbshare sambauserFinally, set a password for your Samba user:
sudo smbpasswd -a sambauserOutput
New SMB password:
Retype new SMB password:
Added user sambauser.Enable the created account by using the following command:
sudo smbpasswd -e sambauserOutput
Enabled user sambauser.Verify Samba Configuration
When you are done with the above steps, you can test your Samba configuration on Centos 7 that is working correctly or not with the following command:
sudo testparmOutput
Load smb config files from /etc/samba/smb.conf
Loaded services file OK.
Server role: ROLE_STANDALONE
Press enter to see a dump of your service definitions
# Global parameters
[global]
printcap name = cups
security = USER
idmap config * : backend = tdb
cups options = raw
[homes]
browseable = No
comment = Home Directories
inherit acls = Yes
read only = No
valid users = %S %D%w%S
[printers]
browseable = No
comment = All Printers
create mask = 0600
path = /var/tmp
printable = Yes
[print$]
comment = Printer Drivers
create mask = 0664
directory mask = 0775
force group = @printadmin
path = /var/lib/samba/drivers
write list = @printadmin root
[public]
comment = Public Folder
force create mode = 0775
force directory mode = 0775
guest ok = Yes
guest only = Yes
path = /public
read only = No
[private]
comment = Private Folder
force create mode = 0770
force directory mode = 0770
inherit permissions = Yes
path = /private
read only = No
valid users = @smbshare
This means that everything is configured appropriately.
Create Demo Files in Samba Share
At this point, you can create demo files in the Samba shares. To do this. you can run the following commands:
# sudo mkdir /private/demo-private /public/demo-public
# sudo touch /private/demo1.txt /public/demo2.txt
To apply the changes, restart the Samba service on Centos 7:
sudo systemctl restart nmbAccess Share Files From Local Machine
Before you set up Samba clients, you can try accessing your share files with the command below on Centos 7:
smbclient '\\localhost\private' -U sambauserOutput
Enter WORKGROUP\sambauser's password:
Try "help" to get a list of possible commands.
smb: \> ls
. D 0 Tue Feb 7 05:40:59 2023
.. D 0 Tue Feb 7 05:45:28 2023
demo1.txt N 0 Tue Feb 7 05:40:59 2023
demo-private D 0 Tue Feb 7 05:40:52 2023
51057152 blocks of size 1024. 46640276 blocks available
smb: \>
Set up Samba Share Windows Client
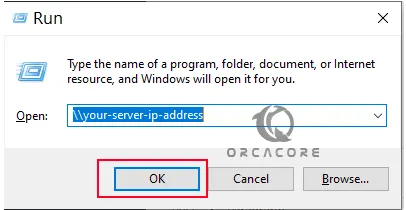
At this point, we want to show you access to the share from Windows. First, open a run box using Win+R and enter your Centos 7 IP address in the box and click Ok:

You will see the following screen, you should enter your Samba user credentials and click Ok.

Then, the Samba shared folders on Centos 7 should appear as below:

You can open one of the files, and create a new file there. You should see the file on your server machine too.
Mount Network Drive
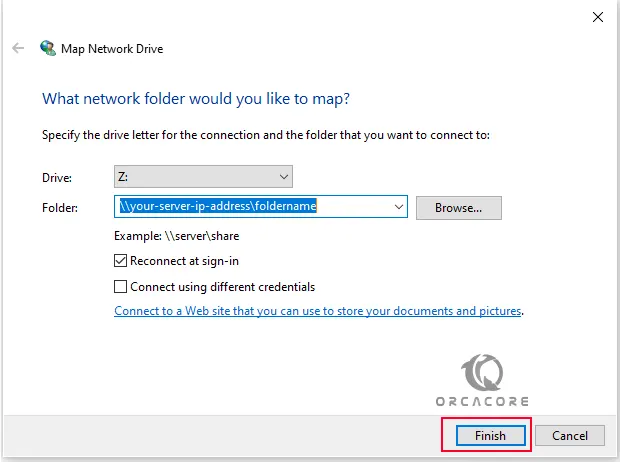
At this point, you can mount the Samba share permanently on your Windows system. Right-Click on This PC->Map Network Drive. This will open a window for you, provide the Path details and click Finish.

Then, enter the Samba user credentials and click ok.
You will have the share available on your This PC.
Set up Samba Linux Client
At this point, you can access the share folders from a Linux client. To do this, you need to have Samba packages installed on your server. Here our Linux client is Centos 7:
sudo yum install samba samba-common samba-client Then, navigate to File manager->Other locations and add your share using the syntax below.
smb://server-name/Share_nameEnter the credentials for the samba user. That is it! You have your Samba share on your Linux client machine.
Conclusion
At this point, you have learned to Install and Configure Samba Share on Centos 7.
Hope you enjoy it. You may be like these articles:
How To Install Tor Browser on Centos 7


