Share your love
How To Install LAMP Stack on Debian 10
In this article, we want to teach you how to install the LAMP stack on Debian 10.
LAMP stack stands for Linux, Apache, MySQL, and PHP.
In this article, we use MariaDB as a database management system app instead of MySQL.
How To Install LAMP Stack on Debian 10
To complete this article, you need some requirements.
You need to log in to your Debian 10 server as a non-root user with sudo privileges and a basic firewall setup. To do this you can check the Initial server setup article for Debian 10.
Install Apache and Adjust the Firewall on Debian 10
By default, Apache is available in the Debian default repository. first, update the APT packages with the following command:
sudo apt update
Then, install Apache the first part of the LAMP stack on Debian 10 with the following command:
sudo apt install apache2
At this point, we assumed that you enabled the UFW firewall from the requirements that we have mentioned above.
Now list the available applications through the firewall with the following command:
sudo ufw app list
In your output you should see:
Output
Available applications:
. . .
  WWW
  WWW Cache
  WWW Full
  WWW Secure
. . .
You can enable the traffic to ports 80 and 443, To do this, check the WWW Full profile with the following command:
sudo ufw app info "WWW Full"
Output
Profile: WWW Full
Title: Web Server (HTTP,HTTPS)
Description: Web Server (HTTP,HTTPS)

Ports:
80,443/tcp
Now allow the incoming HTTP and HTTPS traffic with the following command:
sudo ufw allow in "WWW Full"
Here you can access the default Debian 10 Apache web page. for this, you need your server’s public IP address.
You can get your server’s IP address with the following command:
hostname -I
Or you can use the curl tool to get your IP from icanhazip.com.
Install the curl with the following command:
sudo apt install curl
Then run the following command to get your IP address:
curl -4 icanhazip.com
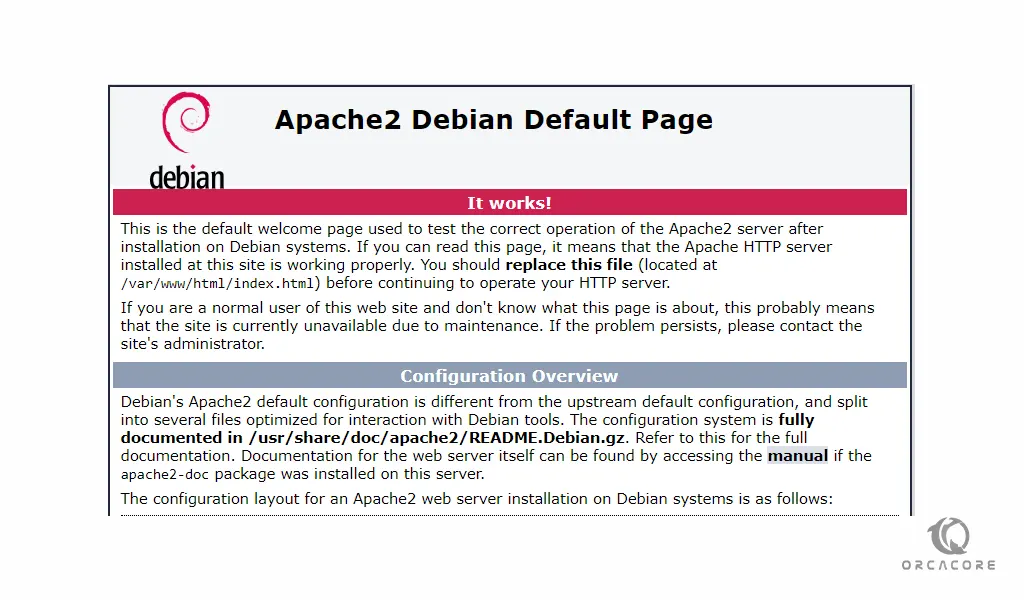
When you get your server IP address, type it in your web browser to access the default Debian 10 Apache web page.
http://your-server-IP
If you see the below page, means that your Apache web server is correctly installed on your Debian 10 server.
When you are done with the first part of the LAMP stack on Debian 10, let’s start to install MariaDB.
Install MariaDB on Debian 10
The default MariaDB database server is available on Debian-based package manager repositories.
It’s recommended to install the program’s actual package. run the following command to install it:
sudo apt install mariadb-server
When the installation of the MariaDB part of the LAMP stack is finished, it’s better to run a security script that comes pre-installed with MariaDB.
Run the following command:
sudo mysql_secure_installation
You will be asked some questions. Because you haven’t made any configuration changes yet, for the first question you don’t need to enter the current root password. Press enter to leave it blank.
For the next question, you don’t need to set up a new database root password press N to continue. From there you can press Y for the rest of the questions to accept the defaults.
Use MariaDB console
When you are finished, you can log in to the MariaDB console with the following command:
sudo mariadb
In your output, you will see:
Output
Welcome to the MariaDB monitor. Commands end with ; or \g.
Your MariaDB connection id is 56
Server version: 10.3.29-MariaDB-0+deb10u1 Debian 10

Copyright (c) 2000, 2018, Oracle, MariaDB Corporation Ab and others.

Type 'help;' or '\h' for help. Type '\c' to clear the current input statement.

MariaDB [(none)]>
You didn’t need to provide a password to connect as the root user. That works because it uses unix_socket the default authentication method for the administrative MariaDB user instead of a password.
For increased security, it’s better to have dedicated user accounts with less extensive privileges set up for every database.
Here we create a database named orca_database and a user named olivia_user.
You can replace them with your own names.
Run the following command from your MariaDB console to create a new database:
MariaDB [(none)]> CREATE DATABASE orca_database;
Here you can create a new user and give them full privileges on the database you have just created.
Run the following command to create the user and replace the password with a secure password of your own:
MariaDB [(none)]> GRANT ALL ON orca_database.* TO 'olivia_user'@'localhost' IDENTIFIED BY 'password' WITH GRANT OPTION;
Now you need to be sure that they are saved and available in the current session. flush the privileges with the following command:
MariaDB [(none)]> FLUSH PRIVILEGES;
Exit the MariaDB shell with the following command:
MariaDB [(none)]> exit
At this point, you can test that your new user has the correct permissions. log in to your MariaDB console with your custom user credentials:
mariadb -u olivia_user -p
You will be asked to enter the user’s password that you have set above.
Then verify that the user has access to the orca_database database with the following command:
MariaDB [(none)]> SHOW DATABASES;
In your output, you will see:
Output
MariaDB [(none)]> SHOW DATABASES;
+--------------------+
| Database |
+--------------------+
| information_schema |
| orca_database |
+--------------------+
2 rows in set (0.004 sec)
Now you can exit from your MariaDB shell.
MariaDB [(none)]> exit
Now you can start to install PHP, the last part of the installation of the LAMP stack on Debian 10.
Install PHP on Debian 10
PHP can run scripts, connect to your MariaDB databases to get information, and hand the processed content over to your webserver to display.
Install PHP and some helper packages with the following command:
sudo apt install php libapache2-mod-php php-mysql
Now you need to modify Apache serves files.
If a user requests a directory from the server, Apache will first look for a file named index.html. You need to make Apache look for an index.php file first.
Now open the dir.conf file with your favorite text editor. here we use vi text editor.
sudo vi /etc/apache2/mods-enabled/dir.conf
When you get into the file, move the PHP index file to the first position after the DirectoryIndex specification, like this:
<IfModule mod_dir.c>
DirectoryIndex index.php index.html index.cgi index.pl index.xhtml index.htm
</IfModule>
When you are finished, save and close the file.
Because you have made configuration changes, you need to reload the Apache with the following command:
sudo systemctl reload apache2
Now you check the status of Apache with the following command:
sudo systemctl status apache2
Output
apache2.service - The Apache HTTP Server
Loaded: loaded (/lib/systemd/system/apache2.service; enabled; vendor preset:
Active: active (running) since Tue 2021-09-28 04:34:25 EDT; 14min ago
Docs: https://httpd.apache.org/docs/2.4/
Process: 11170 ExecStart=/usr/sbin/apachectl start (code=exited, status=0/SUCC
Process: 11307 ExecReload=/usr/sbin/apachectl graceful (code=exited, status=0/
Main PID: 11174 (apache2)
Tasks: 6 (limit: 2359)
Memory: 13.6M
CGroup: /system.slice/apache2.service
├─11174 /usr/sbin/apache2 -k start
├─11311 /usr/sbin/apache2 -k start
├─11312 /usr/sbin/apache2 -k start
├─11313 /usr/sbin/apache2 -k start
├─11314 /usr/sbin/apache2 -k start
└─11315 /usr/sbin/apache2 -k start
At this point, The LAMP stack is fully operational on Debian 10.
Before you can test your setup with a PHP script, it’s better to set up an Apache virtual host to hold your website’s files and folders.
Set up an Apache virtual host on Debian 10
Here you need to create a new virtual host for testing your PHP environment.
You need to create the root web directory for your domain.
Our domain name is apache.orcacore.net. Remember to replace it with your own domain name.
sudo mkdir /var/www/apache.orcacore.net
Then, you need to assign the ownership of the directory with the $USER environment variable with the following command:
sudo chown -R $USER:$USER /var/www/apache.orcacore.net
Now you need to create a new configuration file in Apache’s sites-available with the following command, you can use your favorite text editor.
sudo vi /etc/apache2/sites-available/apache.orcacore.net.conf
Then, paste the bare-bones configuration into the file:
<VirtualHost *:80>
ServerName apache.orcacore.net
ServerAlias www.apache.orcacore.net
ServerAdmin webmaster@localhost
DocumentRoot /var/www/apache.orcacore.net
ErrorLog ${APACHE_LOG_DIR}/error.log
CustomLog ${APACHE_LOG_DIR}/access.log combined
</VirtualHost>
When you are done, save and close the file.
Here you should enable the virtual host with the following command;
sudo a2ensite apache.orcacore.net
Now disable Apache’s default website with the following command:
sudo a2dissite 000-default
Check for the no syntax errors with the following command:
sudo apache2ctl configtest
Run the following command to apply the changes:
sudo systemctl reload apache2
Now your new website is now active, but the webroot /var/www/apache.orcacore.net is still empty.
Test PHP process on Apache webserver
In this step, when you have your LAMP stack on Debian 10 and set up your Apache virtual host you need to create a PHP script to test the new setup and confirm that PHP is correctly installed and configured on your server.
Create a new file named info.php with the following command;
vi /var/www/apache.orcacore.net/info.php
Then, add the following PHP code into the file:
<?php
phpinfo();
Save and close the file, when you are finished.
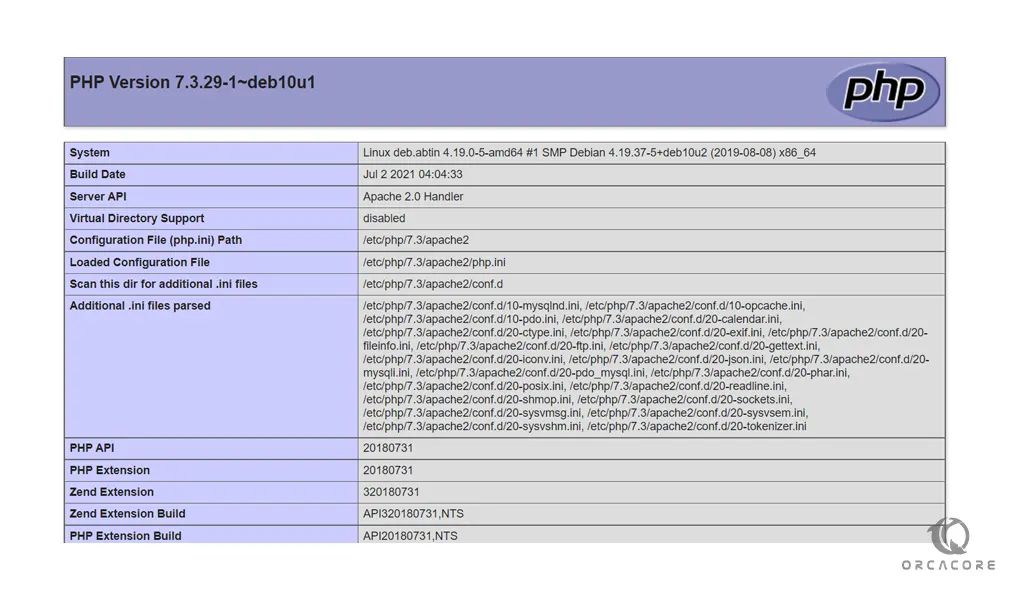
Now you can test the PHP script through your web server.
In your web browser type:
http://apache.orcacore.net/info.php
If you can see this page in your browser, then your PHP installation is working as expected.
After you are finished checking information about the PHP server, it’s better to remove it.
You can do this with the following command:
sudo rm /var/www/apache.orcacore.net/info.php
Also, you can always recreate this page again.
Now let’s test the database connection from PHP.
How to test the database connection from PHP
If you want to test that PHP is able to connect to MariaDB and execute database queries, you can create a test table with dummy data and query for its contents from a PHP script.
First, you need to log in to your MariaDB console with the database user that you have created before with the following command:
mariadb -u olivia_user -p
Then, create a table named todo_list with the following command:
MariaDB [(none)]> CREATE TABLE orca_database.todo_list (
item_id INT AUTO_INCREMENT,
content VARCHAR(255),
PRIMARY KEY(item_id)
);
Now insert a few contents in the test table. you can repeat this command with different values.
MariaDB [(none)]> INSERT INTO orca_database.todo_list (content) VALUES ("First important item");
Verify that your data was successfully added to the table with the following command:
MariaDB [(none)]> SELECT * FROM orca_database.todo_list;
In your output, you should see something similar to this:
Output
+---------+-----------------------+
| item_id | content |
+---------+-----------------------+
| 1 | First important item |
| 2 | Second important item |
+---------+-----------------------+
2 rows in set (0.003 sec)
When you are finished, exit from the MariaDB shell:
MariaDB [(none)]> exit
Now you can create the PHP script that will connect to MariaDB and query for your content.
Create a new PHP file with your favorite text editor:
vi /var/www/apache.orcacore.net/todo_list.php
Then copy this content into your file:
<?php
$user = "olivia_user";
$password = "password";
$database = "orca_database";
$table = "todo_list";

try {
$db = new PDO("mysql:host=localhost;dbname=$database", $user, $password);
echo "<h2>TODO</h2><ol>";
foreach($db->query("SELECT content FROM $table") as $row) {
echo "<li>" . $row['content'] . "</li>";
}
echo "</ol>";
} catch (PDOException $e) {
print "Error!: " . $e->getMessage() . "<br/>";
die();
}
Remember to replace the values with your own.
Then, save and close the file when you are finished.
Now you can access the page by typing this into your web browser:
http://apache.orcacore.net/todo_list.php
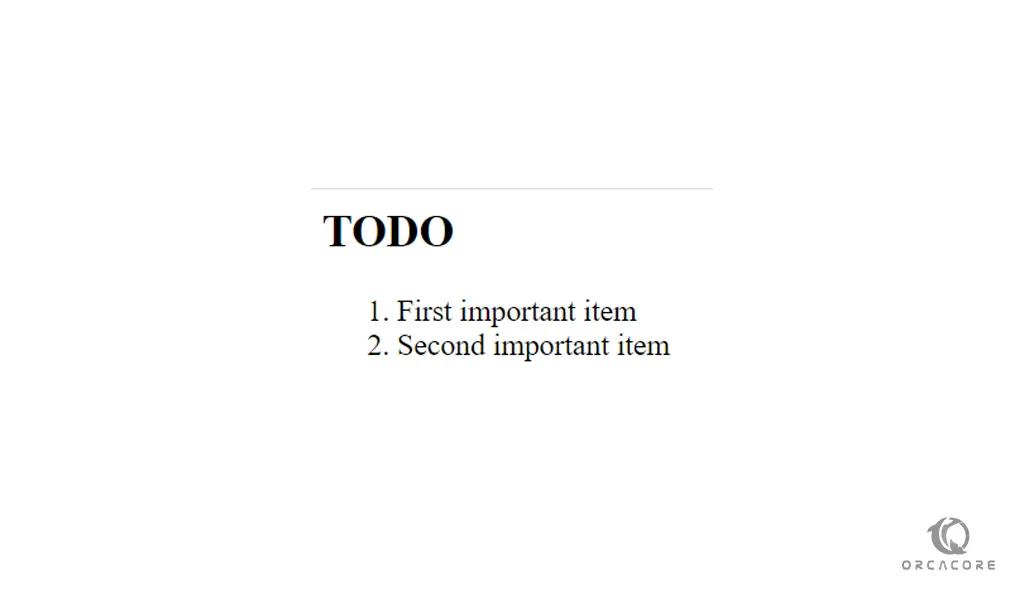
If you see this, means that your PHP environment is ready to connect and interact with your MariaDB server.
Conclusion
At this point, you learn to install and use the Apache web server, a MariaDB database, and dynamic content processed by PHP.
Hope you enjoy this article about How To Install LAMP Stack on Debian 10.