Share your love
Install Nagios Monitoring Tool on AlmaLinux 9 with Best Guide
This guide intends to teach you to Install Nagios Monitoring Tool on AlmaLinux 9. Nagios is a type of tool that is used as a monitoring tool for monitoring the network in several ways. The tool can provide all the system-related information to the user and is also used for real-time monitoring of the network and applications.
Nagios is capable of monitoring the server and finding performance bottlenecks. The tool maintains the server statistics so that performance-related issues can be identified and resolved and also sends alerts to the user when any issue is identified.
You can now proceed to the guide steps below on the Orcacore website to start Nagios Monitoring Tool Setup on AlmaLinux 9.
Table of Contents
Steps To Install Nagios Monitoring Tool on AlmaLinux 9
To complete this guide, you need some requirements first. Let’s see what we need.
1. Requirements for Nagios Core Setup
First, you must log in to your server as a non-root user with sudo privileges and set up a basic firewall. To do this, you can follow our guide on Initial Server Setup with AlmaLinux 9.
Then, you must have Apache installed on your server. For this purpose, you can follow this guide on Install Apache Web Server on AlmaLinux 9.
Also, you must have PHP installed on your server. To do this, you can follow our guide on How To Install PHP 8.2 on AlmaLinux 9.
And you must disable the SELinux by visiting this guide on How To Disable SELinux on AlmaLinux.
When you are done, follow the steps below to Set up Nagios on AlmaLinux 9.
2. Install Required Packages For Nagios on AlmaLinux 9
At this point, you need to run the following command to install the required packages and dependencies:
sudo dnf install php-cli gcc glibc glibc-common gd gd-devel net-snmp openssl-devel wget make gettext autoconf net-snmp-utils perl-Net-SNMP postfix unzip automake -y3. Download the Latest Release of Nagios
Now you need to navigate to your /usr/src/ directory:
cd /usr/src/Then, visit the Project GitHub repository and download the latest release of the Nagios tar.gz file by using the wget command:
sudo wget https://github.com/NagiosEnterprises/nagioscore/releases/download/nagios-4.4.10/nagios-4.4.10.tar.gzWhen your download is completed, extract your file with the following command:
sudo tar zxf nagios-*.tar.gzNext, switch to your Nagios directory on AlmaLinux 9:
cd nagios-4.4.104. Compile and Build Nagios Monitoring Tool on AlmaLinux 9
Now run the following script which will perform a number of checks to make sure all of the dependencies on your system are present:
sudo ./configureThen, start your compilation process with the following command:
sudo make allThe compilation may take some time, depending on your system. Once the build process is completed, you will get the following output:
Output
For more information on obtaining support for Nagios, visit
...
*************************************************************
Enjoy.
At this point, you need to create a new Nagios user and group on AlmaLinux 9:
sudo make install-groups-usersOutput
groupadd -r nagios
useradd -g nagios nagiosThen, add the Apache user to the Nagios group:
sudo usermod -a -G nagios apacheNow run the following command to install Nagios binary files, CGIs, and HTML files:
sudo make installOutput
...
*** Main program, CGIs and HTML files installed ***
...Nagios can process commands from external applications. Create the external command directory and set the proper permissions by running the following command:
sudo make install-commandmodeOutput
*** External command directory configured ***Install the sample Nagios configuration files:
sudo make install-configOutput
*** Config files installed ***
Remember, these are *SAMPLE* config files. You'll need to read
the documentation for more information on how to actually define
services, hosts, etc. to fit your particular needs.Run the command below to install the Apache web server configuration files:
sudo make install-webconfOutput
*** Nagios/Apache conf file installed ***Then, restart Apache:
sudo systemctl restart httpdHere you need to create a systemd unit file. The following command installs a systemd unit file and also configures the Nagios service to start on boot:
sudo make install-daemoninitOutput
*** Init script installed ***5. Create an Admin User for Nagios on AlmaLinux 9
To be able to access the Nagios web interface we’ll create an admin user called nagiosadmin.
Run the following htpasswd command to create a user called nagiosadmin:
sudo htpasswd -c /usr/local/nagios/etc/htpasswd.users nagiosadminYou will be asked to enter a password for your user:
Output
New password:
Re-type new password:
Adding password for user nagiosadmin
To apply the changes, restart Apache:
sudo systemctl restart httpd
6. Configure Firewall for Nagios on AlmaLinux 9
At this point, you need to allow traffic on HTTP and HTTPs with the following commands:
# sudo firewall-cmd --permanent --zone=public --add-service=http
# sudo firewall-cmd --permanent --zone=public --add-service=https
To apply the new rules, run the following command:
sudo firewall-cmd --reload7. Install Nagios Monitoring Tool Plugins on AlmaLinux 9
To install the Nagios plugins, switch to your /usr/src directory:
cd /usr/src/Download the latest version of the Nagios Plugins from the project GitHub repository:
sudo wget -O nagios-plugins.tar.gz https://github.com/nagios-plugins/nagios-plugins/releases/download/release-2.4.3/nagios-plugins-2.4.3.tar.gzWhen the download is complete extract the tar file:
sudo tar zxf nagios-plugins.tar.gzSwitch to your Nagios plugins directory:
cd nagios-plugins-2.4.3Run the following commands one by one to compile and install the Nagios plugins:
# sudo ./configure
# sudo make
# sudo make install
8. Start Nagios Service on AlmaLinux 9
Now that both Nagios and its plugins are installed, start the Nagios service on AlmaLinux 9 with the following command:
sudo systemctl start nagiosTo verify that Nagios is running, check the service status with the following command:
sudo systemctl status nagiosOutput
● nagios.service - Nagios Core 4.4.10
Loaded: loaded (/usr/lib/systemd/system/nagios.service; enabled; vendor pr>
Active: active (running) since Wed 2023-02-15 03:11:45 EST; 5s ago
Docs: https://www.nagios.org/documentation
Process: 112909 ExecStartPre=/usr/local/nagios/bin/nagios -v /usr/local/nag>
Process: 112910 ExecStart=/usr/local/nagios/bin/nagios -d /usr/local/nagios>
Main PID: 112911 (nagios)
Tasks: 6 (limit: 23609)
Memory: 6.1M
CPU: 311ms
CGroup: /system.slice/nagios.service
...9. Access Nagios Monitoring Tool Web Interface
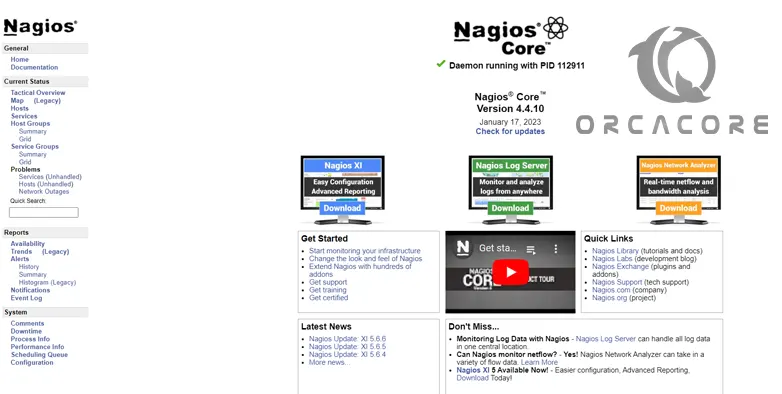
At this point, you access your Nagios Web Interface by typing your server’s IP address in your web browser followed by nagios:
http://server-ip/nagiosEnter the nagiosadmin user login credentials and click sign in:

You will be redirected to the default Nagios home page as shown in the image below:
That’s it, you are done.
For more information, you can visit the Nagios Documentation page.
Conclusion
At this point, you have learned to Install and Configure the Nagios Monitoring Tool on AlmaLinux 9. Nagios Core is a free tool that helps monitor the health of servers, networks, and applications. It works on AlmaLinux 9 and can check if services like websites, databases, or email servers are running properly.
Hope you enjoy using it. You may also like to read the following articles:
Install the ispmanager control panel on AlmaLinux 8
Apache Spark Installation AlmaLinux 9
Set up OpenCV Library on AlmaLinux 8
Alternatives to package cleanup old kernels on AlmaLinux
Download and install Zabbix 6.4 for AlmaLinux 9