Share your love
Install and Configure Nextcloud on AlmaLinux 9 | Best Steps

In this guide, we want to teach you How To Install and Configure Nextcloud on AlmaLinux 9. Nextcloud is open-source software, first developed in 2016, that lets you run a personal cloud storage service. It has features that are comparable to other services such as Dropbox.
The Nextcloud server software can be installed free of charge on Linux, and the client software can be installed on computers running Windows, OS X, or Linux. Mobile apps are also available for Android and iOS.
Nextcloud is a fork of the OwnCloud project, developed by many of the original members of the OwnCloud team. The two projects have many similarities but differ in their interface and their respective licensing agreements, especially for Enterprise editions.
Now you can proceed to the following guide steps on the Orcacore website to Install and Configure Nextcloud on AlmaLinux 9.
Table of Contents
Steps To Install and Configure Nextcloud on AlmaLinux 9
To install and configure Nextcloud on AlmaLinux 9, you need some requirements. Let’s see what we need first.
Requirements for Nextcloud Setup
First, you must log in to your server as a non-root user with sudo privileges and set up a basic firewall. To do this, you can follow this guide on Initial Server Setup with AlmaLinux 9.
Also, you need to have the LAMP stack installed on your server. To do this, you can check How To Install LAMP Stack on AlmaLinux 9.
Once you are done with these requirements, let’s install and Configure Nextcloud on AlmaLinux 9.
Disable SELinux on AlmaLinux 9
At this point, you should put SELinux in permissive mode, which means disabling it temporarily until the next reboot. This will make sure there will be no unwanted restrictions in installing NextCloud. To do this, run the following command:
# sudo setenforce 0
# sudo sed -i 's/^SELINUX=.*/SELINUX=permissive/g' /etc/selinux/config
Check the SELinux status by running the following command:
sestatus
Output
SELinux status:                 disabled
Install Additional PHP Extensions for Nextcloud
At this point, you need to install some additional PHP extensions for Nextcloud on your server. To do this, run the command below:
sudo dnf -y install php-cli php-mysqlnd php-zip php-devel php-gd php-mbstring php-curl php-xml php-pear php-bcmath php-json php-pdo php-pecl-apcu php-pecl-apcu-devel php-ldap
Then, you need to make a configuration change to the php.ini file. Open the file with your favorite text editor, here we use vi:
sudo vi /etc/php.ini
At the file, find memory_limit and set the value to 512M:
memory_limit = 512M
When you are done, save and close the file.
Create a Nextcloud Database on AlmaLinux 9
At this point, you need to create a user and database for Nextcloud. First, log in to your MariaDB shell with the following command:
sudo mysql -u root -p
Then, from your MariaDB shell run the command below to create your user, here we named it nextcloud-user, remember to choose a strong password for it:
MariaDB [(none)]> CREATE USER 'nextcloud-user'@'localhost' IDENTIFIED BY "password";
Next, use the command below to create your database, here we named it nextclouddb:
MariaDB [(none)]> CREATE DATABASE nextclouddb;
Now you need to grant all the privileges to your Nextcloud DB with the command below:
MariaDB [(none)]> GRANT ALL PRIVILEGES ON nextclouddb.* TO 'nextcloud-user'@'localhost';
Flush the privileges and exit from your MariaDB shell with the commands below:
MariaDB [(none)]> FLUSH PRIVILEGES;
MariaDB [(none)]> exit;
Set up Nextcloud on AlmaLinux 9
At this point, you need to visit the Nextcloud official page and download it. Right-click on the Download for server from the Archive file and copy the link address.
Then, use the wget command to download, Install and Configure Nextcloud on AlmaLinux 9:
sudo wget https://download.nextcloud.com/server/releases/latest.zip
Unzip your downloaded file with the command below:
sudo unzip latest.zip
Next, move your extracted file to the /var/www/html/ directory:
sudo mv nextcloud/ /var/www/html/
Now you need to create a data folder to store uploaded data in Nextcloud on AlmaLinux 9:
sudo mkdir /var/www/html/nextcloud/data
Set the correct ownership for your Nextcloud directory:
sudo chown apache:apache -R /var/www/html/nextcloud
Create an Apache Virtualhost file for Nextcloud
At this point, you need to create an Apache configuration file for NextCloud on AlmaLinux 9, to serve the file in case you are using the domain name or multiple websites are running on the same server.
Create and open your file with your favorite text editor, here we use vi:
sudo vi /etc/httpd/conf.d/nextcloud.conf
Add the following content to your file:
<VirtualHost *:80>
ServerName example.com
ServerAdmin admin@example.com
DocumentRoot /var/www/html/nextcloud
<directory /var/www/html/nextcloud>
Require all granted
AllowOverride All
Options FollowSymLinks MultiViews
SetEnv HOME /var/www/html/nextcloud
SetEnv HTTP_HOME /var/www/html/nextcloud
</directory>
</VirtualHost>
When you are done, save and close the file.
Restart Apache, to apply the changes:
sudo systemctl restart httpd
Now allow traffic on HTTP and HTTPs with the command below:
# sudo firewall-cmd --add-service={http,https} --permanent
# sudo firewall-cmd --reload
Access Nextcloud Web Interface
When all the above steps are completed, you are ready to access the web interface to Install and Configure Nextcloud on AlmaLinux 9.
Open your web browser and type your server’s IP address or domain name:
http://your-server-ip-address/nextcloud
or
http://your-domain.com/nextcloud
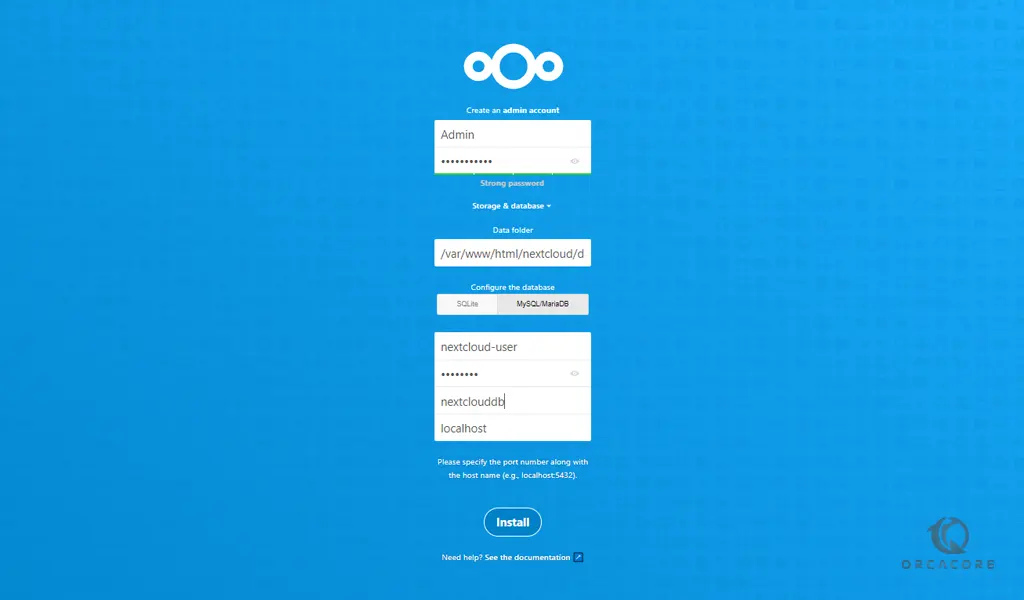
You will see the following screen. You need to create an Admin user and password and then, you need to select MySQL/MariaDB as Database. Then enter the details of the Database you have created. In the end, click Install.
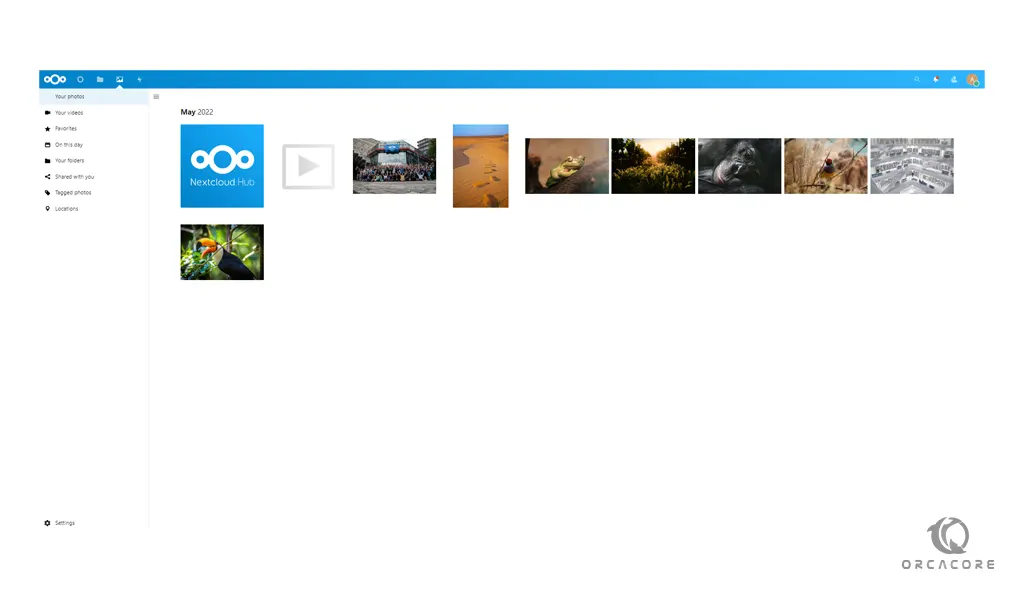
Then, you will see your Nextcloud dashboard.
That’s it, you are done.
Conclusion
At this point, you have learned to Install and Configure Nextcloud on AlmaLinux 9. You can easily configure LAMP Stack and then download the Nextcloud and configure it. After that from the Web interface, you can simply complete your setup installation.
Hope you enjoy it. You may also interested in these articles:
How To Set Up and Configure an OpenVPN on CentOS 7
Secure Apache with Let’s Encrypt on CentOS 7