Share your love
Install Nessus Scanner on Centos 7 – Easy Guide
This tutorial gives simple instructions to Install Nessus Scanner on Centos 7 access your Nessus dashboard and continue your Nessus configuration from a web interface. With the Tenable Nessus scanner, you can easily scan your system to find vulnerabilities and it will help you to prevent the attacks.
You can now proceed to the following guide steps on the Orcacore website and Install Nessus Scanner on Centos 7.
Table of Contents
Steps To Install Nessus Scanner on Centos 7
To Install Nessus Scanner on Centos 7, you must have access to your Centos 7 server as a non-root user with sudo privileges. To do this, you can follow this guide on Initial Server Setup with Centos 7.
Also, you need to enable your Firewalld on your server. To do this, you can follow this guide on Set Up a Firewall with FirewallD on Centos 7.
Now follow the steps below to complete this guide.
Step 1 – Download Tenable Nessus for RHEL 7
The first step is to download the latest installer for Linux RHEL 7. To do this, run the system update with the following command:
sudo yum update -yThen, use the following curl command to get your latest Nessus installer on Centos 7:
sudo curl --request GET \
  --url 'https://www.tenable.com/downloads/api/v2/pages/nessus/files/Nessus-10.5.2-es7.x86_64.rpm' \
  --output 'Nessus-10.5.2-es7.x86_64.rpm'
Step 2 – How To Install Tenable Nessus Scanner on Centos 7?
When your download process is completed, you can run the following command from your Linux terminal to Install Nessus Scanner on Centos 7:
sudo rpm -ivh Nessus-10.5.2-es7.x86_64.rpmWhen your installation is completed, you will get the following output:
Output
...
Preparing...                          ################################# [100%]
Updating / installing...
   1:Nessus-10.5.2-es7                ################################# [100%]
Unpacking Nessus Core Components...
HMAC : (Module_Integrity) : Pass
...
INSTALL PASSED
Step 3 – How To Start Nessus on Centos 7?
At this point, you can easily start and enable your Nessus service to start on boot by using the following commands:
# sudo systemctl start nessusd
# sudo systemctl enable nessusd
Verify your Nessus scanner is active and running on Centos 7 by using the command below:
sudo systemctl status nessusdIn your output, you should see:
Output
● nessusd.service - The Nessus Vulnerability Scanner
   Loaded: loaded (/usr/lib/systemd/system/nessusd.service; enabled; vendor preset: disabled)
   Active: active (running) since Thu 2023-05-25 05:44:56 EDT; 11s ago
 Main PID: 8096 (nessus-service)
   CGroup: /system.slice/nessusd.service
           ├─8096 /opt/nessus/sbin/nessus-service -q
           └─8097 nessusd -q
...
Step 4 – Configure Firewall for Nessus Scanner
Here we assumed that you have enabled firewalld. Now you need to allow Nessus port through the firewall. To do this, run the command below:
sudo firewall-cmd --zone=public --permanent --add-port 8834/tcpReload the firewall to apply the new rules:
sudo firewall-cmd --reloadStep 5 – Configure Nessus Scanner From the Web Interface
At this point, you can access your Nessus web interface by typing your server’s IP address in your web browser followed by 8834:
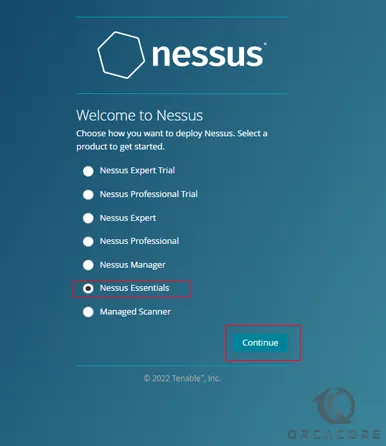
https://server-ip:8834You will see the Nessus Scanner welcome page. At this point, you need to choose how you want to deploy Nessus on Centos 7. Select a product to get started.
Here we choose Nessus Essentials – The free version for educators, students, and hobbyists.
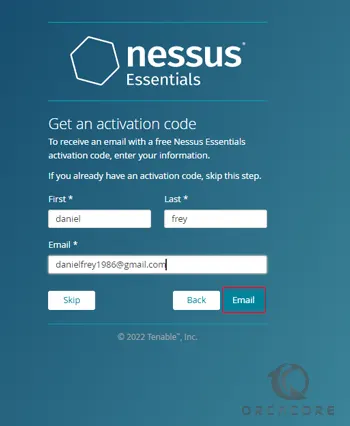
Then, you need to enter your information to register and get an activation code from Nessus on Centos 7.
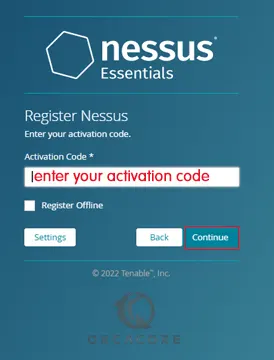
After that, you need to enter the Nessus activation code that you have received and click continue.
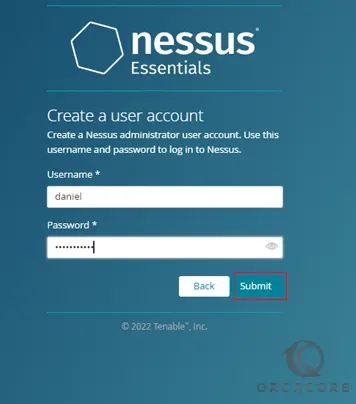
Next, you need to create a Nessus admin user on Centos 7 and click submit.
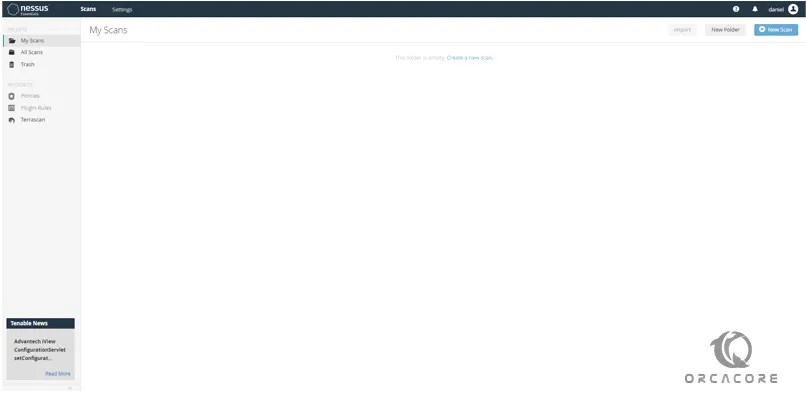
At this point, you need to wait while Nessus prepares the files to scan your assets. When it is completed, you will see your Nessus Dashboard.
Step 6 – Start the First Scan with Nessus on Centos 7
At this point, we want to show you how to scan your Centos system for vulnerabilities from the Nessus web dashboard.
From your Nessus dashboard, click on My Scans and click Create a new scan.
Next, select the scan templates for your new scan. Here we use the template ‘Basic Network Scan‘.
At this point, you need to enter a name for your scan, the description, the folder for storing the scan, and the target server. Then, click Save to save the new scan.
From your ‘My Scan’ page, you will see the new scan that you just created. Click the start button to start the scan.
That’s it you are done.
For more information, you can visit Tenable Nessus Documentation.
Conclusion
At this point, you have learned to Install Nessus Scanner on Centos 7 straightforward and you have learned to start your Nessus service access your dashboard, and create your first scan from your Nessus dashboard.
Hope you enjoy it. You may be interested in these Nessus Scanner guides too:
How To Install Nessus Scanner on Ubuntu 22.04
Install Nessus Scanner on Windows Server 2022