Share your love
Install TeamViewer on Ubuntu 20.04: Best Remote Desktop

In this guide, we want to teach you to Install TeamViewer on Ubuntu 20.04. TeamViewer is without a doubt one of the best remote-access solutions/best remote desktop software programs on the market. It enables users to access devices remotely, providing support or controlling said devices from a different location. It’s available on Windows, Mac, Android, iOS, and various other operating systems for free.
You can now proceed to the following steps on the Orcacore website to start your TeamViewer setup on Ubuntu 20.04.
Table of Contents
Steps To Install TeamViewer on Ubuntu 20.04
To compete with TeamViewer Download and install it, you must log in to your server as a non-root user with sudo privileges. To do this, you can follow our guide on Initial Server Setup with Ubuntu 20.04.
1. TeamViewer Setup on Ubuntu 20.04
First, you need to update your local package index with the following command:
sudo apt updateTeamViewer Download
Then, you need to add the TeamViewer deb package to your server. To do this, you can use the wget command:
sudo wget https://download.teamviewer.com/download/linux/teamviewer_amd64.debWhen your TeamViewer download is completed, you can install your TeamViewer package.
Install TeamViewer Remote Desktop Tool
sudo apt install ./teamviewer_amd64.deb2. Run TeamViewer Application
At this point, you can run your TeamViewer app by going to the Application launcher or in the terminal type- teamviewer.
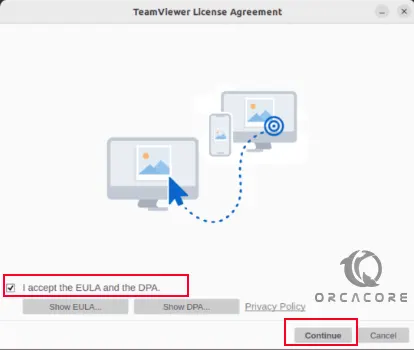
Accept the License Agreement by checking the box saying “I accept the EULA and DPA”. After that click on the Continue button.
Access Remote System
If you want to access some remote system then enter the Partner ID and password generated on the Teamviewer running on the remote system that you want to access.
Whereas, if you want to give access to your computer to someone, then provide him the Partner ID and password on your screen.
After connecting to a computer using TeamViewer on Ubuntu, the menu item “Actions” is available in the menu area at the top of the screen.
You can use this to send keyboard shortcuts such as Ctrl+Alt+End to the remote PC, restart the computer and even switch to safe mode.
In addition, keystrokes from the remote PC can be blocked and notes can be transferred. The notes are pinned to the desktop of the remote PC.
For more information, you can check the Official website.
3. Uninstall TeamViewer From Ubuntu 20.04
If you no longer need TeamViewer, you can easily use the following command to remove it:
sudo apt remove teamviewerAlso, you can remove the App repo by using the command below:
sudo rm /etc/apt/sources.list.d/teamviewer.listConclusion
At this point, you have learned to Install Teamviewer Remote Desktop Tool on Ubuntu 20.04. It has a straightforward process that allows you to securely connect to remote systems for support or collaboration. Hope you enjoy it. You may also like these articles:
HTTP Load Testing with Siege on Ubuntu 20.04
Bitwarden Password Manager For Ubuntu 20.04
Cloudron Setup on Ubuntu 20.04
XFCE Desktop Setup For Ubuntu 20.04
Install and Configure Jekyll on Ubuntu 20.04
Install Netdata on Ubuntu 20.04
Upgrade PHP Version on Ubuntu 20.04
FAQs
Is TeamViewer free for Ubuntu users?
TeamViewer has a free version for personal use. For business or professional use, you’ll need to purchase a license.
How do I start TeamViewer on Ubuntu?
From your terminal, simply type teamviewer to launch the app.
Can I connect to mobile devices using TeamViewer on Ubuntu?
Yes, TeamViewer allows you to connect to Android and iOS devices using its remote access features.