Share your love
Install and Use Composer on Ubuntu 20.04

In this article, we want to teach you how to Install and Use Composer on Ubuntu 20.04.
Composer is a dependency manager for PHP.
Composer will allow you to manage your libraries, classes, and functions throughout your applications.
These libraries and classes that you create for Composer are referred to as Packages.
How To Install and Use Composer on Ubuntu 20.04
To install and use Composer you need to log in to your server as a non-root user with sudo privileges and set up a basic firewall.
To do these you can check our guide about the Initial server Setup with Ubuntu 20.04.
Install PHP on Ubuntu 20.04
To install PHP and its dependencies on Ubuntu 20.04, first, update your local package index with the following command:
sudo apt update
Now install the required packages with the following command:
sudo apt install php-cli unzip
When you are done, you can start to download and install Composer on Ubuntu 20.04.
Download and Install Composer on Ubuntu 20.04
Composer comes with an installer script written in PHP.
To download it, be sure you are in your home directory and run the following command to get the installer:
cd ~
curl -sS https://getcomposer.org/installer -o composer-setup.php
Here you need to get the latest hash from the composer page and store it in a shell variable with the following command:
HASH=`curl -sS https://composer.github.io/installer.sig`
You can use the following command to verify it:
echo $HASH
In your output you will see:
Output
906a84df04cea2aa72f40b5f787e49f22d4c2f19492ac310e8cba5b96ac8b64115ac402c8cd292b8a03482574915d1a8
Then, you need to verify that the installation script is safe to run.
For this you can use the following command:
php -r "if (hash_file('SHA384', 'composer-setup.php') === '$HASH') { echo 'Installer verified'; } else { echo 'Installer corrupt'; unlink('composer-setup.php'); } echo PHP_EOL;"
You should see this in your output:
Output
Installer verified
Note: If in your output, you see the Installer corrupt, you need to download the installation script again and check that you are using the correct hash.
Then, repeat the verification process. When you have a verified installer, you can continue.
Now you can download and install Composer globally on Ubuntu 20.04 with the following command:
sudo php composer-setup.php --install-dir=/usr/local/bin --filename=composer
In your output, you will see something similar to this:
Output
All settings correct for using Composer
Downloading...
Composer (version 2.1.10) successfully installed to: /usr/local/bin/composer
Use it: php /usr/local/bin/composer
You can test your installation with the following command:
composer
Output
______
/ ____/___ ____ ___ ____ ____ ________ _____
/ / / __ \/ __ `__ \/ __ \/ __ \/ ___/ _ \/ ___/
/ /___/ /_/ / / / / / / /_/ / /_/ (__ ) __/ /
\____/\____/_/ /_/ /_/ .___/\____/____/\___/_/
/_/
Composer version 2.1.10 2021-10-29 22:34:57
Usage:
command [options] [arguments]
Options:
-h, --help Display this help message
-q, --quiet Do not output any message
-V, --version Display this application version
--ansi Force ANSI output
--no-ansi Disable ANSI output
-n, --no-interaction Do not ask any interactive question
...
It means that the Composer was successfully installed on Ubuntu 20.04 and is available system-wide.
Note: If you want to have separate Composer executables for each project you host on this server, you can install them locally.
This method is also useful when your system user doesn’t have permission to install software system-wide.
To do this you can use the “php composer-setup.php” command.
Let’s see how to use Composer on Ubuntu 20.04.
How To Use Composer on Ubuntu 20.04
To use Composer in your project, you will need a “composer.json” file.
This file tells Composer which dependencies it needs to download for your project, and which versions of each package are allowed to be installed.
You don’t need to create this file manually.
Composer offers an interactive way to create a new composer.json file based on the user’s input.
It is a good choice if you plan on sharing your project later as a public package on Packagist.
The purpose of this application is to transform a given sentence into a URL-friendly string – a slug.
First, create a directory for your project. here we call it slugify:
cd ~
mkdir slugify
cd slugify
It is not required, but you could now run a Composer init command on Ubuntu 20.04 to create a detailed composer.json file for your project.
Our project’s only objective is to show how to install dependencies with Composer. We will use a simpler composer.json file that will be auto-generated when we require our first package.
Now you can search for the term slug on Packagist that can help you generate the slug. You will see results similar to this:
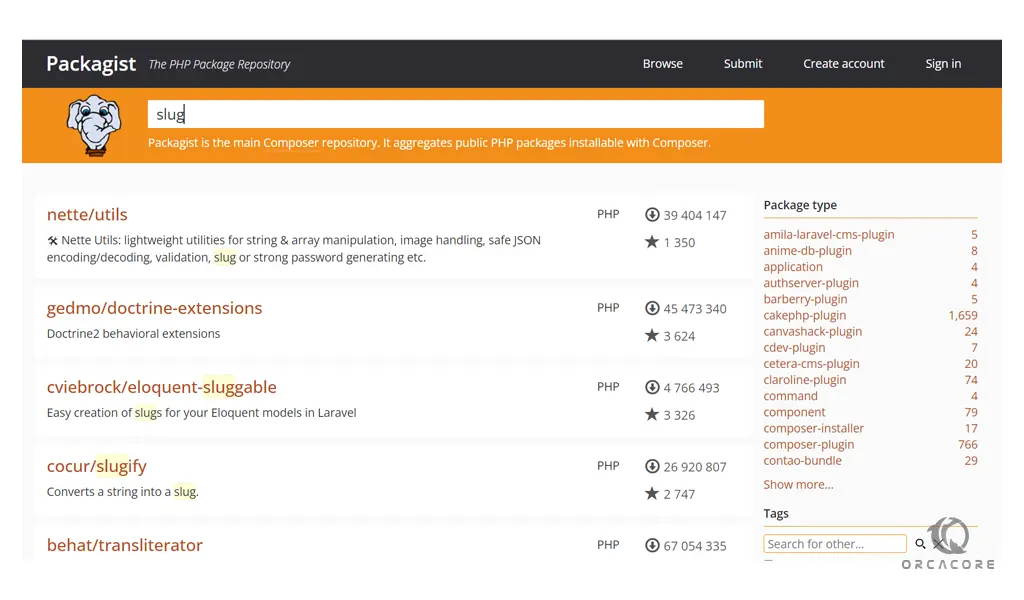
You’ll see two numbers on the right side of each package in the list.
The number on the top shows how many times the package was installed via Composer. And the number on the bottom shows how many times a package was starred on GitHub.
Packages with more installations and more stars tend to be more stable.
You need a string-to-slug converter. As you can see in your search result, the cocur/slugify package is a good match.
Use Composer Require command
Now you know which package you want to install. You can run the following command to include it as a dependency and also generate the composer.json file for your project:
composer require cocur/slugify
Output
Using version ^3.0 for cocur/slugify
./composer.json has been created
Running composer update cocur/slugify
Loading composer repositories with package information
Updating dependencies
Lock file operations: 1 install, 0 updates, 0 removals
- Locking cocur/slugify (v3.0)
Writing lock file
Installing dependencies from lock file (including require-dev)
Package operations: 1 install, 0 updates, 0 removals
- Downloading cocur/slugify (v3.0)
- Installing cocur/slugify (v3.0): Extracting archive
Generating autoload files
As you can see in your output, Composer automatically decided which version of the package to use.
Now you can check your project with the following command:
You will see that it contains two files the composer.json and the composer.lock, and a vendor directory.
ls -l
Output
total 12
-rw-r--r-- 1 root root 59 Oct 31 10:04 composer.json
-rw-r--r-- 1 root root 3114 Oct 31 10:04 composer.lock
drwxr-xr-x 4 root root 4096 Oct 31 10:04 vendor
The composer.lock file is used to store information about which versions of each package are installed.
Also, it ensures the same versions are used if someone else clones your project and installs its dependencies.
The vendor directory is where the project dependencies are located.
You can check the version restriction. if you check the composer.json file on Ubuntu 20.04 you will see:
cat composer.json
Output
{
"require": {
"cocur/slugify": "^3.0"
}
}
The caret (^) before the version number used by the auto-generated composer.json file is the recommended operator for maximum interoperability.
Here, it defines 3.0 as the minimum compatible version and allows updates to any future version under 4.0.
For more information about Composer version restrictions, you can visit the official documentation.
Let’s see how to load dependencies automatically with Composer.
How To Load Dependencies Automatically with Composer
Composer provides an autoload script that you can include in your project to get autoloading working for your project.
This file is automatically generated by Composer when you add your first dependency.
You only need to include the vendor/autoload.php file in your PHP scripts before any class instantiation.
Now open a new file named test.php with your favorite text editor:
vi test.php
Add the following code to the file:
<?php
require __DIR__ . '/vendor/autoload.php';

use Cocur\Slugify\Slugify;

$slugify = new Slugify();

echo $slugify->slugify('Hello World, this is a long sentence and I need to make a slug from it!');
When you are done, save and close the file.
Now you can run the script with the following command:
php test.php
In your output you will see:
Output
hello-world-this-is-a-long-sentence-and-i-need-to-make-a-slug-from-it.
Dependencies need an update when new versions come out.
Use the Composer update command on Ubuntu 20.04 to update your project dependencies to more recent versions:
composer update
If a new version is found and it’s compatible with the version restrict defined in the composer.json file, the Composer will replace the previous version installed.
Also, you can update one or more specific libraries with the following command:
composer update vendor/package vendor2/package2
Note: After you update your dependencies be sure to check the composer.json and the composer.lock files within your version control system. So that others can install these newer versions too.
Conclusion
At this point, you learn to install Composer, include new dependencies in a project, and update dependencies to new versions available.
Hope you enjoy it.
May this article about How To Set up PHP Composer on Centos 7 be useful for you.