Share your love
Best Tomcat Installation Guide on Debian 12 Bookworm
In this article, you will learn an Ultimate guide on Apache Tomcat Installation Guide on Debian 12 Bookworm. Apache Tomcat allows the users to run Servlet and JAVA Server Pages that are based on web applications. It can be used as an HTTP server. The performance of the Tomcat server is not as good as the designated web server. It can be used as a separate product with its own internal Web server.
It can also be used mutually with the other Web-servers which include Apache, Microsoft Internet Information Server, and Microsoft Personal Web-server. Now you can follow the guide steps on the Orcacore website to install the latest Tomcat on Debian 12.
Table of Contents
Steps To Tomcat Installation Guide on Debian 12 Bookworm
Before you start Tomcat Installation Guide on Debian 12 Bookworm, you must have access to your server as a non-root user with sudo privileges and set up a basic firewall. To do this, you can follow this guide on Initial Server Setup with Debian 12 Bookworm.
Now follow the steps below to complete your Tomcat Installation Guide on Debian 12 Bookworm.
Step 1 – Java Installation For Apache Tomcat on Debian 12
To install Tomcat, you must have Java installed on your server. First, run the system update with the command below:
sudo apt updateThen, use the following command to install OpenJDK on your server:
sudo apt install default-jdk -y Verify your Java installation with the following command:
java --version Output
openjdk 17.0.8 2023-07-18
OpenJDK Runtime Environment (build 17.0.8+7-Debian-1deb12u1)
OpenJDK 64-Bit Server VM (build 17.0.8+7-Debian-1deb12u1, mixed mode, sharing)Note: It is recommended to run the Tomcat service as a non-root user. To create a new user run the following command:
sudo useradd -m -d /opt/tomcat -U -s /bin/false tomcat This command will create a user and group named Tomcat on your system.
Step 2 – Download and Install Latest Tomcat on Debian 12
At this point, you need to visit the Tomcat Downloads page and copy the tar.gz file link address of the latest release.
Now you can use the wget command to download the Tomcat 10 on Debian 12:
sudo wget https://dlcdn.apache.org/tomcat/tomcat-10/v10.1.13/bin/apache-tomcat-10.1.13.tar.gzRemember to replace the latest version of Tomcat in the above command.
When your download is completed, extract the file in the /opt/tomcat home directory with the following command:
sudo tar xzvf apache-tomcat-10*tar.gz -C /opt/tomcat --strip-components=1 Now you need to set the correct permissions for Apache Tomcat on Debian 12 with the following commands:
# sudo chown -R tomcat:tomcat /opt/tomcat/
# sudo chmod -R u+x /opt/tomcat/bin
Now you have the latest Tomcat on your server.
Step 3 – Tomcat Configuration Steup on Debian 12
At this point of Tomcat Installation Guide on Debian 12 Bookworm, you need to configure Tomcat with user accounts to secure access to admin/manager pages. You need to edit the Tomcat user configuration file. Open the file with your favorite text editor like vi editor and nano editor:
sudo vi /opt/tomcat/conf/tomcat-users.xml Now you need to add the following content to the <tomcat-users>. Just remember to replace the password with a strong and secure password for your manager and admin:
</tomcat-users>
<!-- user manager can access only manager section -->
<role rolename="manager-gui" />
<user username="manager" password="_SECRET_PASSWORD_" roles="manager-gui" />

<!-- user admin can access manager and admin section both -->
<role rolename="admin-gui" />
<user username="admin" password="_SECRET_PASSWORD_" roles="manager-gui,admin-gui" />
When you are done, save and close the file.
Note: The default Tomcat manager and host-manager applications are accessible for local hosts only.
To allow access to these pages from the remote system, you need to modify the following configuration files.
For the manager, open the file with your favorite text editor, we use vi:
sudo vi /opt/tomcat/webapps/manager/META-INF/context.xmlHere you need to comment on the section added for IP address restriction to allow connections from anywhere as shown below:
<Context antiResourceLocking="false" privileged="true" >
  <CookieProcessor className="org.apache.tomcat.util.http.Rfc6265CookieProcessor"
                   sameSiteCookies="strict" />
  <!-- <Valve className="org.apache.catalina.valves.RemoteAddrValve" allow="127\.\d+\.\d+\.\d+|::1|0:0:0:0:0:0:0:1" /> -->
...
When you are done, save and close the file.
Do the same thing for the host:
sudo vi /opt/tomcat/webapps/host-manager/META-INF/context.xmlComment in the same section as the manager:
<Context antiResourceLocking="false" privileged="true" >
  <CookieProcessor className="org.apache.tomcat.util.http.Rfc6265CookieProcessor"
                   sameSiteCookies="strict" />
  <!-- <Valve className="org.apache.catalina.valves.RemoteAddrValve"
         allow="127\.\d+\.\d+\.\d+|::1|0:0:0:0:0:0:0:1" /> -->
...
When you are done, save and close the file.
Step 4 – Create a Systemd Unit File For Apache Tomcat
At this point of Tomcat Installation Guide on Debian 12 Bookworm, you need to create a Tomcat systemd unit file. Open and create the file with your favorite text editor, we use vi:
sudo vi /etc/systemd/system/tomcat.serviceAdd the following content to the file:
[Unit]
Description=Tomcat
After=network.target

[Service]
Type=forking

User=tomcat
Group=tomcat

Environment="JAVA_HOME=/usr/lib/jvm/java-17-openjdk-amd64"
Environment="JAVA_OPTS=-Djava.security.egd=file:///dev/urandom"
Environment="CATALINA_BASE=/opt/tomcat"
Environment="CATALINA_HOME=/opt/tomcat"
Environment="CATALINA_PID=/opt/tomcat/temp/tomcat.pid"
Environment="CATALINA_OPTS=-Xms512M -Xmx1024M -server -XX:+UseParallelGC"

ExecStart=/opt/tomcat/bin/startup.sh
ExecStop=/opt/tomcat/bin/shutdown.sh

[Install]
WantedBy=multi-user.target
When you are done, save and close the file.
Reload the systemd service to apply the new Tomcat systemd unit file:
sudo systemctl daemon-reload Step 5 – Start and Enable Tomcat Service on Debian 12
At this point of Tomcat Installation Guide on Debian 12 Bookworm, you can start the Tomcat service on Debian 12 Bookworm with the following command:
sudo systemctl start tomcat.service Then, use the flowing command to start the service every time at boot:
sudo systemctl enable tomcat.serviceYou can verify that your Tomcat is up and running on Debian 12 with the following command:
sudo systemctl status tomcat.service Output
● tomcat.service - Tomcat
Loaded: loaded (/etc/systemd/system/tomcat.service; enabled; preset: enabled)
Active: active (running) since Thu 2023-10-05 06:22:29 EDT; 12s ago
Main PID: 10489 (java)
Tasks: 31 (limit: 4653)
Memory: 144.8M
CPU: 4.784s
CGroup: /system.slice/tomcat.service
...Now you can access the Apache Tomcat web interface.
Step 6 – Access Tomcat via Web Interface on Debian 12 Bookworm
At this point of Tomcat Installation Guide on Debian 12 Bookworm, you can access your Tomcat web interface by typing your Server’s IP address in your web browser followed by 8080:
http://server-ip-address:8080You will see:
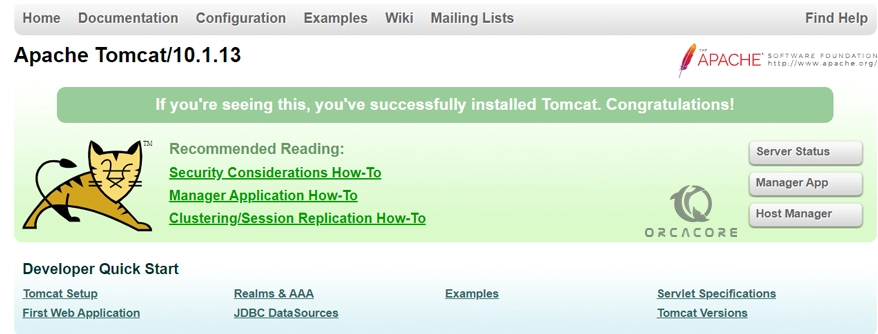
If you see this page means that you have successfully finished Tomcat Installation Guide on Debian 12 Bookworm.
As you can see in the web interface, you have Manager App and Host Manager.
The Manager interface provides you with the basic functionality you need to manage your deployed web applications.
Tomcat Host Manager App is used to create/remove Virtual Hosts from the Tomcat service.
Conclusion
At this point, you have learned an Ultimate guide for Tomcat Installation Guide on Debian 12 Bookworm and access it through the web interface. Hope you enjoy using it.
You may be interested in these articles: