Share your love
Migrate From Rocky Linux 8 To Rocky Linux 9 | Best Setup
In this guide, we want to teach you How To Migrate From Rocky Linux 8 To Rocky Linux 9. Rocky Linux is a free, open, community enterprise operating system designed to be 100% bug-for-bug compatible with the top upstream enterprise Linux distribution. Built by the community, for the community. With fully open and transparent development, there’s plenty of opportunity for anyone to contribute.
The latest release version for this Linux distribution is Rocky Linux 9. This release version, which is in line with RHEL 9, was publicly made available on July 14, 2022. It comes with several amazing features and improvements. You can now proceed to the guide steps below on the Orcacore website to migrate from Rocky Linux 8 to Rocky Linux 9 from the command line.
Table of Contents
Steps To Migrate From Rocky Linux 8 To Rocky Linux 9
To complete this guide, you must log in to your Rocky Linux 8 as a non-root user with sudo privileges. To do this, you can follow our guide on Initial Server Setup with Rocky Linux 8.
1. Check the current OS and version available on Rocky Linux 8
First, you need to update your local package index with the command below:
sudo dnf update -yThen, use the following command to check your current OS on your server:
sudo cat /etc/os-release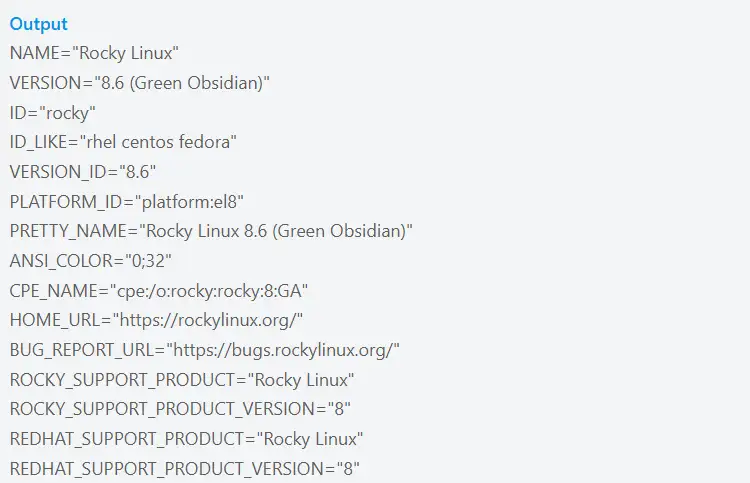
2. Backup Rocky Linux 8 System
At this point, it is highly recommended to back up your Rocky Linux 8 system. You can do this with tar or any backup solution you use — just make sure you take care to store those backups on an external drive.
If tar is your solution of choice, you could simply back up everything by running the command below:
sudo tar czf /rocky8.tar.gz \
     --exclude=/rocky8.tar.gz \
     --exclude=/dev \
     --exclude=/mnt \
     --exclude=/proc \
     --exclude=/sys \
     --exclude=/run \
     --exclude=/tmp \
     --exclude=/media \
     --exclude=/lost+found \
     /
When you are finished, you can proceed to the next step.
3. Add Rocky Linux 9 Repositories
At this point, you need to add the Rocky Linux 9 repositories to your server. To do this, you can visit the official repo web path and check for the latest releases.
REPO_URL="https://download.rockylinux.org/pub/rocky/9/BaseOS/x86_64/os/Packages/r"

RELEASE_PKG="rocky-release-9.0-2.3.el9.noarch.rpm"

REPOS_PKG="rocky-repos-9.0-2.3.el9.noarch.rpm"

GPG_KEYS_PKG="rocky-gpg-keys-9.0-2.3.el9.noarch.rpm"
Install the required packages with the following command:
sudo dnf install $REPO_URL/$RELEASE_PKG $REPO_URL/$REPOS_PKG $REPO_URL/$GPG_KEYS_PKG4. Remove the RedHat-logos Directory
At this point, you need to remove the RedHat-logos directory, otherwise, the upgrade will fail. To do this, run the command below:
sudo rm -rf /usr/share/redhat-logos5. Upgrade Rocky Linux 8 To Rocky Linux 9
Finally, upgrade Rocky Linux from 8.x to 9 with the following command:
sudo dnf --releasever=9 --allowerasing --setopt=deltarpm=false distro-sync -yAfter the installation completes, rebuild the RPM database with the command below:
sudo rpm --rebuilddbOnce everything is taken care of, reboot the system and log into Rocky Linux 9.
rebootWhen you are logged in, you can verify your Rocky Linux 9 installation by checking the OS release:
sudo cat /etc/os-releaseIn your output, you will see:

Conclusion
At this point, you have learned to Migrate From Rocky Linux 8 to Rocky Linux 9. Migrating from Rocky Linux 8 to Rocky Linux 9 upgrades your system for better performance, security, and software compatibility. It involves updating packages, backing up data, and using the Linux commands to upgrade your system.
Hope you enjoy it. Also, you may like these articles: