Share your love
Run Automatic Updates with dnf-automatic on RHEL 8 & 9 Easy Guide
This guide intends to teach you to Configure and Run Automatic Updates with dnf-automatic on RHEL 8 & 9. The dnf-automatic command in RHEL is part of the DNF package management system. It is designed to automate the process of updating your system. It can be configured to automatically download and apply updates for all packages installed on your system. This includes security updates, bug fixes, and enhancements.
Now you can follow the steps below to enable automatic updates on RHEL distros including AlmaLinux and Rocky Linux. You can use this instruction for both 8 and 9 versions.
Table of Contents
Learn To Run Automatic Updates with dnf-automatic on RHEL 8 & 9
Before setting up automatic updates on your server, you must log in as a non-root user with sudo privileges. We use AlmaLinux 9 to show you the guide steps in this guide. For this purpose, you can check the AlmaLinux 9 Initial Setup Guide.
Now proceed to the next steps to Run Automatic Updates with dnf-automatic on RHEL.
Step 1 – Install dnf-automatic on RHEL
First, you must run the system update with the command below:
sudo dnf update yThen, you need to install the dnf-automatic command line tool on your RHEL distros:
sudo dnf install dnf-automatic -y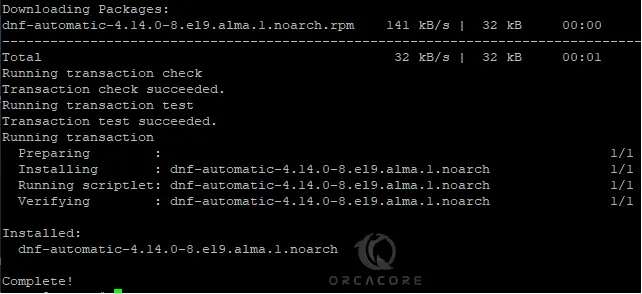
Step 2 – Configure Automatic Updates on RHEL
The configuration settings for automatic updates are located under the /etc/dnf/automatic.conf directory. This allows you to specify how often it checks for updates, whether it should download, install, or just notify you of available updates, and other behaviors.
Open the file with your desired text editor like Vi editor or Nano Editor:
sudo vi /etc/dnf/automatic.confIn the file, you can specify different options according to your needs. The following options are the most key features you may want to configure:
- upgrade_type: To download all updates leave it to default value. For security updates set it to security, or you can set it for the none value.
- apply_updates: If you want updates to be automatically applied, set it to yes.
- emit_via: Configure how you want to receive notifications (e.g., email, stdio, etc.).
- Email settings: If you choose email notifications, configure the email settings accordingly.
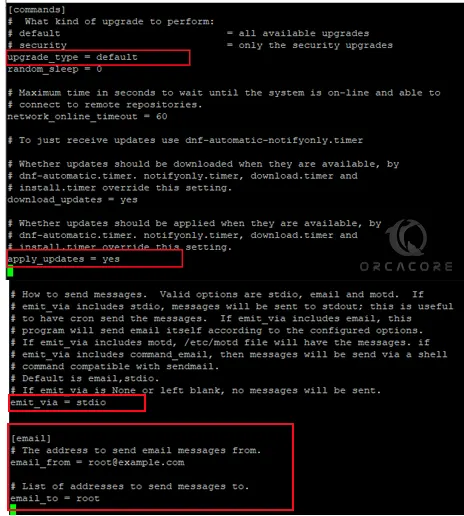
Once you are done, save and close the file.
Step 3 – Enable and Start dnf-automatic.timer
The dnf-automatic uses a systemd timer to schedule its operations on RHEL. So you need to start and enable it on your server. To do this, run the command below:
sudo systemctl enable --now dnf-automatic.timer
Then, check its status by using the following command:
sudo systemctl status dnf-automatic.timer
Also, you can check your automatic update process with the command below:
sudo systemctl list-timers dnf-*

That’s it, you are done.
Summing Up
At this point, you have learned to configure and run dnf-automatic on your RHEL server to get the latest updates and security patches automatically. However, it is recommended that check your system and update manually to ensure everything is functioning as expected.
Hope you enjoy it. Also, you may like to read the following articles:
RPM Package Management in RHEL For Beginners