Share your love
Run a Scan with Defender Antivirus on Windows Server 2022: Easy Steps
This guide intends to teach you to Run a Scan with Defender Antivirus on Windows Server 2022. You will learn to Perform a Quick Scan, Full scan, Schedule a Scan, and Custom Scan on Windows Server 2022 with Defender Antivirus.
Windows Defender Antivirus will help you to protect your system from viruses, malware, etc.
Now follow the steps below on the Orcacore website to enable your Defender Antivirus and run a scan with Windows Defender on your Windows Server 2022.
Table of Contents
Steps To Run a Scan with Defender Antivirus on Windows Server 2022
Before you start to Run a Scan with Defender Antivirus on Windows Server 2022, you need some requirements.
Requirements for Scanning with Defender Antivirus
First, you must have access to your Windows Server with administrative privileges.
Then, you must enable Windows Defender. To do this, you can visit this guide on Enable Defender Antivirus on Windows Server 2022.
Note: Microsoft Windows Defender must be installed by default on your server. If you don’t have it, you can follow the above article.
Now follow the steps below to Run a Scan with Defender Antivirus on Windows Server 2022.
Step 1 – Run a Quick Scan with Windows Defender Antivirus
We begin with a Quick scan of Windows Server 2022. A quick scan only checks the folders where threats are detected in your system.
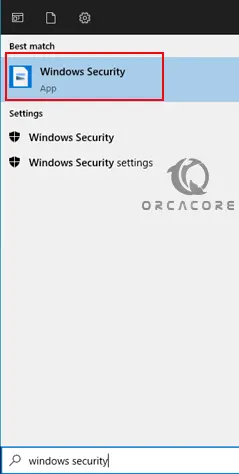
To start a quick scan, from your search bar, search for Windows Security, and click on the App to open it.
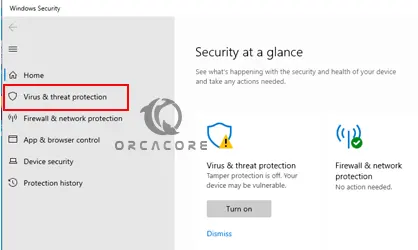
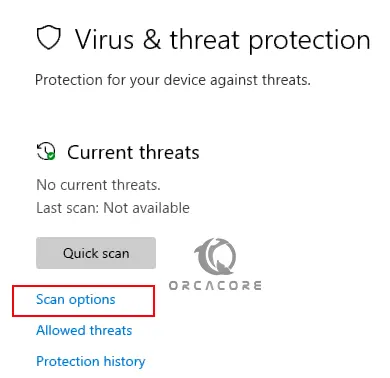
Then, from the Windows Security app, click on Virus & Threat Protection.
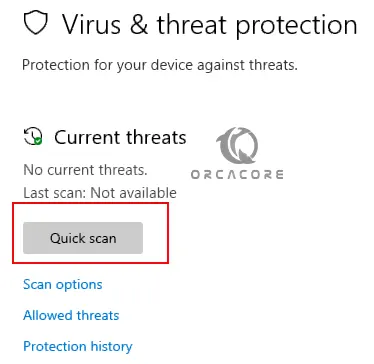
At this point, you can efficiently run a quick scan on your Windows Server 2022 with Microsoft Windows Defender. Click on Quick Scan.
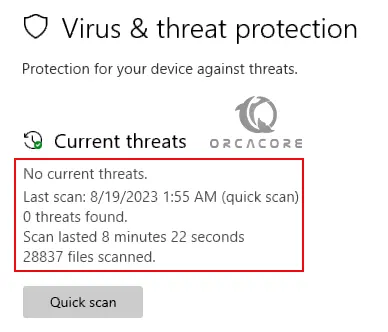
Wait until your Quick Scan process is completed. Then, you will get a result the same as the following.
Step 2 – Run a Full Scan with Windows Defender Antivirus
At this point, we want to run a full scan on Windows Server 2022. A full scan will check all files and programs on your system. To do this, you need to open the Windows Security app again. Click on Virus & Threat Protection.
From there, under the Quick Scan, click on Scan options.
Next, check the box next to Full Scan and click Scan Now.
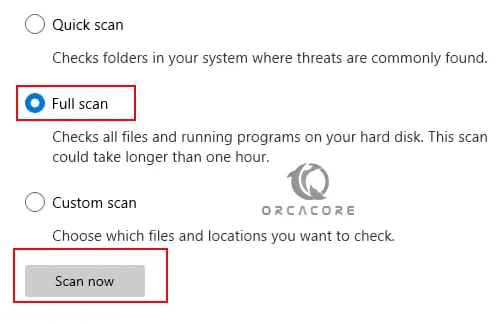
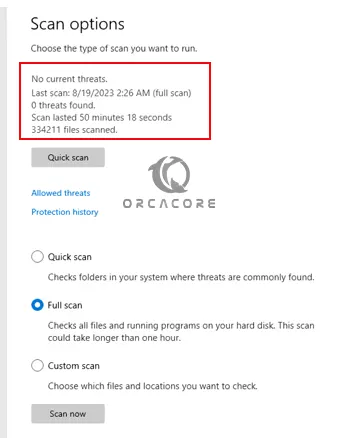
The full scan process will take some time to complete. After that, the results will be printed.
Step 3 – Run a Custom scan with Windows Defender Antivirus
If you plan to check a specific drive or folder, you need to run a custom scan on Windows Server 2022.
To do this, again open the Windows Security app, and click on Virus & Threat Protection. From there, under the Quick Scan, click on Scan options.
From there, check the box next to Custom Scan and click on Scan Now.
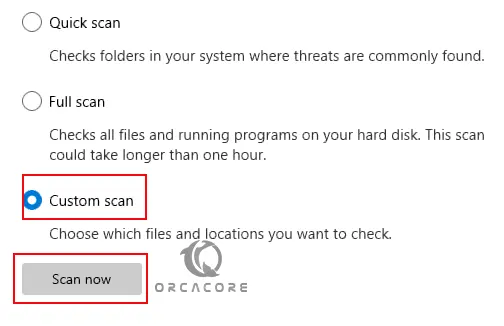
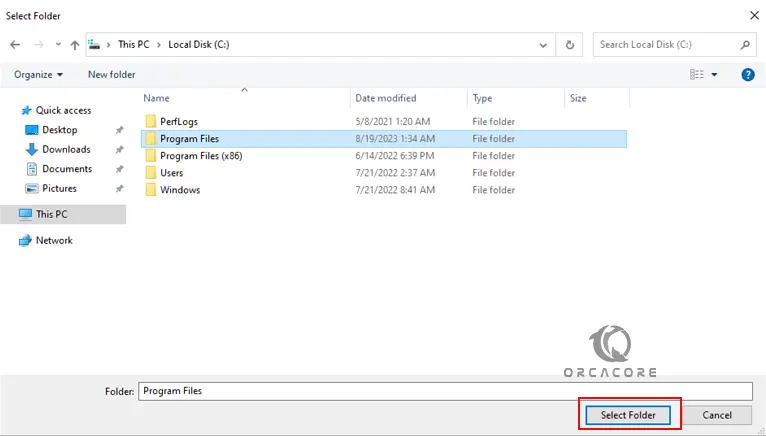
Then, you need to select your desired drive and folder. Then, click Select Folder.
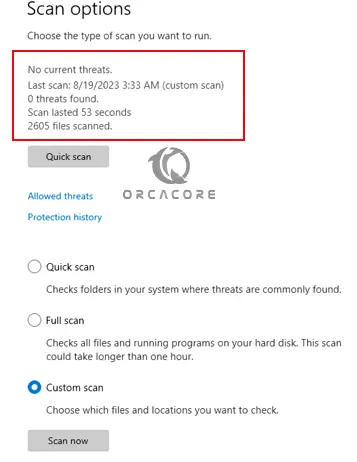
When it is completed, you will see the “Custom scan” results on the scan options screen.
Note: You can use Event Viewer, to check the “scan type”, “scan time”, etc. in the log for each of your scans.
Step 4 – Schedule a Scan in Windows Defender Antivirus
At this point, you can schedule a scan in Windows Server 2022 with Task Scheduler. With this option, you can manually set a scan. To do this, follow the steps below:
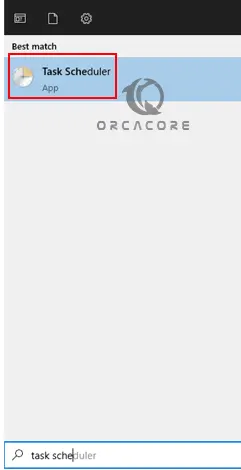
First, from your search bar, find Task Scheduler and open the app.
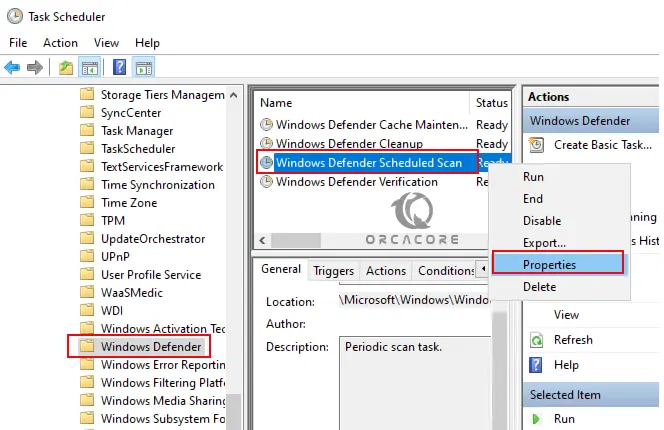
Then, from the app, go to the following path:
Task Scheduler Library > Microsoft > Windows > Windows DefenderNext, right-click on Windows Defender Scheduled Scan and select properties.
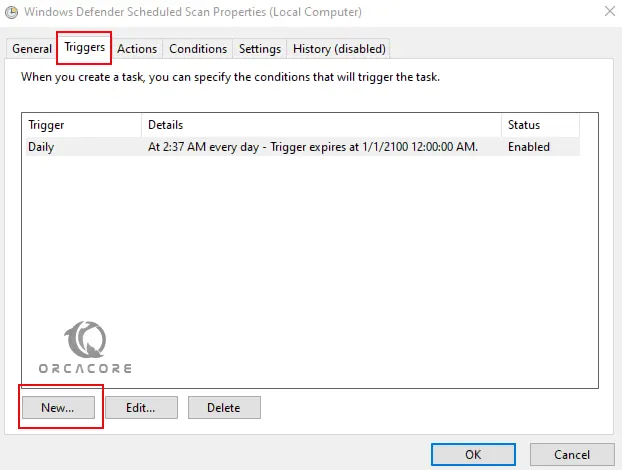
From there, click on the Triggers tab and click New.
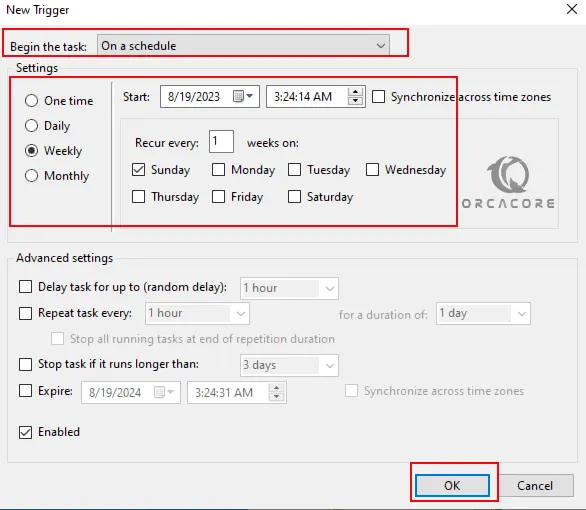
On the New Trigger tab, you will see the Begin the Task option. You will see many triggers such as On a schedule, At startup, etc. Here we use the On a Schedule trigger. From the settings, we select the Weekly option. Specify when the task should start running and the time. Also, specify the number of weeks when to recur the task. Check the day of the week you want to start your scan. Finally, click OK.
That’s it. Your scan is now scheduled on your Windows Server 2022 with Microsoft Windows Defender.
Conclusion
Defender Antivirus on Windows Server 2022 is a built-in security feature designed to protect servers from various forms of malware, including viruses, spyware, and other malicious software.
At this point, you have learned to Run a Scan with Defender Antivirus on Windows Server 2022. You have learned to perform the following scans:
- Quick Scan
- Full scan
- Custom scan
- And Set a Schedule Scan with Task Scheduler.
With Windows Defender you can protect your system from viruses and malware.
Hope you enjoy using it. You may also be interested in these articles:
Install Nessus Scanner on Windows Server 2022