Share your love
Set up System Locale on Ubuntu 22.04: Easy Guide Steps

This tutorial intends to teach you to Set up System Locale on Ubuntu 22.04 from the Command line. Also, you will learn to change the default locale on the Ubuntu 22.04 server. The system locale defines the language and country-specific setting for the programs running on your system and the shell sessions. You can use locales to see the time and date, numbers, currency, and other values formatted as per your language or country. Follow the guide steps on the Orcacore website to Set up System Locale on Ubuntu 22.04.
Table of Contents
Set up System Locale on Ubuntu 22.04
To Set up System Locale on Ubuntu 22.04, you must have access to your server as a root or non-root user with sudo privileges. For this purpose, you can visit this guide on Initial Server Setup with Ubuntu 22.04.
Step 1 – Check Default System Locale on Ubuntu 22.04
First, you can check your current system locale on your Ubuntu server by using the command below:
localeOutput
LANG=en_US.UTF-8
LANGUAGE=
LC_CTYPE="en_US.UTF-8"
LC_NUMERIC="en_US.UTF-8"
LC_TIME="en_US.UTF-8"
LC_COLLATE="en_US.UTF-8"
LC_MONETARY="en_US.UTF-8"
LC_MESSAGES="en_US.UTF-8"
LC_PAPER="en_US.UTF-8"
LC_NAME="en_US.UTF-8"
LC_ADDRESS="en_US.UTF-8"
LC_TELEPHONE="en_US.UTF-8"
LC_MEASUREMENT="en_US.UTF-8"
LC_IDENTIFICATION="en_US.UTF-8"
LC_ALL=Also, you can use the following command instead:
localectl statusOutput
System Locale: LANG=en_US.UTF-8
VC Keymap: n/a
X11 Layout: us
X11 Model: pc105Step 2 – Check Which Locales are Enabled on Ubuntu 22.04
You may have several locales set for different parts of your system. To check which locales are enabled on your Ubuntu server, run the command below:
locale -aOutput
C
C.utf8
en_US.utf8
POSIXStep 3 – How To Generate a Locale on Ubuntu 22.04?
If you want to enable a system locale for the region you want, you can simply use the locale-gen command. Here we use the following command to select a locale and generate it on Ubuntu 22.04:
dpkg-reconfigure localesHere as an example, we select the en_US.ISO-8859-1 and click OK.
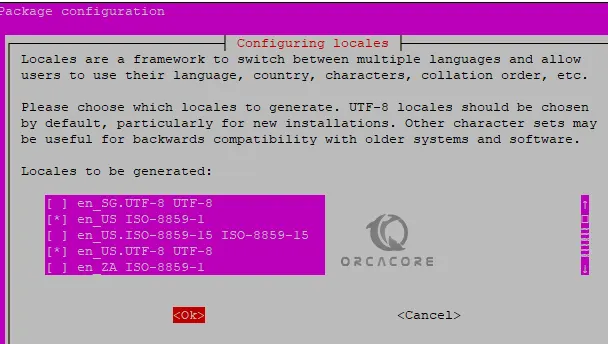
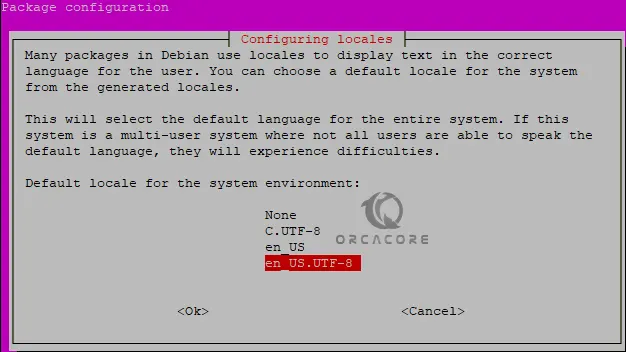
Then, it will ask you to select the default system locale on your Ubuntu 22.04. We select the en_US.UTF-8 and click OK.
When it is finished, you will get the following output:
Output
Generating locales (this might take a while)...
  en_US.ISO-8859-1... done
  en_US.UTF-8... done
Finally, verify your system locale is enabled with the command below:
locale -aOutput
C
C.utf8
en_US
en_US.iso88591
en_US.utf8
POSIXStep 4 – How To Change the Default Locale in the Ubuntu Server?
At this point, you can easily change the default locale manually. For this purpose, you need to edit the /etc/default/locale file, we use vi editor to open the file:
vi /etc/default/localeThe file has a single line that describes the default locale:
LANG=en_US.UTF-8You can change the LANG with your desired locale. When you are done, save and close the file.
Finally, log out from your current session and then log back in, or open a new terminal, to activate the new system locale.
Also, there is an alternative method that you can update the locale file without editing it. You just run the following update-locale command to set your system locale:
update-locale LANG=your-desired-localeRemember to restart the session to activate your locale.
For more information, you can see the man pages for locale commands:
# man locale
# man update-locale
# man localectl
Conclusion
At this point, you have learned to Set up System Locale on Ubuntu 22.04, Check the Default System Locale, Check Which Locales are Enabled, Generate a Locale, and Change the Default Locale.
Hope you enjoy it. You may also interested in these articles: