Share your love
How To Set up WordPress on Centos 7

In this article, we want to teach you How To Set up or Install WordPress on Centos 7.
WordPress is an open-source content management system (CMS).
It’s a popular tool for individuals without any coding experience who want to build websites and blogs.
The software doesn’t cost anything. Anyone can install, use, and modify it for free.
Steps To Set up WordPress on Centos 7
Before you start to install WordPress on Centos 7, you need some requirements.
Requirements
First, you need to log in to your server as a non-root user with sudo privileges. To do this, you can follow our article the Initial Server Setup with Centos 7.
Next, you need to set up a basic firewall with firewalld. For this, you can check our article How To Set up Firewall with Firewalld on Centos 7.
Also, you need to have the LAMP stack installed on your server. To do this, you can check our article How To Install LAMP stack on Centos 7.
WordPress requires PHP at least 5.6. You can visit our article How To Install PHP 7.3 on Centos 7.
Now follow the steps below to install WordPress on Centos 7.
Create a WordPress Database on Centos 7
At this point, you need to create a WordPress database and user. To do this, log in to your MariaDB console with the command below:
mysql -u root -p
Enter your MariaDB root password and you will see your MariaDB console.
Then, from your MariaDB console run the following command to create the WordPress database:
CREATE DATABASE wordpress;Next, use the following command to create your WordPress user on Centos 7. Here we named it orca you can choose your desired name and remember to choose a strong password for it.
CREATE USER orca@localhost IDENTIFIED BY 'password';Now grant all the privileges to your user database with the following command:
GRANT ALL PRIVILEGES ON wordpress.* TO orca@localhost IDENTIFIED BY 'password';Flush the privileges and exit from your MariaDB console with the commands below:
FLUSH PRIVILEGES; exitInstall WordPress on Centos 7
To install WordPress on Centos 7, you need a PHP module installed on your server.
You can install it with the following command:
sudo yum install php-gd
Restart your Apache web server to apply the changes:
sudo systemctl restart httpdDownload WordPress
Now you can download the latest version of WordPress on your server with the following command:
cd ~
wget http://wordpress.org/latest.tar.gz
Then, extract your downloaded file:
tar xzvf latest.tar.gzHere you have a WordPress directory in your home directory on Centos 7. You need to transfer the unpacked files to Apache’s document root. To do this, run the following command:
sudo rsync -avP ~/wordpress/ /var/www/html/Note: If you don’t have the rsync tool on your server, you can install it with the command below:
sudo yum install rsync
Next, you need to create a directory for WordPress on Centos 7 to store uploaded files with the following command:
mkdir /var/www/html/wp-content/uploadsGrant the ownership to Apache’s user and group:
sudo chown -R apache:apache /var/www/html/*Configure WordPress on Centos 7
At this point, you need to make some configuration changes to the WordPress main configuration file.
First, switch to your Apache document root directory:
cd /var/www/htmlNow you need to copy the WordPress sample configuration file with the command below:
cp wp-config-sample.php wp-config.phpThen, open the file with your favorite text editor, here we use vi:
vi wp-config.php
Find the lines below and set them to your database settings:
// ** MySQL settings - You can get this info from your web host ** //
/** The name of the database for WordPress */
define('DB_NAME', 'wordpress');

/** MySQL database username */
define('DB_USER', 'orca');

/** MySQL database password */
define('DB_PASSWORD', 'password');
When you are done, save and close the file.
Access WordPress Web Interface
At this point, you can access the WordPress web interface on Centos 7 to complete your installation by typing your server’s IP address in your web browser.
http://server_domain_name_or_IP
On the first page, you need to choose your desired language and click on the continue button.

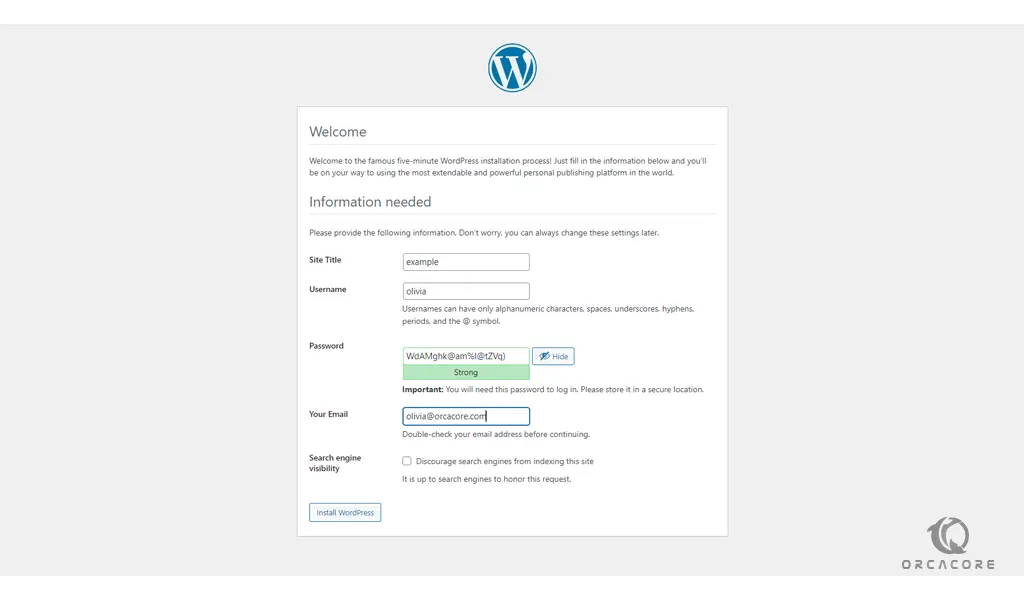
Next, you will see the WordPress main setup page. Provide your information and click on the Install WordPress button. Note the password for your WordPress login.
When your installation is completed you will see the following page. Click on the login button.

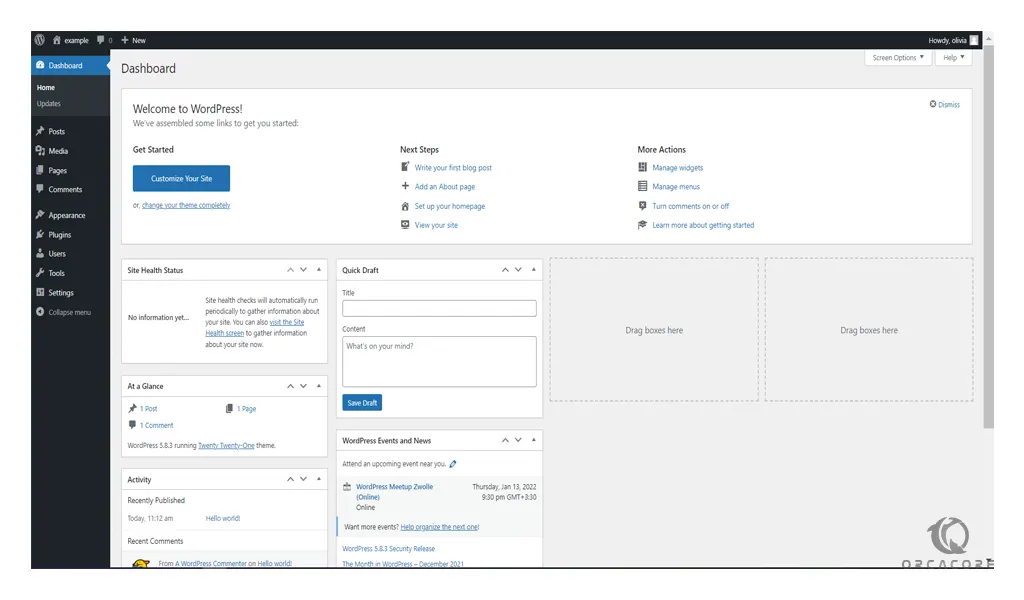
Enter the username and password that you have provided and you will see your WordPress dashboard.
Conclusion
At this point, you learn to set up and configure WordPress on Centos 7. Now you can manage your site and add content to your site.
Hope you enjoy using it.
May you will be interested in these articles too:
Set up WordPress on Debian 11.
How To Set up phpMyAdmin on Centos 7.