Share your love
Best Ubuntu 22.04 ProFTPD Setup Tutorial
This guide will teach you Ubuntu 22.04 ProFTPD Setup. ProFTPD is an open-source File Transfer Protocol (FTP) Server popular among Linux users. It has amazing security features like TLS/SSL encryption and can be integrated with firewalls. Also, it supports multiple authentication methods including standard Unix passwords. You can easily use ProFTPD to transfer your large files securely. To learn the Ubuntu 22.04 ProFTPD Setup Tutorial, follow the guide steps provided by the Orcacore team.
Table of Contents
A Comprehensive Guide For Ubuntu 22.04 ProFTPD Setup
Before you start your Ubuntu 22.04 ProFTPD Setup, you must access your server as a non-root user with sudo privileges and set up a basic firewall. To do this, you can check the Ubuntu 22.04 Initial Server Setup Guide.
Then, follow the steps below to start your Ubuntu 22.04 ProFTPD Setup.
Step 1 – Ubuntu 22.04 ProFTPD Server Installation
First, you must run the system update with the command below:
sudo apt updateThen, run the command below to install ProFTPD:
sudo apt install proftpd -yStep 2 – Start and Enable ProFTPD Service on Ubuntu 22.04
At this point, you must start and enable your ProFTPD service on your server. To do this, you can use the following commands:
# sudo systemctl start proftpd
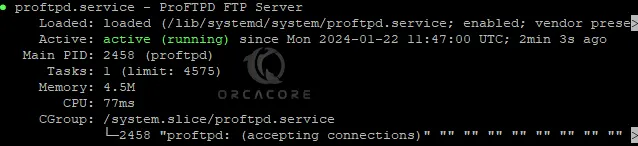
# sudo systemctl enable proftpdThen, verify that ProFTPD is active and running on Ubuntu 22.04:
sudo systemctl status proftpdExample Output:
Step 3 – Allow ProFTPD Traffic Through Ubuntu 22.04 Firewall
Here we assumed that you have enabled the UFW firewall. Now you must allow ProFTPD port through UFW firewall rules. By default, ProFTPD listens on port 21. To verify it, you can run:
sudo ss -antpl | sudo grep proftpdExample Output
LISTEN 0 128 *:21 *:* users:(("proftpd",pid=2458,fd=0))Then, use the command below to allow port 21:
sudo ufw allow 21/tcpReload the firewall to apply the new rules:
sudo ufw reloadNote: To get more information about UFW Firewall Rules, you can check Essential UFW Firewall Commands and Rules with Examples.
Step 4 – Ubuntu 22.04 ProFTPD Server Configuration
At this point, you can start your ProFTPD server configuration. First, you must create a dedicated user for ProFTPD. To do this, you can run the command below:
sudo adduser ftpuser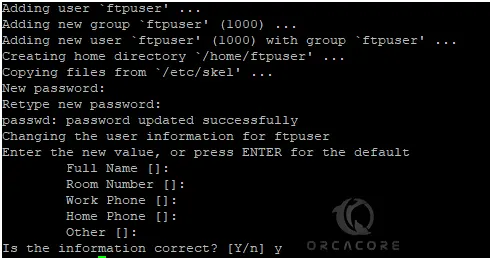
Then, for testing your ProFTPD server in the next step, you can create some test folders. Switch to your ProFTPD user and create some testing files:
# su - ftpuser
# mkdir folder1 folder2
# touch testing1 testing2
Now exit from your ProFTPD user:
exitNext, you need to open the /etc/proftpd/proftpd.conf file with your desired text editor like Vi editor or Nano editor:
sudo vi /etc/proftpd/proftpd.confAt the file, search for the ServerName directive and change it to your server’s hostname.

Also, at the end of the file, add the following content with your ProFTPD user:
<Directory /home/ftpuser>
  Umask 022
  AllowOverwrite off
  <Limit LOGIN>
    AllowUser ftpuser
    DenyAll
  </Limit>
  <Limit ALL>
    AllowUser ftpuser
    DenyAll
  </Limit>
</Directory>
Once you are done, save and close the file.
Next, restart your ProFTPD service to apply the changes:
sudo systemctl restart proftpdNote: To get more configurations, you can visit the official example configurations.
Step 5 – Connect To ProFTPD Server Via Linux Terminal
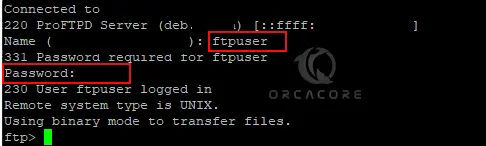
At this point, you can connect your Ubuntu 22.04 ProfTPD server via a Linux terminal. To do this, you can use the following FTP command:
ftp ProFTPD-server’s-IP-addressYou must enter your ProFTPD username and password to access your FTP shell:
Then, you can verify that you have access to your ProFTPD server files by checking the files you have created with the ls command:

As you can see, you have access to your files and folders.
Final Words on ProFTPD Setup Tutorial
By setting up ProFTPD on Ubuntu 22.04 you have a reliable and efficient way to manage file transfers on your network. In this guide, you have learned the installation and basic configuration of ProFTPD. By following the steps above, you’ve learned how to install ProFTPD, configure user access, and connect to your ProFTPD server via a Linux terminal.
Hope you enjoy using it. Also, you may like to read the following articles:
Pritunl VPN Server Setup on Debian 12 – Configure Clients