Share your love
Use Ping Command in Linux with Best 9 Examples

In this guide, we intend to teach you How To Use Ping Command in Linux. Ping is a command-line utility, available on virtually any operating system with network connectivity, that acts as a test to see if a networked device is reachable.
The ping command sends a request over the network to a specific device. A successful ping results in a response from the computer that was pinged back to the originating computer.
The ping command allows you to:
- Test your internet connection.
- Check if a remote machine is online.
- Analyze if there are network issues, such as dropped packages or high latency.
You can now proceed to the guide steps below on the Orcacore website to learn Ping command Examples in Linux.
Table of Contents
Use Ping Command in Linux with Examples
To see how the ping command works, follow the steps below from the Linux commands tutorials.
1. Ping Command Examples General Syntax
The basic syntax of the ping command is followed by a hostname, a name of a website, or the exact IP address.
ping [option] [hostname] or [IP address]For example, ping orcacore.com:
ping orcacore.com
You will get various information such as:
icmp_seq: It is used to show the sequence number of packets sent
TTL: TTL means “time to live“. It is a value on an ICMP packet that prevents that packet from propagating back and forth between hosts ad infinitum.
Time: The ping time, measured in milliseconds, is the round trip time for the packet to reach the host and for the response to return to the sender.
To stop the ping process in Linux, press “Ctrl C”, the command will tell the number of packets it transmitted/received, the number of packets lost, and the time.

Note: If you don’t get a ping reply, then there is no network connectivity between your device and the host server.
2. Check Local Network With Ping Command
At this point, if you get issues reaching a website or a remote machine, you can ping localhost to confirm you have a network connection. To do this, you can use one of the three ways to check the local network interface:
# ping 0
# ping localhost
# ping 127.0.0.1
The results will be the same.

3. Change Interval Time Between Ping Packets
The default interval between each ping request is set to one second. You can increase or decrease that time using the -i switch.
To decrease the ping interval, use values lower than 1. For example:
ping -i 0.5 orcacore.comTo increase the ping interval, enter any value higher than 1 in the Ping command in your Linux server. For example:
ping -i 1.5 orcacore.com4. Change packet Size with Ping Command
At this point, if you want to change the default 56 (84) packet size, you can use the -s option in the ping command. For example:
ping -s 1000 orcacore.com
This command is useful when testing network performance. You can test if a network link throttles when you increase the packet size to a few thousand bytes.
5. Flood the Network with Ping Command
To check the performance of the network under heavy load, the ping command can also be used to flood the network.
sudo ping -f orcacore.comPing flood -f option requires root to execute. Otherwise, apply sudo to your ping command to flood a host. This command sends a large number of packets as soon as possible.
6. Specify the Internet Protocol in the Ping command
To request IPv6 or IPv4 address, add -6 or -4 after the ping command and before a hostname/IP.
# ping -6 hostname/IPv6
# ping -4 hostname/IPv4
7. Limit Number of Packets
The Ping command keeps on sending packets until it is manually stopped. But you can easily set it to a certain number of packets by using the -c option in the ping command.
For example:
ping -c 2 orcacore.com
As you can see in the output, the Ping command stopped sending packets after two requests in Linux.
8. Set a Time Limit for Ping Command
To stop receiving a ping output after a specific amount of time, you can use the -w option in your ping command.
For example, to stop printing ping results after 25 seconds, run the command below:
ping -w 25 orcacore.com
9. Get an Audible Ping
An audible ping is useful when you are troubleshooting network issues and do not want to look at the screen until there is a response.
When you use the -a switch, the system plays a sound when there is a response from a host. For example, get an audible Ping with the command below:
ping -a google.comThe output looks the same as a regular ping command output.
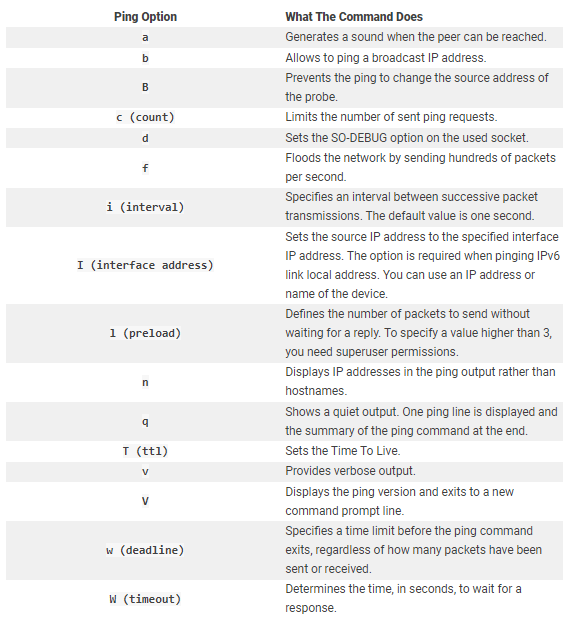
The following image shows the common options used for the ping command.
Conclusion
At this point, you learn to Use Ping Command In Linux with Examples. The ping command in Linux is used to check the connectivity between a local machine and a remote host by sending ICMP echo requests. It helps in diagnosing network issues by measuring response time and packet loss.
Hope you enjoy it. Please subscribe to us on Facebook, YouTube, and Twitter.
You may also like these articles:
Monitor Linux Network Bandwidth Usage with nload Command