Share your love
Use Let’s Encrypt Private Network SSL with Cloudflare
As you must know, securing websites and services on a private network can be challenging, especially when your server isn’t accessible directly from the internet. In this guide, you will learn how to use Let’s Encrypt Private Network SSL with Cloudflare.
You can now proceed to the guide steps below on the Orcacore website to Get Free HTTPS Certificates on a Private Network Using Cloudflare.
Table of Contents
Why Use Let’s Encrypt on a Private Network?
Let’s Encrypt is a free and trusted Certificate Authority (CA) that provides SSL/TLS certificates to secure websites with HTTPS. Normal HTTP validation on a private network won’t work because the server isn’t reachable publicly. For this purpose, you can use Cloudflare DNS, which allows domain validation through DNS records instead of direct connections..
How To Use Let’s Encrypt Private Network SSL with Cloudflare?
Before you start to get free HTTPS Certificates on a private network using Cloudflare, you need to be sure to have the following requirements:
- A valid domain name managed by Cloudflare
- A server on your private network with command-line (shell) access
- Certbot and the Cloudflare DNS plugin installed (If you don’t have them, we will show you the installation steps in the guide).
Now, follow the steps below to create a Cloudflare API token.
Step 1. Create a Cloudflare API Token
First, log in to your Cloudflare dashboard and navigate to this path: Zones > Select website. Then, select API > Get your API token.
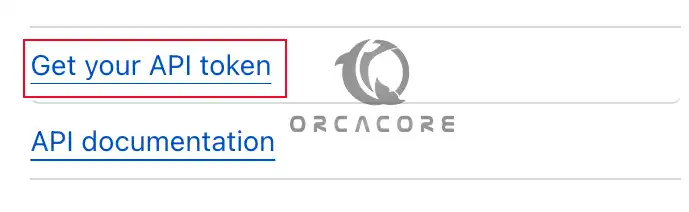
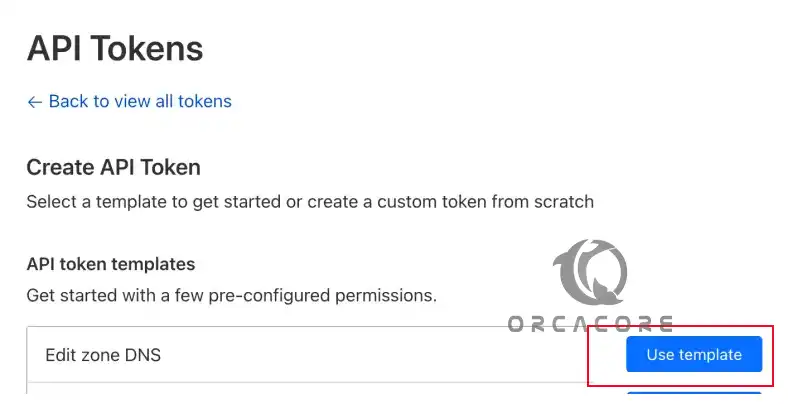
From API Tokens, click on Create Token.

Under API Token Templates, use Edit zone DNS Template.
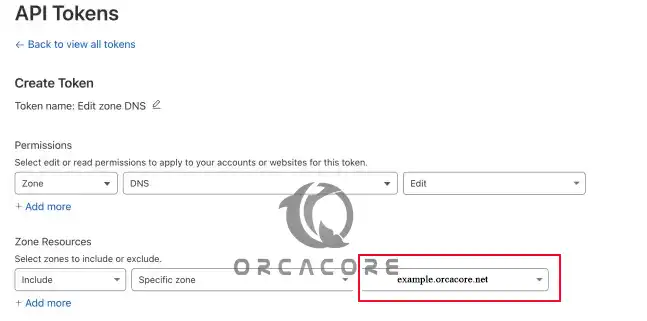
From there, keep Permissions by default, and for Zone Resources, select the specific domain you’ll use.
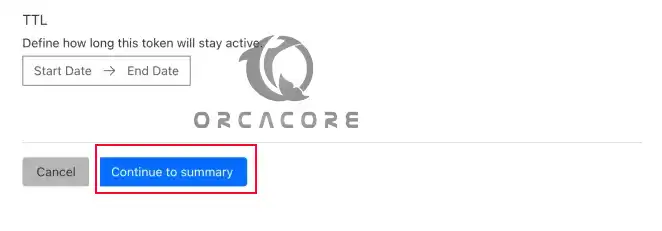
Click Continue to summary.
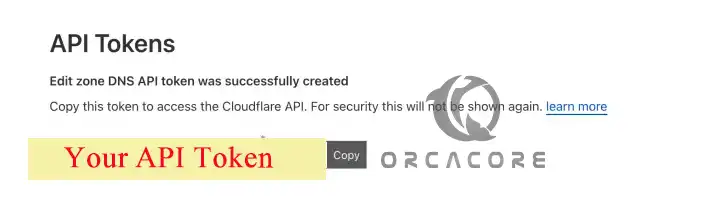
At this point, click on Create Token to finish the API token setup.

Finally, you will get your Cloudflare API Token. Copy and save your token in a secure place.
Step 2. Install Certbot with the Cloudflare Plugin
At this point, you must install Certbot for generating SSL certificates and Cloudflare plugins on your server.
If you are running an Ubuntu or Debian-based server, you can use the following command to install certbot and Cloudflare plugins:
# sudo apt update
# sudo apt install certbot python3-certbot-dns-cloudflare python3-pip -y
If you are running CentOS, Fedora, or any RHEL-based server, you can use the following commands:
# sudo dnf install epel-release -y
# sudo dnf install certbot python3-certbot-dns-cloudflare python3-pip -y
Also, it is recommended to upgrade Python SSL libraries by using the command below:
sudo python3 -m pip install -U pyOpenSSL cryptographyStep 3. Store the Cloudflare Credentials
In this step, you need to create a directory where you can store your Cloudflare certbot credentials. Create the directory by using the command below:
sudo mkdir -p ~/.secrets/certbotThen, create a file inside the directory by using your desired text editor, like Vi Editor or Nano Editor:
sudo vi ~/.secrets/certbot/cloudflare.iniAdd the following line to the file with your Cloudflare API Token you have created:
dns_cloudflare_api_token = YOUR_TOKEN_HEREOnce you are done, save and close the file.
Next, set the correct permission for your file with the following command:
sudo chmod 0600 ~/.secrets/certbot/cloudflare.iniNote: In old installations of certbot, you may need an email address defined. On newer versions, you only define the dns Cloudflare API Token.
dns_cloudflare_api_key = your-token
dns_cloudflare_email = cloudflare-email-address
Step 4. Get Free HTTPS Certificates on a Private Network
At this point, you can easily request your Let’s Encrypt Private Network Certificate by running the following certbot command. Replace your email and domain name.
sudo certbot certonly \
  --dns-cloudflare \
  --dns-cloudflare-credentials ~/.secrets/certbot/cloudflare.ini \
  -m admin@example.orcacore.net \
  --agree-tos \
  -d example.orcacore.net
This uses DNS-based validation through Cloudflare and is perfect for Let’s Encrypt private network setups. The SSL certificate will be stored in:
/etc/letsencrypt/live/example.orcacore.net/Automate SSL Renewal
At this point, you can define a Cron job for automatic SSL renewal. You can open a new cron job with the command below:
sudo crontab -eAdd the following line to the file:
15 3 * * * /usr/bin/certbot renew --quietOnce you are done, save and close the file.
Note: If you are using the Nginx web server, you can use a hook to restart Nginx:
15 3 * * * /usr/bin/certbot renew --quiet --renew-hook "systemctl restart nginx"For Apache web server on Debian-based servers, you can use:
15 3 * * * /usr/bin/certbot renew --quiet --renew-hook "systemctl restart apache2"And for Apache web server on RHEL-based servers, you can use:
15 3 * * * /usr/bin/certbot renew --quiet --renew-hook "systemctl restart httpd"This ensures your Let’s Encrypt private network SSL certificate renews automatically.
FAQs
What is Let’s Encrypt private network SSL?
Let’s Encrypt private network SSL refers to using Let’s Encrypt certificates to secure websites or services that run on internal or private IP addresses, such as intranet apps, home servers, or lab environments.
Can I use Let’s Encrypt without a public IP?
Yes. By using the DNS-01 challenge through Cloudflare or another DNS provider, you can validate domain ownership without exposing your server to the internet.
Is the Let’s Encrypt private network setup secure?
Yes. Let’s Encrypt private network, combined with Cloudflare API tokens and strict permissions, it’s a secure solution.
Conclusion
By using Let’s Encrypt with Cloudflare DNS, you can secure applications on a private network just like public websites. Also, with automated renewal, your HTTPS connection stays safe without manual work. Hope you enjoy using this guide.
Please subscribe to us on Facebook, YouTube, and X.
You may also like to read the following articles:
Secure Nginx with Let’s Encrypt on Debian 12