Share your love
How To Change RDP Port on Windows

In this guide, we want to teach you How To Change RDP Port on Windows.
Remote Desktop Protocol (RDP) is a Microsoft proprietary protocol that enables remote connections to other computers, typically over TCP port 3389. It provides network access for a remote user over an encrypted channel. Network administrators use RDP to diagnose issues, log in to servers, and perform other remote actions. Remote users use RDP to log into the organization’s network to access email and files.
For security reasons, some systems’ firewalls block incoming and outgoing messages to and from port 3389. Administrators change the RDP port number to work around firewalls.
Steps To Change the Listening Port of RDP on Windows
Now that you know why you should change the remote desktop port number, let’s see how you can change it on your Windows client and Windows Server system.
In this guide, we will show you how to change the RDP Port in two ways:
- Using Windows Registry
- Through the PowerShell
Changing RDP Port Number Using Windows Registry
First, you need to press the Win+R key to open the Run dialog box. Type Regedit to open the registry editor.
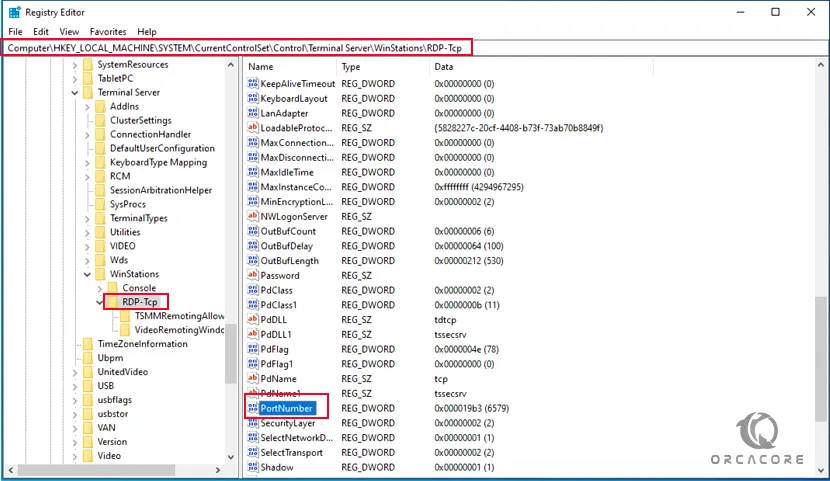
Then, navigate to the following path:
HKEY_LOCAL_MACHINE\System\CurrentControlSet\Control\Terminal Server\WinStations\RDP-TcpFrom there look for the Port Number.

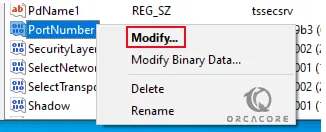
Then, right-click on the port number and select Modify.

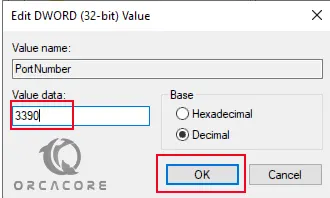
From there, enter your desired port number and click OK.

Next, close the registry editor. And Restart your Windows system.
Then, check if you can connect to the remote computer.
Important Note: If your remote system is using a firewall, make sure to configure it to allow connections to the new port number.
Changing RDP Port Number Using PowerShell
Another way that you can change your RDP port, is to use PowerShell.
First, open your PowerShell terminal, and run the command below to check the current port being used:
Get-ItemProperty -Path 'HKLM:\SYSTEM\CurrentControlSet\Control\Terminal Server\WinStations\RDP-Tcp' -name "PortNumber"
Output
PortNumber   : 3389
PSPath       : Microsoft.PowerShell.Core\Registry::HKEY_LOCAL_MACHINE\SYSTEM\CurrentControlSet\Control\Terminal
               Server\WinStations\RDP-Tcp
PSParentPath : Microsoft.PowerShell.Core\Registry::HKEY_LOCAL_MACHINE\SYSTEM\CurrentControlSet\Control\Terminal
               Server\WinStations
PSChildName  : RDP-Tcp
PSDrive      : HKLM
PSProvider   : Microsoft.PowerShell.Core\Registry
As you can see, the default RDP port number is 3389.
You can use the following commands to change the port to your desired number. Here we change it to 3390:
$ portvalue = 3390
Commands:
# Set-ItemProperty -Path 'HKLM:\SYSTEM\CurrentControlSet\Control\Terminal Server\WinStations\RDP-Tcp' -name "PortNumber" -Value $portvalue
# New-NetFirewallRule -DisplayName 'RDPPORTLatest-TCP-In' -Profile 'Public' -Direction Inbound -Action Allow -Protocol TCP -LocalPort $portvalue
# New-NetFirewallRule -DisplayName 'RDPPORTLatest-UDP-In' -Profile 'Public' -Direction Inbound -Action Allow -Protocol UDP -LocalPort $portvalue
To verify it, you can use the command below again to check the current RDP port number:
Get-ItemProperty -Path 'HKLM:\SYSTEM\CurrentControlSet\Control\Terminal Server\WinStations\RDP-Tcp' -name "PortNumber"Output
PortNumber : 3390
PSPath : Microsoft.PowerShell.Core\Registry::HKEY_LOCAL_MACHINE\SYSTEM\CurrentControlSet\Control\Terminal
Server\WinStations\RDP-Tcp
PSParentPath : Microsoft.PowerShell.Core\Registry::HKEY_LOCAL_MACHINE\SYSTEM\CurrentControlSet\Control\Terminal
Server\WinStations
PSChildName : RDP-Tcp
PSDrive : HKLM
PSProvider : Microsoft.PowerShell.Core\RegistryThat’s it, you can choose either of the two methods to change the remote desktop port number on Windows.
Conclusion
At this point, you have learned to Change the RDP Port Number on Windows to make it difficult for hackers to take over remote devices.
Hope you enjoy it.
You may be interested in these articles:
How To Connect Remotely on Windows
Remote Windows via iPhone Device


