Share your love
Check and Monitor CPU Temperature on Windows 10/11 with Best Methods

This tutorial intends to show you how to Check and Monitor CPU Temperature on Windows. CPU temp is the temperature of a technological device’s central processing unit. These processors are arguably the most important parts of any device because they process requests and information so the device works properly.
CPU temps can run high if the processor is being used over a long period of time or for multiple high-maintenance tasks. If a CPU’s temperature is too high for too long, the processor can overheat which could lead to slower processing or system failure. It is important to be aware of the CPU temp in order to keep a computer running at its best.
Now follow the steps below on the Orcacore website to learn how to do a Windows CPU TEMP monitor.
Table of Contents
Steps To Check and Monitor CPU Temperature on Windows
To complete the Windows CPU TEMP monitor, you can log in to your Windows Client and follow the steps below.
You can use one of the following methods to check and monitor your CPU Temp:
- Use Core Temp Tool
- Use Windows’ built-in BIOS/UEFI Tool
Method 1. Check CPU Temperature with Core Temp
Core Temp is a compact, no-fuss, small footprint, yet powerful program to monitor processor temperature and other vital information.
What makes Core Temp unique is the way it works. It is capable of displaying the temperature of each individual core of every processor in your system.
First, you need to download and install the Core Temp from the Official Page.

When your download is completed, open your application.
Look for the Temperature Readings. From there, you can monitor the temps for each CPU core.

In the Load column, you can see the current CPU load of each core. In the Max column, you can monitor the highest processor temperatures.
Windows CPU TEMP Monitor with Core Temp
Core Temp offers an easy way to monitor your CPU temperature at all times, across multiple cores. By default, the information stays hidden, but you can make the CPU temperature monitor visible. To do this, follow the steps below:
First, from the notification area of your taskbar click the arrow. You will see four numbers that are the four core temperatures.
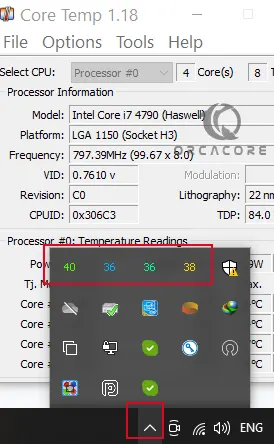
Click each number and drag it to your taskbar. Now, the processor temperatures are pinned to your taskbar, allowing you to monitor them constantly.
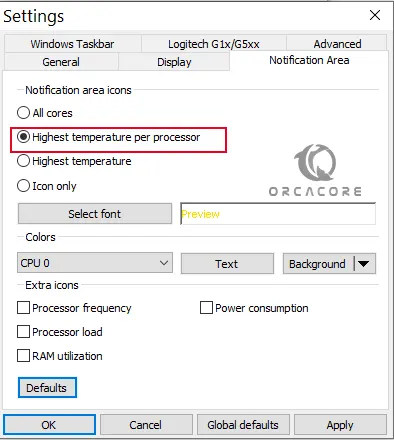
Also, you can display only the highest temperature of any of the cores. Within the Core Temp app, click Options > Settings and navigate to the Notification Area. Switch the view to the Highest temperature per processor.
Method 2. Check CPU Temp with Windows’ built-in BIOS/UEFI
If you’re running Windows 11, Windows 10, or an earlier version, it includes its own temperature check built into the BIOS/UEFI.
To access it, turn on your PC and press a specific key during startup — usually F12, ESC, F2, or DEL.
Once BIOS/UEFI is open, it shows you the CPU temperature right on the main screen.
This thermometer feature is part of the core software of your motherboard.
It only allows you to check the current temperature of the PC. It does nothing to monitor the temperature over time as you use Windows, particularly when your PC or laptop is busy with heavy loads.
How To Reduce CPU Temperature?
If your CPU temp is too high, you can do the following tips to slow down your CPU temp:
- Vacuum your PC: Clean out your CPU fans.
- Use a laptop stand
- Keep your environment cool
- Replace your cooling fan
- Keep it malware-free
- Turn off background applications and close programs
Conclusion
At this point, you have learned to Check and Monitor CPU Temperature (CPU Temp) on Windows.
Hope you enjoy it. You may also interested in these articles:
How To Check RAM Capacity on Windows