Share your love
Create RAM Disk on Linux Command Line Terminal: Comprehensive Guide
In this guide on the Orcacore website, you will learn to Create RAM Disk on Linux Command Line Terminal. Now let’s see what is the purpose of a RAM disk and why you should use a RAM disk on Linux.
Purpose of Using a RAM Disk on Linux:
As you may know, a RAM Disk is also known as a RAM drive. It is a section of the RAM that is formatted with a file system. So you can mount the RAM disk to a Linux directory and start using it as a disk partition. Also, it is super fast and can keep countless reads and writes. You can use it for temporary data or caching directories. Also, you can use it to run virtual machines inside VirtualBox.
Now proceed to the following steps to Create RAM Disk on Linux Command Line Terminal.
Table of Contents
Simply Create RAM Disk on Linux Command Line Terminal
At this point, you can use this instruction on any Linux distribution such as AlmaLinux, Fedora, Debian, Ubuntu, etc. You just need to have access to your Linux server as a non-root user with sudo privileges. Then, follow the steps below to Create RAM Disk on Linux Command Line Terminale.
Step 1 – Creating a Directory for RAM Disk on Linux
First of all, you must create a RAM disk directory in your Linux system. You can create it anywhere you want. For example, we create our directory under the /tmp directory:
sudo mkdir /tmp/ramdiskThen, you can set the permissions for this directory so that any user in your Linux distro can use the RAM Disk. To do this, you can run the following command:
sudo chmod 777 /tmp/ramdiskStep 2 – Check the Free RAM with htop on the Linux Terminal
At this point, you can check how much free RAM space is on your Linux system. You can do this by using the htop command line utility. To install htop utility, you can run the following command:
On Debian-based distros, you can run:
sudo apt install htop -yOn RHEL-based distros, you can run:
sudo dnf install htop -yThen, run the htop utility from the Linux terminal command line:
sudo htop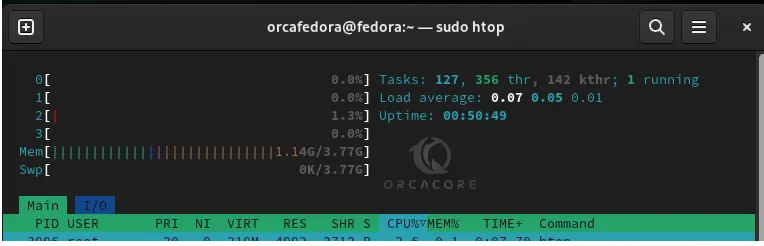
As you can see from the output, we have enough RAM space. Also, we don’t need to use too much RAM.
Step 3 – Mount the RAM Disk on Linux Terminal
Now we can easily allocate 1GB for our RAM Disk. Or you can choose your desired RAM space. To do this, you can use the following command and specify a device name for it in your RAM disk directory:
sudo mount -t tmpfs -o size=1024m myramdisk /tmp/ramdiskThen, you can verify your mounted RAM Disk file with the following Linux command:
mount | tail -n 1In your output, you will see:

Now if you copy your files into your RAM disk, and check your RAM space with the htop utility your RAM space usage will go up. Then, if you unmount the RAM disk, everything will back to the original usage:
sudo umount /tmp/ramdisk/With this option, you can easily test whether your RAM disk is working correctly or not on your Linux system.
Step 4 – Automatically Mount the RAM Disk on the Linux System Boot
If you want to automatically mount the RAM disk when your computer boots up, you need to open the /etc/fstab file and add some contents to it. You can open the file with your desired text editor like vi editor or nano editor:
sudo vi /etc/fstabAdd the following content to your values to the file:
myramdisk /tmp/ramdisk tmpfs defaults,size=1G,x-gvfs-show 0 0When you are done, save and close the file. This will automatically mount your RAM disk on the system boot.
To mount it immediately without reboot, you can run the following command:
sudo mount -aConclusion
At this point, you have learned to Create RAM Disk on Linux Command Line Terminal, Mount your RAM disk, and auto-mount it on your system. From there, you can easily define your directories to the RAM Disk to free up your RAM usage.
Hope you enjoy it. Also, you may like to read: