Share your love
Step-by-Step Guide For Installing GitLab on Rocky Linux 9

In this article, you will a comprehensive guide for Installing GitLab on Rocky Linux 9. GitLab Community Edition is the open-source version of GitLab. It is a web-based DevOps lifecycle tool that provides a Git repository manager, wiki, issue-tracking, and CI/CD pipeline features. GitLab Community Edition is freely available for anyone to download, install, and use. Now you can follow the steps below to install and configure GitLab CE on Rocky Linux 9.
- A Comprehensive Guide For Installing GitLab on Rocky Linux 9
- Step 1 - Dependencies For GitLab Installation
- Step 2 - Installing GitLab on Rocky Linux 9
- Step 3 - Configure GitLab CE on Rocky Linux 9
- Step 4 - Configure Firewall Rules For GitLab on Rocky Linux 9
- Step 5 - Access GitLab Community Edition Web UI
- Step 6 - Configure Let’s Encrypt Certificates for GitLab
A Comprehensive Guide For Installing GitLab on Rocky Linux 9
Before starting Installing GitLab on Rocky Linux 9, you must access your server as a non-root user with sudo privileges and set up a basic firewall. For this purpose, you can check the Rocky Linux 9 Initial Setup Guide.
Also, you need a domain name that is pointed to your server’s IP address.
Then, follow these steps for Installing GitLab on Rocky Linux 9.
Step 1 – Dependencies For GitLab Installation
First, you must run the system update with the command below:
sudo dnf update -yThen, you need to install the required packages and dependencies for GitLab installation on Rocky Linux 9:
sudo dnf install curl vi policycoreutils python3-policycoreutils git libxcrypt-compat -yStep 2 – Installing GitLab on Rocky Linux 9
At this point, you must add the GitLab community edition repository to your server. To do this, you need to create a repo file for GitLab with your desired text editor like Vi editor or Nano editor:
sudo vi /etc/yum.repos.d/gitlab_gitlab-ce.repoAdd the following content to the file:
[gitlab_gitlab-ce]
name=gitlab_gitlab-ce
baseurl=https://packages.gitlab.com/gitlab/gitlab-ce/el/9/$basearch
repo_gpgcheck=1
gpgcheck=1
enabled=1
gpgkey=https://packages.gitlab.com/gitlab/gitlab-ce/gpgkey
       https://packages.gitlab.com/gitlab/gitlab-ce/gpgkey/gitlab-gitlab-ce-3D645A26AB9FBD22.pub.gpg
sslverify=1
sslcacert=/etc/pki/tls/certs/ca-bundle.crt
metadata_expire=300

[gitlab_gitlab-ce-source]
name=gitlab_gitlab-ce-source
baseurl=https://packages.gitlab.com/gitlab/gitlab-ce/el/9/SRPMS
repo_gpgcheck=1
gpgcheck=1
enabled=1
gpgkey=https://packages.gitlab.com/gitlab/gitlab-ce/gpgkey
       https://packages.gitlab.com/gitlab/gitlab-ce/gpgkey/gitlab-gitlab-ce-3D645A26AB9FBD22.pub.gpg
sslverify=1
sslcacert=/etc/pki/tls/certs/ca-bundle.crt
metadata_expire=300
Once you are done, save and close the file.
Then, make sure your GitLab repo has been successfully added to your Rocky Linux 9:
dnf repolist
Finally, use the command below to install GitLab CE on your server:
sudo dnf install gitlab-ce -yStep 3 – Configure GitLab CE on Rocky Linux 9
At this point, you must open the GitLab config file with the following command:
sudo vi /etc/gitlab/gitlab.rbFind the external_url configuration line and update it to your domain and make sure to change http to https to automatically redirect users to the site protected by the Let’s Encrypt certificate.
…
external_url 'https://your_domain'
…
Also, find the line below and uncomment it by removing the “#” and setting your email address:
…
letsencrypt['contact_emails'] = ['olivia@orcacore.com']
…
When you are done, save and close the file.
Now use the command below to reconfigure GitLab on Rocky Linux 9:
sudo gitlab-ctl reconfigureThis will initialize GitLab using the information it can find about your server. The process will also configure a Let’s Encrypt certificate for your domain. It may some time to complete.
When you are done, you will get the following output:
Output
gitlab Reconfigured!
Step 4 – Configure Firewall Rules For GitLab on Rocky Linux 9
At this point, you need to allow the HTTP/HTTPS and SSH services through the Rocky Linux firewall. To do this, you can run the command below:
sudo firewall-cmd --permanent --add-service={ssh,http,https} --permanentReload the firewall to apply the new rules:
sudo firewall-cmd --reloadStep 5 – Access GitLab Community Edition Web UI
At this point, you can continue Installing GitLab on Rocky Linux 9 via the web interface. To do this, type your domain name in your web browser as shown below:
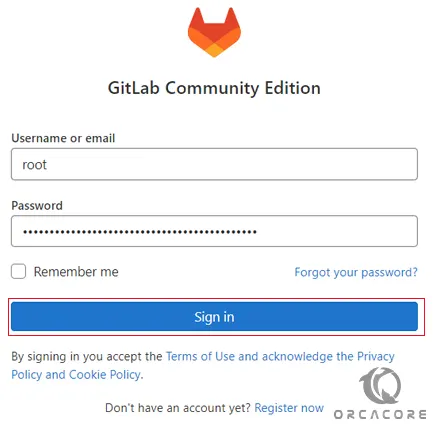
https://your_domainYou will see the GitLab Community Edition Login page.
Note: GitLab generates an initial secure password for you. It is stored in a folder that you can access as an administrative sudo user:
sudo cat /etc/gitlab/initial_root_passwordYou should see something similar to this:
Password: ak5aGVoaYqliXAtd8r5fyCMMZszfeAwm7xeix4tBkIU=Now from your GitLab login page enter root as the username and your initial password as your password and click Sign in.

You will see your GitLab CE dashboard on Rocky Linux 9.

From here you can update your password, adjust your profile settings, change your account name, add an SSH key to your account, etc.
Step 6 – Configure Let’s Encrypt Certificates for GitLab
By default, GitLab has a scheduled task set up to renew Let’s Encrypt certificates after midnight every fourth day, with the exact minute based on your external_url.
You can change these settings by modifying the GitLab configuration file:
sudo vi /etc/gitlab/gitlab.rbThen, find the following lines in the file, remove the #, and update it with the following:
letsencrypt['auto_renew'] = true
letsencrypt['auto_renew_hour'] = "12"
letsencrypt['auto_renew_minute'] = "30"
letsencrypt['auto_renew_day_of_month'] = "*/7"
…
This will renew your certificates every 7th day at 12:30. You can change it to your desired date.
Also, you can disable auto-renewal by setting the letsencrypt[‘auto_renew’] to false:
…
letsencrypt['auto_renew'] = false
…
When you are done, save and close the file.
For more information, you can visit the official website docs.
Conclusion
By following the guide steps, you can simply learn a comprehensive guide for Installing GitLab on Rocky Linux 9 and access your Web UI dashboard. GitLab allows teams to collaborate on code, track issues, and automate software development processes. Hope you enjoy it.
Also, you may like to read the following articles:
Reset MySQL Root Password on AlmaLinux / Rocky Linux
CheckMK Setup Guide For AlmaLinux 9 / Rocky Linux 9


