Share your love
Nagios Core Installation on Debian 12 Bookworm – Best Steps

In this guide, we want to teach you to Nagios Core Installation on Debian 12 Bookworm. As described on the official site, Nagios Core is an open-source network monitoring tool designed for Linux distributions. It is simple, fast, and easy-to-use software and has amazing features.
You can follow this guide from the Orcacore website to install Nagios or Nagios Core on Debian 12 and access it through the web interface.
Table of Contents
Steps To Nagios Core Installation on Debian 12 Bookworm
To start Nagios Core Installation on Debian 12 Bookworm, you must have access to your server as a non-root user with sudo privileges and set up a basic firewall. For this purpose, you can visit this guide on Initial Server Setup with Debian 12 Bookworm.
Step 1 – Download Nagios Latest Version on Debian 12
First, you must run the system update with the following command:
sudo apt updateThen, use the following command to install the required packages and dependencies:
sudo apt install wget curl build-essential unzip openssl libssl-dev apache2 php libapache2-mod-php php-gd libgd-devAt this point, you must visit the Nagios Downloads page and get the latest release by using the following commands:
# NAGIOS_VER=$(curl -s https://api.github.com/repos/NagiosEnterprises/nagioscore/releases/latest|grep tag_name | cut -d '"' -f 4)
# wget https://github.com/NagiosEnterprises/nagioscore/releases/download/$NAGIOS_VER/$NAGIOS_VER.tar.gz
Extract your downloaded file with the command below:
sudo tar xvzf $NAGIOS_VER.tar.gzStep 2 – Compile and Install Nagios Core on Debian 12
Now you should compile your extracted file. Switch to your Nagios directory with the following command:
sudo cd $NAGIOS_VERBegin the compile process and Nagios Core Installation on Debian 12 Bookworm by running the command below:
sudo ./configure --with-httpd-conf=/etc/apache2/sites-enabledWhen you are done, you will get the following output:
Output
...
Review the options above for accuracy. If they look okay,
type 'make all' to compile the main program and CGIs.
Now you need to create a user and group. And the www-data user is also added to the “nagios” group with the commands below:
sudo make install-groups-users Output
groupadd -r nagios
useradd -g nagios nagiossudo usermod -a -G nagios www-dataNow compile the main Nagios program and associated packages with the following command:
sudo make allThen, install the main program, CGIs, and HTML files:
sudo make installNext, install Nagios daemon files and also configure them to start when the system boots:
sudo make install-daemoninitOutput
*** Init script installed ***After that, add the command mode that installs and configures the external command file:
sudo make install-commandmodeOutput
*** External command directory configured ***Here you should install the SAMPLE configuration files required as Nagios needs some configuration files to allow it to start on Debian 12:
sudo make install-configOutput
*** Config files installed ***At this point, you need to configure your Apache to serve Nagios web pages. Nagios developers made it easier to set up Apache. You simply run one command to set up configuration files and then enable specific Apache modules.
Install config files with:
sudo make install-webconfOutput
*** Nagios/Apache conf file installed ***
Enable Apache rewrite and CGI modules with:
sudo a2enmod rewrite cgiStep 3- Set up Apache Authentication For Nagios Core on Debian 12
In this step of Nagios Core Installation on Debian 12 Bookworm, to create Nagios Web authentication, you need to create a web user for authentication. The “htpasswd” command rises to the occasion for this task. Please note that Nagios uses the “nagiosadmin” user by default. Run the command below and input your favorable password:
sudo htpasswd -c /usr/local/nagios/etc/htpasswd.users nagiosadminOutput
New password:
Re-type new password:
Adding password for user nagiosadminWhen you are done, set the correct permissions to the (/usr/local/nagios/etc/htpasswd.users) file with the following commands:
# sudo chown www-data:www-data /usr/local/nagios/etc/htpasswd.users
# sudo chmod 640 /usr/local/nagios/etc/htpasswd.users
Step 4 – Nagios Plugins Installation on Debian 12
Before you can access to your Nagios web interface, you need Nagios Plugins that will help you accomplish a lot of stuff including monitoring the local host. You can find the plugins at Nagios Plugins.
Now follow the steps below to install the latest plugins. First, switch to your home directory:
cd ~Then, run the following commands to download the Nagios plugins and extract them on Debian 12:
# VER=$(curl -s https://api.github.com/repos/nagios-plugins/nagios-plugins/releases/latest|grep tag_name | cut -d '"' -f 4|sed 's/release-//')

# wget https://github.com/nagios-plugins/nagios-plugins/releases/download/release-$VER/nagios-plugins-$VER.tar.gz

# tar xvf nagios-plugins-$VER.tar.gz
Next, navigate into the new plugins folder then compile and install it:
# cd nagios-plugins-$VER
# ./configure --with-nagios-user=nagios --with-nagios-group=nagios
# sudo make
# sudo make install
Step 5 – Configure Firewall for Nagios Core
If you have a running UFW firewall, you must allow port 80 through it with the command below:
sudo ufw allow 80 Then, reload the firewall to apply the changes:
sudo ufw reloadFinally, start the Nagios and Apache services on Debian 12 with the commands below:
# sudo systemctl restart apache2
# sudo systemctl start nagios.service
Step 6 – Access Nagios Core Dashboard via Web Interface
At this step of Nagios Core Installation on Debian 12 Bookworm, you can access your Nagios web interface by typing your server’s IP address in your web browser followed by nagios:
http://<IP Address>/nagiosYou will be prompted for a username and password. The username as you may remember is the one we set in the previous steps, that is “nagiosadmin“. Provide credentials and click sign in.

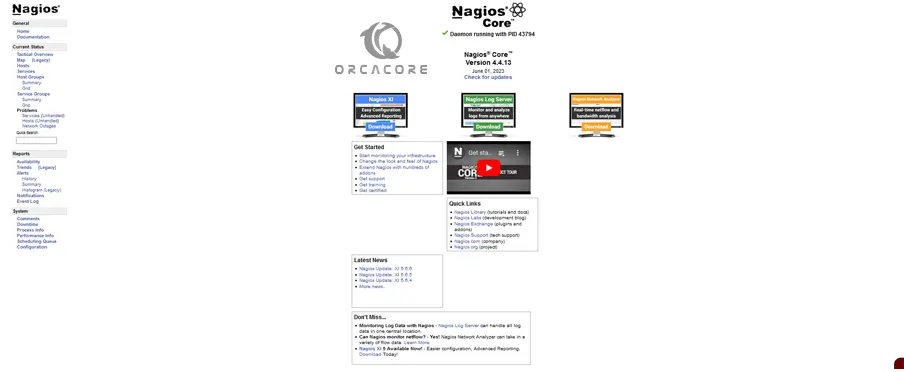
Now you will see your Nagios dashboard:
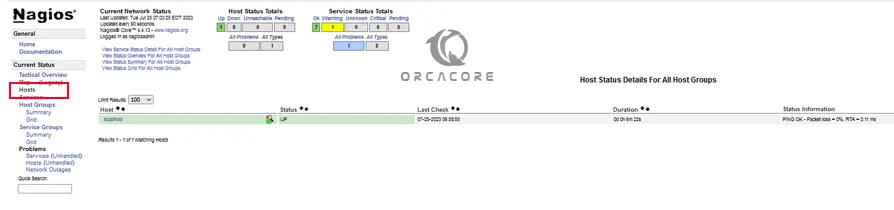
If you click on the “Hosts” link, you should see that the localhost is up and hence being monitored thanks to the plugins we installed earlier.
Conclusion
At this point, you have finished the Nagios Core Installation on Debian 12 Bookworm and also installed Nagios plugins, and accessed the Nagios dashboard through a Web interface.
Hope you enjoy it. You may also like the following articles:
Install Netdata Monitoring Tool on Debian 12
Install OpenNMS on Debian 12 Bookworm