Share your love
Make Template in Virtualizor: Easy Tutorial step by step
In this tutorial, we want to clarify how we can make a new template in Virtualizor based on a VPS created before in Virtualizor. If you want to know more about creating a VPS in Virtualizor, You can read our post about Creating a new VPS on Virtualizor.
Table of Contents
How to create a Template from VPS in Virtualizor Panel?
In Virtualizor, we can create a VPS and customize it by changing some settings. Then we can convert it to a template. With this template, we can create many VPS. Please login to your Virtualizor panel by entering ServerIP:4085 on a browser and completing login credentials. Then, please follow the below steps to learn how to create a template from a VPS.
Step 1 – Create a new VPS
First, you should create a VPS with your iso file that was uploaded before, Or you can use pre-downloaded templates. Then Try to log in and make the changes you want.
You can edit network settings, add any firewall rules, etc. After all of them are complete, try to shut down the VPS from inside the OS.
Step 2 – Where is the Template menu?
In this section, Navigate to the “Media >> Create Template” menu from the left panel to see the below page.
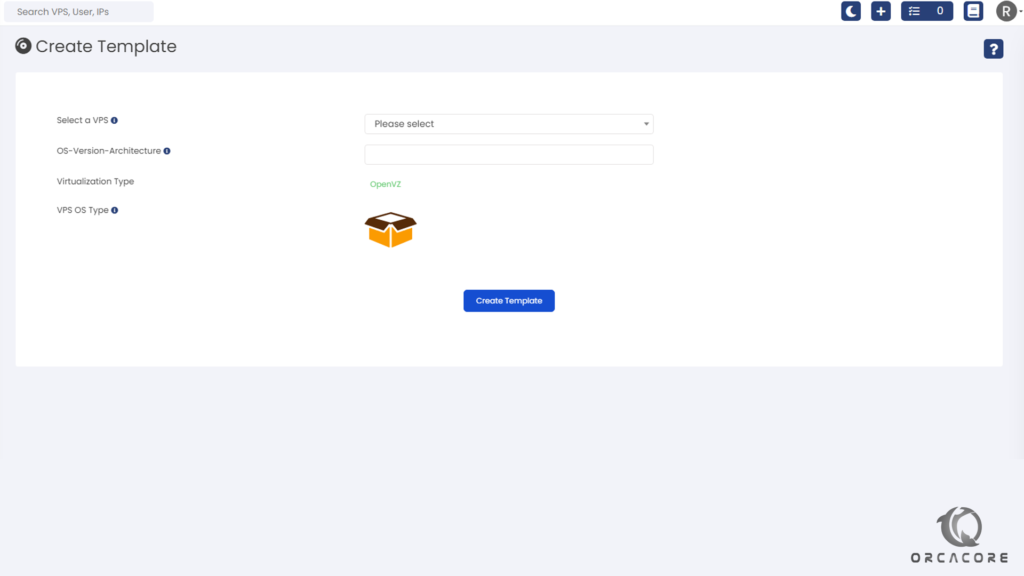
This is the main page, you can see some options and fields. The fields can be changed based on the VPS type you select. Therefore, we will discuss items in the next step.
Step 3 – How to create a new Template in Virtualizor?
Now that, Select a VPS from the first drop-down list. Some options will be added and you can see the below image.
Then, Enter a name for this template in the OS-Version-Architecture field. The two next items show the details about the selected VPS. Virtualization Type and VPS OS Type are these 2 items.
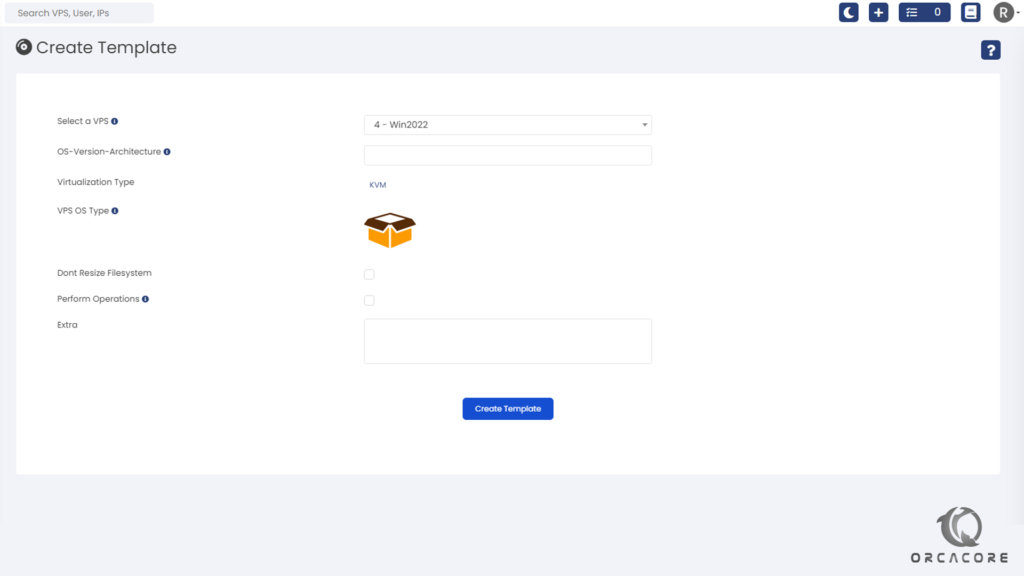
In the creating templates steps in Virtualizor, Virtulizor compares any files and drives on the VPS. You can enable Dont Resize Filesystem, then Virtualizor never makes any changes to the file system.
Then, enable Perform Operations to change network settings and root password after the VPS is installed. In the Extra text box, You can enter some extra descriptions about this template.
At the end, Click on “Create Template” to process the request.
Conclusion
In this article, we found out how to create a Template in Virtualizor from existing VPS. Items and all details are defined by details. Please don’t hesitate to contact us by commenting on this post if you have any questions.
Also, You may be interested in other tutorials about Virtualizor, you can follow the Links.