Share your love
Upgrading from Ubuntu 22.04 to Ubuntu 24.04: Full & Easy Steps
In this guide, we want to show you the process of Upgrading from Ubuntu 22.04 to Ubuntu 24.04 Noble Numbat. As you may know, Ubuntu 22.04 is the latest LTS version which was released on 25th April 2024. This version will supported for five years until June 2029. It has a Gnome 46 desktop environment and many more improved default applications.
Also, you read more on Ubuntu 24.04 Noble Numbat Future LTS Release.
Here we try to provide a step-by-step guide for upgrading from Ubuntu 22.04 to Ubuntu 24.04 by using the command line terminal.
Note: Ubuntu 23.10 offers an automatic upgrade to version 24.04. But Ubuntu 22.04 will only receive the automatic upgrade offer once 24.04.1 LTS becomes available, which is scheduled for August 15. However, you can still do the upgrade process by following the steps below on the Orcacore website.
Table of Contents
Level Up your Ubuntu: Upgrading from Ubuntu 22.04 to Ubuntu 24.04 Noble Numbat
Before you start to upgrade from Ubuntu 22.04 To 24, you need to log in to your Ubuntu 22.04 as a non-root user with sudo privileges and set up a basic firewall. You can check the Ubuntu 22.04 Initial Setup Guide for this purpose.
Then, follow the steps below for upgrading from Ubuntu 22.04 to Ubuntu 24.04.
Step 1 – Backup Ubuntu 22.04 System
Before doing anything, it is strongly recommended to back up everything because you may face issues during the upgrading process. For this purpose, you can use different backup tools such as restic backup and restore data tools.
Once you are done, proceed to the next step.
Step 2 – Update Ubuntu 22.04 System For Upgrading Process To Ubuntu 24.04
At this point, you must run the system update and upgrade to ensure all the packages are upgraded. To do this, run the following commands:
# sudo apt update
# sudo apt upgrade
During the upgrade command, press yes to continue.
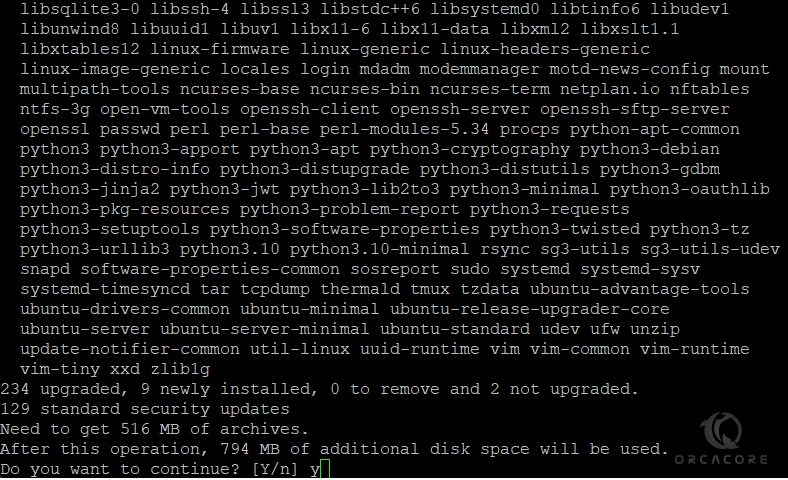
Once you are done, you may face the following message:
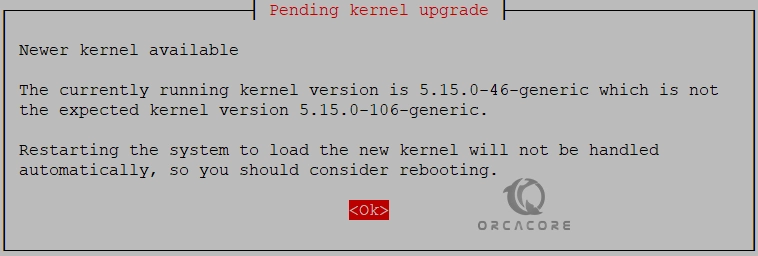
You must reboot your system with the following command:
sudo rebootStep 3 – Prepare the Migration Process from Ubuntu 22.04 to 24.04
At this point, you must install the ubuntu-release-upgrader-core package. To do this, you can run the command below:
sudo apt install ubuntu-release-upgrader-core -yThen, you need to be sure that the prompt line in the /etc/update-manager/release-upgrades is set to LTS. To verify this, you can use one of the following commands:
# grep 'lts' /etc/update-manager/release-upgrades
# cat /etc/update-manager/release-upgrades
In your output, you should see:

Also, you must open TCP port 1022 through your firewall. This is the default port set by the upgrade procedure as a fallback if the default SSH port dies during upgrades.
If you are using UFW, run the command below:
# sudo ufw allow 1022/tcp
# sudo ufw reloadTIPS: To get a complete guide about UFW firewall rules, you can check this guide on Essential UFW Firewall Commands and Rules with Examples.
If you are using iptables, run the command below:
sudo /sbin/iptables -I INPUT -p tcp --dport 1022 -j ACCEPTTIPS: For learning iptables rules, you can also check this guide on Install and Use Iptables on Ubuntu 22.04.
Once you are done, you can proceed to the next step for upgrading from Ubuntu 22.04 to Ubuntu 24.04.
Step 4 – Migrate From Ubuntu 22.04 to Ubuntu 24.04
At this point, you can start to upgrade your Ubuntu 22.04 to 24.04. To do this, you can easily run the command below:
sudo do-release-upgrade -dYou may face the following error:

Let’s see how to fix it.
There is no development version of an LTS available – Ubuntu 22.04 To Ubuntu 24.04
To fix this issue, you need to edit the /etc/update-manager/release-upgrades file and set Prompt to normal. Open the file with your desired text editor like Vi editor or Nano Editor:
sudo vi /etc/update-manager/release-upgrades
When you are done, save and close the file.
Then, run the following command:
sudo do-release-upgradeFollow the instructions and this will upgrade your system to Ubuntu 23.10. You must reboot the system:
sudo rebootAfter reboot, open the /etc/update-manager/release-upgrades file again and set Prompt to LTS:
sudo vi /etc/update-manager/release-upgradesOnce you are done, save and close the file.
Finally, you can run the upgrade command to get into Ubuntu 24.04:
sudo do-release-upgrade -dRemember that after August 15, it will be fixed automatically.
After upgrading from Ubuntu 22.04 to Ubuntu 24.04, you can verify it by using the commands below:
# cat /etc/os-release
# lsb_release -a
Example Output
PRETTY_NAME="Ubuntu 24.04 LTS"
NAME="Ubuntu"
VERSION_ID="24.04"
VERSION="24.04 LTS (Noble Numbat)"
VERSION_CODENAME=noble
ID=ubuntu
ID_LIKE=debian
...Step 5 – Enable 3rd Party Repositories and Mirrors After Upgrading to Ubuntu 24.04
At this point, you must enable the 3rd party repos and mirrors. If you don’t, you will not receive updates. To do this, switch to the following path:
# cd /etc/apt/sources.list.d
# ls -l
If you have a repo disabled during the updates, you must enable it again by removing the # from the repo line.
Then, run the system update and upgrade, and then, remove the unused packages:
# sudo apt update && sudo apt upgrade
# sudo apt autoremove --purge
Also, you need to remove the firewall rules you have added for the SSH port at TCP 1022. To do this, you can use the commands below:
# sudo ufw show added
# sudo ufw delete allow 1022/tcp
That’s it. It is recommended to wait for the LTS release to come for the migration and then, easily you can migrate from Ubuntu 22.04 to Ubuntu 24.04.
Conclusion
Now you have seen that you can easily do the above steps and upgrading from Ubuntu 22.04 to Ubuntu 24.04. You just need to migrate to the Ubuntu 23.10 and then, jump into the Ubuntu 24.04. Or it is recommended to wait until Agust 15 for direct migration.
Hope you enjoy it. Also, you may like to read the following articles:
Migrate From Rocky Linux 8 To Rocky Linux 9