Share your love
Install Apache Web Server on Rocky Linux 8 – Full Guide

In this guide, we want to show you How To Install Apache web server on Rocky Linux 8. Apache is the most widely used web server software and runs on 67% of all websites in the world. Developed and maintained by Apache Software Foundation, Apache is open-source software and is available for free.
It’s fast, reliable, and secure. Apache can be highly customized to meet the needs of many different environments by using extensions and modules.
Steps To Install Apache Web Server on Rocky Linux 8
Before you start to Install Apache Web Server on Rocky Linux 8, you need to log in to your server as a non-root user with sudo privileges and set up a basic firewall. To do this, you can follow our article the Initial Server Setup with Rocky Linux 8.
Also, you need a domain name that is pointed to your server’s IP address.
Install Apache on Rocky Linux 8
To Install Apache Web Server on Rocky Linux 8, you need to update the DNF package manager with the following command:
sudo dnf updateNow install the Apache package with the following command:
sudo dnf install httpdWhen your installation is completed, you need to configure Apache to serve content over HTTPS.
We assumed that you installed firewalld from the requirements. now run the commands below:
sudo firewall-cmd --permanent --add-service=http
sudo firewall-cmd --permanent --add-service=https
Then, reload the firewall to apply the changes:
sudo firewall-cmd --reloadAt this point, you can start your service and check the web server.
Check Apache Status on Rocky Linux
You need to start Apache on Rocky Linux 8 manually by the following command:
sudo systemctl start httpdYou can check that your Apache web server is active and running with the following command:
sudo systemctl status httpdIn your output you should see:
Output
httpd.service - The Apache HTTP Server
Loaded: loaded (/usr/lib/systemd/system/httpd.service; disabled; vendor pres>
Active: active (running)
Docs: man:httpd.service(8)
Main PID: 52316 (httpd)
Status: "Started, listening on: port 80"
Tasks: 213 (limit: 11409)
Memory: 30.9M
Now you can access to default Apache landing page. for that, you need your server’s IP address.
To get your IP address you can use the following command:
hostname -IOr you can use the curl command to request your IP from icanhazip.com. run the following command:
curl -4 icanhazip.comWhen you have your IP address, type it in your web browser to access the default Apache landing page.
http://your_server_ipYou should see a page similar to this:
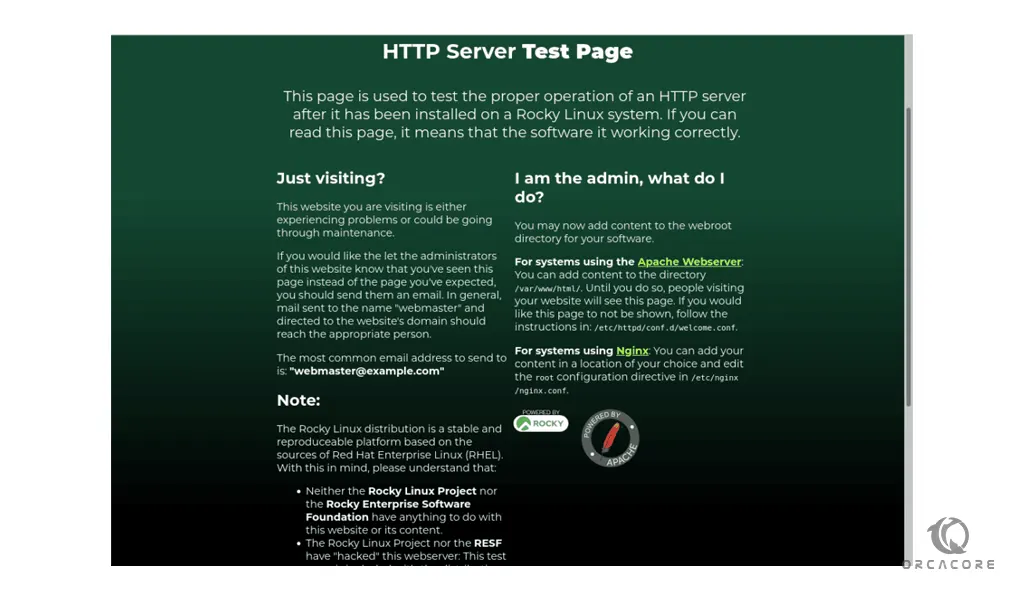
If you see this page, it shows that Apache is working correctly.
At this point, you are finished with how to Install Apache Web Server on Rocky Linux 8. Let’s see some basic management processes.
Manage Apache process on Rocky Linux
Here your service is active and running on your server. you can use the systemctl command to manage the service.
To stop the service use:
sudo systemctl stop httpdStart the service with:
sudo systemctl start httpdYou stop and start the service again with the following command:
sudo systemctl restart httpdIf you made configuration changes, you need to apply the changes with the following command:
sudo systemctl reload httpdApache is configured to start automatically when the server boots. if you don’t want to happen this, run the following command:
sudo systemctl disable httpdTo re-enable the service starts at boot, use the command below:
sudo systemctl enable httpdThe default configuration for Apache will allow your server to host a single website. If you plan on hosting multiple domains on your server, you will need to configure virtual hosts on your Apache webserver.
Let’s see how to set up Apache virtual hosts on Rocky Linux 8.
How to Set up Apache Virtual Hosts on Rocky Linux 8
The concept of virtual hosts allows more than one Web site on one system or Web server. The servers are different by their hostname.
To set up Apache virtual hosts on Rocky Linux 8 follow these steps and replace our domain name with yours:
- Create an HTML directory for your domain with the following command:
sudo mkdir -p /var/www/apache.orcacore.net/html2. Now you should create a directory to store log files for the site:
sudo mkdir -p /var/www/apache.orcacore.net/log3. Set ownership of the HTML directory with the $USER environmental variable by the following command:
sudo chown -R $USER:$USER /var/www/apache.orcacore.net/html4. Here you need to set default permissions for your webroot. use:
sudo chmod -R 755 /var/www5. Create a sample index.html page with your favorite editor. here we use vi editor:
sudo vi /var/www/apache.orcacore.net/html/index.htmlThen, add the following HTML sample to your file:
<html>
<head>
<title>Welcome to apache.orcacore.net!</title>
</head>
<body>
<h1>Success! The apache.orcacore.net virtual host is working!</h1>
</body>
</html>
Save and close the file when you are done.
To set up an Apache virtual host on Rocky Linux 8, you need to create sites-available and sites-enabled directories.
6. Create directories with the following command:
sudo mkdir /etc/httpd/sites-available /etc/httpd/sites-enabled7. Here you need to edit Apache’s main configuration file and add a line declaring an optional directory for additional configuration files. open the file with:
sudo vi /etc/httpd/conf/httpd.confThen, add the line below to the end of the file:
IncludeOptional sites-enabled/*.confWhen you are finished save and close your file.
8. In this step, you need to create your Apache virtual host file by creating a new file in the sites-available directory:
sudo vi /etc/httpd/sites-available/apache.orcacore.net.confNow, add the configuration block to your file:
<VirtualHost *:80>
    ServerName www.apache.orcacore.net
    ServerAlias apache.orcacore.net
    DocumentRoot /var/www/apache.orcacore.net/html
    ErrorLog /var/www/apache.orcacore.net/log/error.log
    CustomLog /var/www/apache.orcacore.net/log/requests.log combined
</VirtualHost>
9. At this point, Create a symbolic link for each virtual host in the sites-enabled directory:
sudo ln -s /etc/httpd/sites-available/apache.orcacore.net.conf /etc/httpd/sites-enabled/apache.orcacore.net.conf10. To set a universal Apache policy run the command below:
Note: if you disable SELinux before, you don’t need to run this command.
sudo setsebool -P httpd_unified 111. check the context type that SELinux gave the /var/www/apache.orcacore.net/log directory:
sudo ls -dZ /var/www/apache.orcacore.net/log/12. Generate and append to web application log files:
sudo semanage fcontext -a -t httpd_log_t "/var/www/apache.orcacore.net/log(/.*)?"13. use the restorecon command to apply these changes:
sudo restorecon -R -v /var/www/apache.orcacore.net/logRestart your web server with the following command:
sudo systemctl restart httpdTest Apache Virtual Host on Rocky Linux
At this point, you have learned to Install Apache Web Server on Rocky Linux 8 and set up the Virtual host file. Now you are ready to test your Apache virtual host configuration on Rocky Linux 8.
Type this in your web browser with your domain name:
http://your-domainYou will see a page similar to this:

Conclusion
At this point, you learn How to Install Apache Web Server on Rocky Linux 8. Also, you learn how to set up Apache virtual hosts on Rocky Linux 8. Hope you enjoy it.
You may like these articles:
How To Install Apache Cassandra on Rocky Linux 8