Share your love
Install Dig on Windows 10/11 | Easy Setup

In this tutorial, you will learn to Install Dig on Windows 10/11. The “dig” is a robust command-line tool developed by BIND for querying DNS nameservers. It can identify IP address records, record the query route as it obtains answers from an authoritative nameserver, and diagnose other DNS problems.
You can now proceed to the guide steps below on the Orcacore website to set up Dig tool on Windows from CLI and downloading it manually.
Table of Contents
Steps To Install Dig on Windows 10/11
To complete this guide, log in to your Windows client and follow the steps below. In this guide, you will learn to install dig in two ways:
- With Chocolatey package manager
- By downloading the bind tool package manually
Method 1. Install Dig on Windows with Chocolatey
The easiest way to install dig is to use the Chocolatey package manager.
Chocolatey is a package manager for Windows that builds on top of existing Windows technologies, using NuGet for packaging. Chocolatey downloads applications from their official distribution point and then installs, upgrades, uninstalls, and configures them silently on your machine, including dependencies, per the instructions in the package.
First, you need to open a PowerShell console and execute the following command to install Chocolatey:
Set-ExecutionPolicy Bypass -Scope Process -Force; [System.Net.ServicePointManager]::SecurityProtocol = [System.Net.ServicePointManager]::SecurityProtocol -bor 3072; iex ((New-Object System.Net.WebClient).DownloadString('https://chocolatey.org/install.ps1'))Then, run the following command to install the bind-toolsonly package:
choco install -y bind-toolsonlyAnd that is it! You can now run the dig command from both CMD and PowerShell.
If for some reason, you don’t like to use Chocolatey, you can still install dig by manually downloading the bind tool package. The following section provides detailed instructions on how to do it.
Method 2. Install dig on Windows Manually
First, you need to visit the www.isc.org/download/ page and download the latest version of BIND.

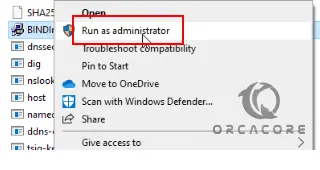
After the download has finished, extract the ZIP file. Then right-click on the BINDInstall and choose run as administrator from the contextual menu.
Check the Tools only checkbox and click the Install button.
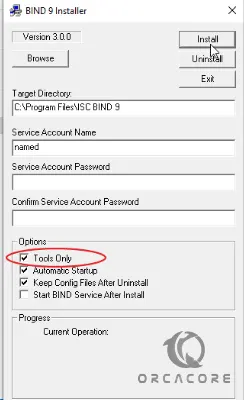
If successful, you will see the message: “BIND installation completed successfully”.
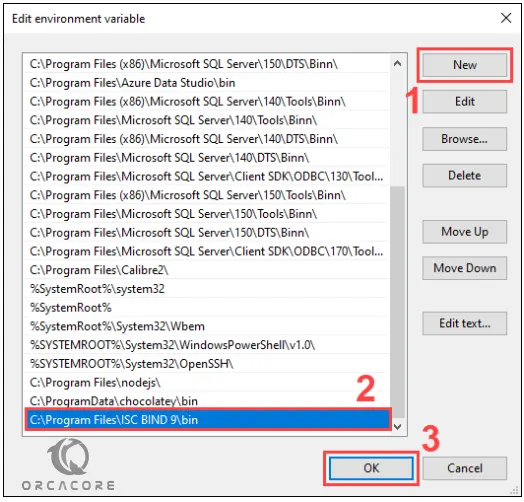
Add Dig to Windows Path variable
At this point, you need to add the bin directory (C:\Program Files\ISC BIND 9\bin), which contains the dig.exe file, to the Windows PATH variable.
Right-click on This PC and select Properties. Go to Advanced system settings > Environment Variables. Edit the PATH variable under the System variables.
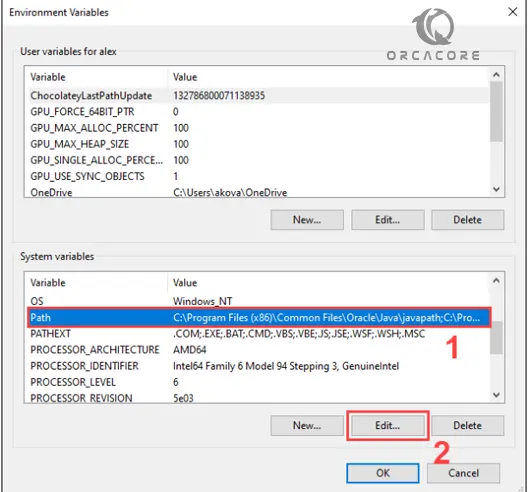
Click OK to confirm the changes and exit the Environment Variables window.
How to Use the dig Command on Windows?
The basic usage of the dig command is to specify the domain name you want to look up and the type of record you want to query (e.g. A for address records, MX for MX records). Let’s see some examples.
Note: Types of DNS records you can query include: A, AAAA, MX for Mail exchanger, NS, and TXT.
Find the IP address of a website or domain (A record):
dig example.com AFind the IPv6 address of a domain (AAAA record):
dig example.com AAAAYou can specify the nameserver you’d like to query:
dig A example.com @8.8.8.8Looks up MX records:
dig mx example.comThe -x option performs a reverse lookup when you specify the IP address:
dig -x 8.8.8.8Conclusion
At this point, you have learned to install Dig on Windows 10 and Windows 11 in two different ways. Also, you have learned the basic usage of dig. Hope you enjoy it.
You may also like these articles:
Set up Python on Windows Server 2022