Share your love
Lighttpd Web Server Installation on Debian 12
This tutorial intends to teach you Lighttpd Web Server Installation and Configuration on Debian 12 Bookworm From Command Line. Lighttpd or Lighty is a free, open-source, lightweight, high-speed, and secure web server. It is an alternative webserver to Apache. Also, it is often an excellent option for high-traffic sites. Also, you can read on Top 5 Alternatives To Apache HTTP Server on Linux.
Now you can follow the steps below to Install Lighttpd Web Server with MariaDB and PHP on Debian 12 Bookworm.
Steps To Lighttpd Web Server Installation on Debian 12 From Command Line
To complete this guide, you must have access to your server as a non-root user with sudo privileges. For this purpose, you can visit this guide on Initial Server Setup with Debian 12 Bookworm.
Also, you need a domain name that is pointed to your server’s IP address.
Step 1 – Install Lighttpd Web Server on Debian 12 Bookworm
Debian 12 ships with Lighttpd 1.4.69. To install it, run the system update first:
sudo apt updateThen, use the following command to install Lighty on Debian 12:
sudo apt install lighttpd -yTo check which Lighttpd version is installed on your Debian server, run the following command:
lighttpd -vOutput
lighttpd/1.4.69 (ssl) - a light and fast webserverStep 2 – Start and Enable Lighttpd Service on Debian12
At this point, you need to start your Lighttpd by using the following command:
sudo systemctl start lighttpdThen, enable your service to start on boot by using the command below:
sudo systemctl enable lighttpdVerify that Lighttpd is active and running on Debian 12:
sudo systemctl status lighttpdIn your output you will see:
Output
● lighttpd.service - Lighttpd Daemon
     Loaded: loaded (/lib/systemd/system/lighttpd.service; enabled; preset: ena>
     Active: active (running) since Sun 2023-06-18 05:23:59 EDT; 2min 44s ago
   Main PID: 3379 (lighttpd)
      Tasks: 1 (limit: 4653)
     Memory: 808.0K
        CPU: 362ms
     CGroup: /system.slice/lighttpd.service
Step 3 – Install MariaDB Support for Lighttpd on Debian 12
At this point, you can install MariaDB for your Lightttpd. To do this, run the command below:
sudo apt install mariadb-server mariadb-client -yVerify your MariaDB installation on Debian 12 by checking its version:
mariadb --versionOutput
mariadb Ver 15.1 Distrib 10.11.3-MariaDB, for debian-linux-gnu (x86_64) using EditLine wrapperNow you need to start and enable your MariaDB service to start on boot with the following commands:
# sudo systemctl start mariadb
# sudo systemctl enable mariadb
Confirm that your MariaDB is active and running on Debian 12:
sudo systemctl status mariadbOutput
● mariadb.service - MariaDB 10.11.3 database server
Loaded: loaded (/lib/systemd/system/mariadb.service; enabled; preset: enab>
Active: active (running) since Sun 2023-06-18 05:30:52 EDT; 47s ago
Docs: man:mariadbd(8)
https://mariadb.com/kb/en/library/systemd/
Main PID: 5083 (mariadbd)
Status: "Taking your SQL requests now..."
Tasks: 14 (limit: 4653)
Memory: 174.9M
CPU: 769ms
CGroup: /system.slice/mariadb.serviceAt this point that you have MariaDB installed on your server you need to secure your MariaDB by running a security script:
sudo mysql_secure_installationOutput
Enter current password for root (enter for none):
You already have your root account protected, so you can safely answer 'n'.
Switch to unix_socket authentication [Y/n] n
You already have your root account protected, so you can safely answer 'n'.
Change the root password? [Y/n] Y
New password:
Re-enter new password:
Remove anonymous users? [Y/n] Y
Disallow root login remotely? [Y/n] Y
Remove test database and access to it? [Y/n] Y
Reload privilege tables now? [Y/n] Y
All done! If you've completed all of the above steps, your MariaDB
installation should now be secure.
Thanks for using MariaDB!Now you can use the command below to access your MariaDB shell on Debian 12:
sudo mysql -u root -pOutput
Welcome to the MariaDB monitor. Commands end with ; or \g.
Your MariaDB connection id is 39
Server version: 10.11.3-MariaDB-1 Debian 12
Copyright (c) 2000, 2018, Oracle, MariaDB Corporation Ab and others.
Type 'help;' or '\h' for help. Type '\c' to clear the current input statement.
MariaDB [(none)]>Once you have finished, you can proceed to the next step.
Step 4 – Install PHP and PHP-FPM with FastCGI on Debian 12
To enable PHP-FPM with FastCGI support, first, you need to install PHP along with the necessary extensions. To do this, you can use the command below:
sudo apt install php php-cgi php-fpm php-mysql -yThen, verify your PHP installation by checking its version:
php --versionOutput
PHP 8.2.7 (cli) (built: Jun 9 2023 19:37:27) (NTS)
Copyright (c) The PHP Group
Zend Engine v4.2.7, Copyright (c) Zend Technologies
with Zend OPcache v8.2.7, Copyright (c), by Zend TechnologiesNext, you need to edit the php.ini file and set cgi.fix_pathinfo to 1. Open the file with your favorite text editor like nano editor or vi editor:
sudo vi /etc/php/8.2/fpm/php.iniFind the following line uncomment it and change it to 1 as shown below:
cgi.fix_pathinfo=1When you are done, save and close the file.
By default, PHP points to the UNIX socket /var/run/php/php8.2-fpm.sock. So, you will need to configure the PHP-FPM pool to set PHP to listen to the TCP socket.
You can do this by editing /etc/php/8.2/fpm/pool.d/www.conf file:
sudo vi /etc/php/8.2/fpm/pool.d/www.confFind the following line:
listen = /run/php/php8.2-fpm.sockAnd replace it with the following line:
listen = 127.0.0.1:9000Save and close the file when you are finished.
Then, restart the PHP-FPM service to apply the Lighttpd configuration changes on Debian 12:
sudo systemctl restart php8.2-fpmNext, you will need to modify the 15-fastcgi-php.conf file:
sudo vi /etc/lighttpd/conf-available/15-fastcgi-php.confFind the following lines in the file:
fastcgi.server += ( ".php" =>
((
"bin-path" => "/usr/bin/php-cgi",
"socket" => "/run/lighttpd/php.socket",
...
))
)
And replace them with the following:
"host" => "127.0.0.1",
"port" => "9000",
Save and close the file when you are finished.
Then, enable both FastCGI and FastCGI-PHP modules with the following commands:
# lighty-enable-mod fastcgi
# lighty-enable-mod fastcgi-php
Finally, restart the Lighttpd service to apply the changes:
sudo systemctl restart lighttpdStep 5 – Create Lighttpd Virtual Host on Debian 12
At this point, you need to create a new virtual host file to test PHP with Lighttpd. Create and open the file with your favorite text editor:
sudo vi /etc/lighttpd/conf-available/example.com.confAdd the following content to the file:
$HTTP["host"] == "www.example.com" {
    server.document-root = "/var/www/html/"
    server.errorlog      = "/var/log/lighttpd/example.com-error.log"
}
When you are done, save and close the file.
Then, enable the Virtual host with the following command:
sudo ln -s /etc/lighttpd/conf-available/example.com.conf /etc/lighttpd/conf-enabled/Next, create a sample index.php file in the Lighttpd document root directory with the following command:
sudo vi /var/www/html/index.phpAdd the following line:
<?php
phpinfo();
?>
Save and close the file.
Now you must change the ownership of the Lighttpd document root directory to www-data with the following command:
sudo chown -R www-data:www-data /var/www/html/Finally, restart the Lighttpd service to apply all the configuration changes on Debian 12:
sudo systemctl restart lighttpdStep 6 – Test Lighttpd Installation and Configuration
At this point, Lighttpd is installed and configured with PHP and PHP-FPM support. Now, it’s time to test it.
In your web browser type your domain name or server’s IP address:
http://domain-name
Or
http://server-ip
From there, you will see working information on PHP, PHP-FPM, and MySQL with lots of other modules that are already enabled.
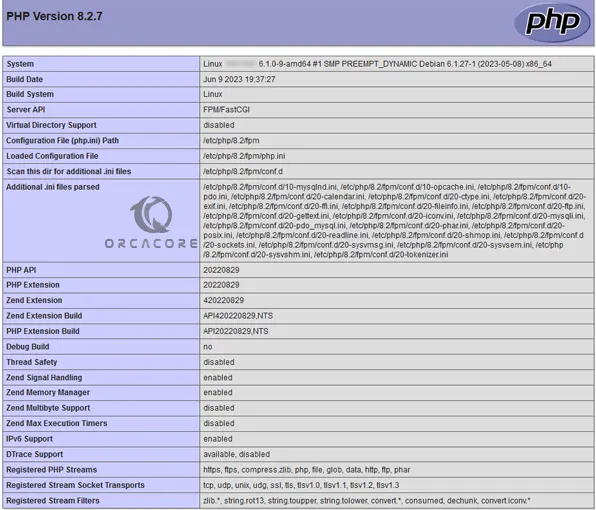
For more information, you can visit the Lighttpd Documentation page.
Conclusion
At this point, you have learned Lighttpd web server Installation and Configuration with MariaDB support and enabled PHP-FPM with FastCGI support, on Debian 12 Bookworm. Also, you have learned to create a Lighttpd virtual host file to test your PHP.
Hope you enjoy it. You may be interested in these articles on the Orcacore website:

