Share your love
Install Netcat on Windows Server 2022 | Powerful Tool
This guide intends to teach you How To Install Netcat on Windows Server 2022. Netcat or NC is a utility tool that uses TCP and UDP connections to read and write in a network. It can be used for both attack and security. In the case of attacking, it helps us to debug the network along with investing in it.
Netcat runs on all operating systems. You can now proceed to the guide steps below on the Orcacore website to set up Netcat on Windows Server 2022.
Table of Contents
Steps To Install Netcat on Windows Server 2022
To complete this guide, you must log in to your Windows Server and follow the steps below.
1. Download Netcat For Windows
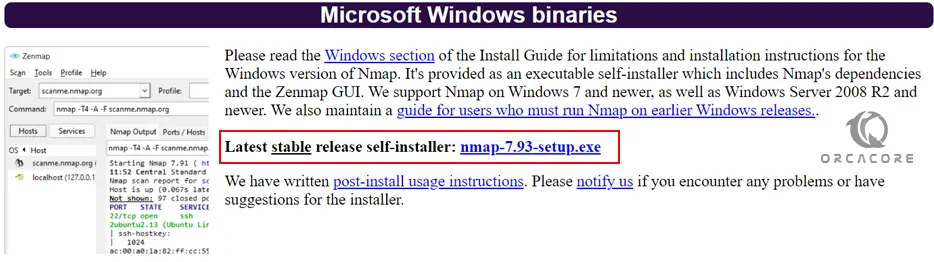
To install Netcat, you must download the Ncat package that comes with Nmap from the Nmap Downloads Page. Visit the page and get the Latest stable release self-installer for Windows.
2. Netcat Setup on Windows Server 2022
After your download is completed, right-click the setup and select Run as administrator to begin the installation.
First, you need to agree with the License Agreement. Click I Agree.
At this point, choose which components of Nmap you want to install and click Next. Here we choose all the components.
Note: Be sure that the Ncat and the Register Nmap Path options are selected.

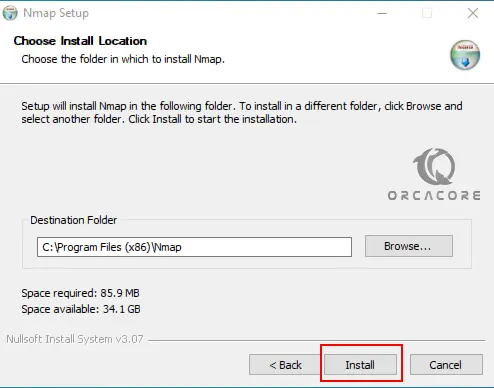
Then, you need to choose your installation path on Windows Server 2022 and click Install.
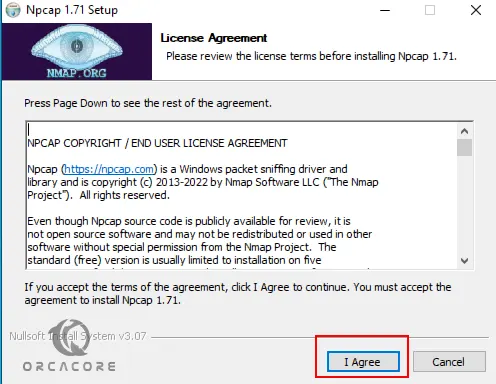
At this point, you must click I Agree to accept the license agreement to install Npcap.
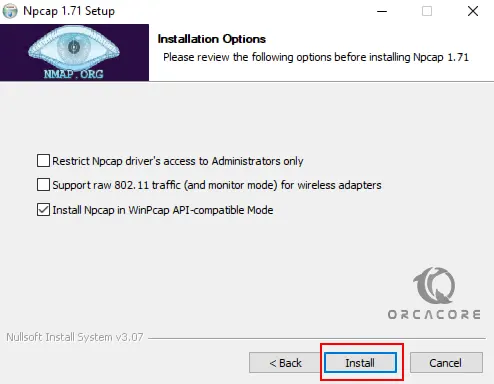
Now you need to choose the installation option and click Install.
When your installation is completed, click Finish. At this point, you can use the Netcat command (Ncat) on your Windows Server 2022 from the Nmap installation.
3. How To Use Netcat Command?
The name of the Netcat command-line tool is called ncat, which you can run from either Windows Terminal, CMD, or PowerShell.
To verify your Netcat installation, open the command prompt and run the following command to check its version:
ncat --versionOutput
C:\Users\Administrator>ncat --version
Ncat: Version 7.93 ( https://nmap.org/ncat )As you can see, the version of Netcat means that you have successfully installed it on your Windows server. To display the help page, run the following command:
ncat -hOutput
Ncat 7.93
Usage: ncat [options] [hostname] [port]
Options taking a time assume seconds. Append 'ms' for milliseconds,
's' for seconds, 'm' for minutes, or 'h' for hours (e.g. 500ms).
-4 Use IPv4 only
-6 Use IPv6 only
-C, --crlf Use CRLF for EOL sequence
-c, --sh-exec <command> Executes the given command via /bin/sh
-e, --exec <command> Executes the given command
--lua-exec <filename> Executes the given Lua script
-g hop1[,hop2,...] Loose source routing hop points (8 max)
-G <n> Loose source routing hop pointer (4, 8, 12, ...)
-m, --max-conns <n> Maximum <n> simultaneous connections
-h, --help Display this help screen
-d, --delay <time> Wait between read/writes
-o, --output <filename> Dump session data to a file
-x, --hex-dump <filename> Dump session data as hex to a file
-i, --idle-timeout <time> Idle read/write timeout
-p, --source-port port Specify source port to use
-s, --source addr Specify source address to use (doesn't affect -l)
-l, --listen Bind and listen for incoming connections
-k, --keep-open Accept multiple connections in listen mode
-n, --nodns Do not resolve hostnames via DNS
-t, --telnet Answer Telnet negotiations
-u, --udp Use UDP instead of default TCP
...Also, you can verify your Nmap installation by checking its version from the command prompt shell:
nmap --versionOutput
Nmap version 7.93
Platform: i686-pc-windows-windows
Compiled with: nmap-liblua-5.3.6 openssl-3.0.5 nmap-libssh2-1.10.0 nmap-libz-1.2.12 nmap-libpcre-7.6 Npcap-1.71 nmap-libdnet-1.12 ipv6
Compiled without:
Available nsock engines: iocp poll selectThat’s it, you are done. Now you can enjoy using Netcat on your Windows Server.
Conclusion
At this point, you have learned to install Netcat (Ncat) on Windows Server 2022 by using Nmap. You can easily use Netcat for testing connectivity, port scanning, debugging, sending commands over the network, checking open ports, vulnerabilities, etc.
Hope you enjoy it. Also, you may be interested in these articles:
Set up Defender Antivirus on Windows Server 2019
Set up IIS on Windows Server 2019
Configure Default Site in IIS Server 2019