Share your love
How To Install Ntopng on AlmaLinux 9: Best Monitoring Tool

In this guide, we want to teach you How To Install Ntopng on AlmaLinux 9. Let’s start with an introduction to Ntopng and how it works.
Ntopng is a network top program that lets admins display all the relevant parameters for the connected networks. It is a passive network monitoring tool that supports statistical evaluation of traffic data on the connected networks; it does not actively intervene in the network traffic (but see the “Layer 7 Manipulation” box). Ntopng is therefore ideally suited as a tool for administrators wanting to answer, among others, the following questions:
- What devices are currently on the network?
- How much traffic do the various devices cause on the network?
- Which devices are communicating or exchanging data with others (internally and externally)?
- What kind of bandwidth is used by each device, or which device is currently hogging the Internet connection?
- What protocols exist on the network, and how is network traffic distributed among them?
- Is any suspicious data traffic on the network caused by, for example, viruses or Trojans?
Ntopng is ideally suited for monitoring small and medium-sized Class C networks at gigabit speeds but can also be used for monitoring larger networks, given appropriate hardware.
Now you can follow the guide steps provided by the Orcacore team to Install Ntopng on AlmaLinux 9.
Table of Contents
Steps To Install Ntopng on AlmaLinux 9
To Install Ntopng on AlmaLinux 9, you must log in to your server as a root user with sudo privileges and set up a basic firewall. To do this, you can follow our guide the Initial Server Setup with AlmaLinux 9.
1. Add Ntopng Repository
As you know, Ntopng packages aren’t available in the default AlmaLinux repository.
First, you need to add the Ntop packages repository with the following command:
curl https://packages.ntop.org/centos/ntop.repo > /etc/yum.repos.d/ntop.repo
Then, you need to install the Epel repository on your server:
dnf install epel-release -y
Now you need to add the Remi repository to your server with the following command:
rpm -ivh http://rpms.remirepo.net/enterprise/remi-release-9.rpm
Next, install the dnf plugins on AlmaLinux 9:
dnf install dnf-plugins-core -y
Use the following commands to enable the power tools and Remi repository:
# dnf config-manager --set-enabled remi
powertools are called crb(CodeReady Linux Builder) now. To enable it, run
dnf config-manager --set-enabled crbUpdate your local package index:
dnf update -y
2. Installing Ntopng Monitoring Tool on AlmaLinux 9
At this point, you can install the Ntopng and its dependencies with the following command:
dnf install pfring-dkms n2disk nprobe ntopng cento -y
Note: PF_RING is now packaged without ZC drivers so you can optionally install them:
dnf install pfring-drivers-zc-dkms
Most software works without licenses. However, some components do need a license. They include:
- PF_RING ZC user-space libraries
- nProbe (NetFlow/IPFIX probe)
- n2disk (packet-to-disk application)
If you are a nProbe user and want to install a nProbe package with no dependency, please install the nProbes (rather than the nProbe) package. Note that you can either install the nProbe or the nProbes package but NOT both simultaneously.
Start And Enable Ntopng Service
Now start and enable your Ntopng service on AlmaLinux 9 with the following command:
systemctl enable --now ntopng
Verify your service is active and running:
systemctl status ntopng
Output
● ntopng.service - ntopng high-speed web-based traffic monitoring and analysis >
     Loaded: loaded (/usr/lib/systemd/system/ntopng.service; enabled; vendor pr>
     Active: active (running) since Sun 2022-10-02 06:21:44 EDT; 2s ago
    Process: 36766 ExecStartPre=/bin/sh -c /usr/bin/ntopng-utils-manage-config >
    Process: 36780 ExecStartPre=/bin/sh -c /bin/cat /etc/ntopng/ntopng.conf > />
    Process: 36782 ExecStartPre=/bin/sh -c /bin/cat /etc/ntopng/ntopng.conf.d/*>
    Process: 36784 ExecStartPre=/bin/sh -c /bin/sed "/^[ ]*-e.*$\|^[ ]*-G.*\|^[>
   Main PID: 36786 (ntopng)
      Tasks: 7 (limit: 23609)
     Memory: 37.3M
        CPU: 542ms
     CGroup: /system.slice/ntopng.service
             └─36786 /usr/bin/ntopng /run/ntopng.conf
...
3. Access Ntopng Dashboard
Ntopng by default listens on port 3000. You need to open the Ntopng port through the ALmaLinux 9 firewall with the following command:
firewall-cmd --permanent --add-port=3000/tcp
Reload the firewall to apply the new rules:
firewall-cmd --reload
At this point, you can access the Ntopng web interface by typing your server’s IP address in your web browser followed by 3000:
http://server-IP:3000
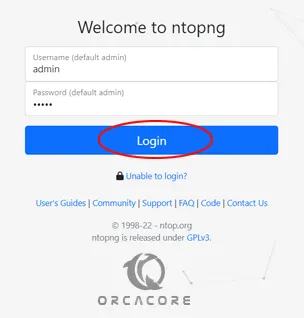
You will see the Ntopng login screen. Use the default credentials: admin:admin and reset the password afterward.
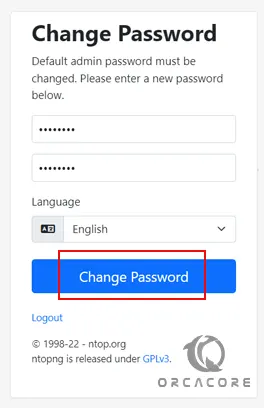
Now you can change the default password and press change password.
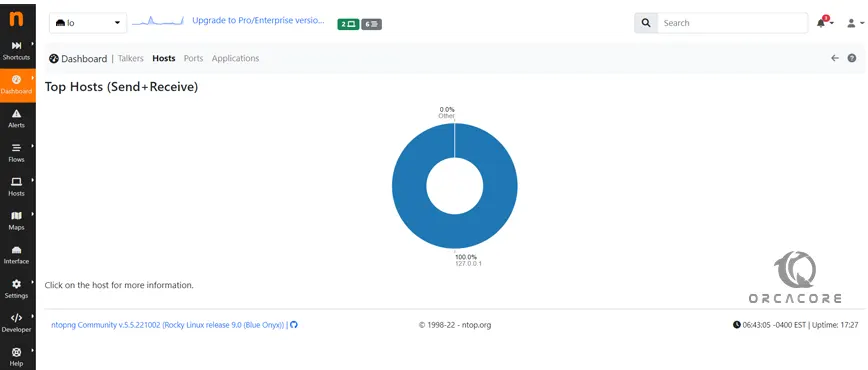
At this point, you will see your Ntopng dashboard.
Conclusion
At this point, you have learned to Install Ntopng on AlmaLinux 9. You can easily add the Ntopng repository to your server and follow the guide steps to finish your installation and access your Monitoring dashboard from the web interface.
Hope you enjoy it. Also, you may like to read the following articles:
Ubuntu 24.04 Nagios Core Setup
Installing bmon on Ubuntu 22.04