Share your love
How To Manage Windows Networking and Firewall

This guide intends to teach you How To Manage and Configure Windows Networking and Firewall with the Netsh (Network Shell) command.
Anyone who works with Windows network configurations will sooner or later come across the Network Shell (Netsh). The term refers to an interface between users and the operating system, which enables the administration and configuration of local, and remote network settings.
The range of applications includes settings for the Windows firewall and LAN/WLAN management and IP and server configuration. Moreover, networked infrastructure can also be protected from external attacks. Using the command line tool, it’s also possible to diagnose problems and carry out repairs in the network. A significant advantage of Netsh is that network-related administration tasks can be performed quickly and conveniently, and can be automated with scripts.
Manage Windows Networking and Firewall with Netsh Command
To complete this guide, you must log in to your Windows Client and follow the steps below.
Start Netsh Command
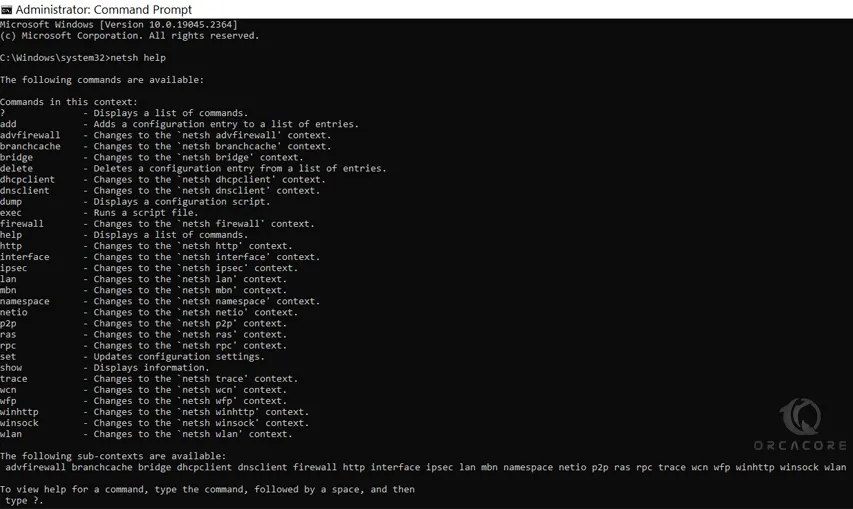
You can run the Netsh command from both CMD and PowerShell. Run PowerShell or CMD as an administrator and list available contexts with the following command:
netsh help
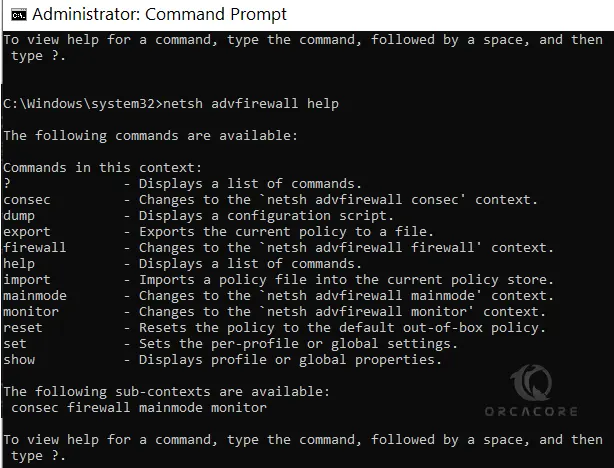
Netsh has multiple command contexts (subcommands). Each command context has multiple subcommands you can use. For example, to get a list of the available commands under the advfirewall context, run the help command as follows:
netsh advfirewall help
You can run the help command for each context to see the different sets of available subcommands.
Manage Network Settings on Windows
At this point, you can use the Netsh command to manage your Windows networking.
List all Network Interfaces
To get a list of all network interfaces on your Windows, you can use the following command:
netsh interface show interfaceExample Output
C:\Windows\system32>netsh interface show interface
Admin State State Type Interface Name
-------------------------------------------------------------------------
Enabled Connected Dedicated Wi-Fi
Enabled Disconnected Dedicated EthernetYou can display the status of a specific interface, by using the name of the interface, for example:
netsh interface show interface name="Ethernet"Example Output
Ethernet
Type: Dedicated
Administrative state: Enabled
Connect state: DisconnectedCheck IP Addresses on Windows
To check IP Addresses, use ipv4 and ipv6 contexts as follows:
# netsh interface ipv4 show addresses
# netsh interface ipv6 show addresses
This will give you all the IP addresses, you can use the command below to find the IP address of a specific interface, for example:
netsh interface ipv4 show addresses name="Wi-Fi"Example Output
Configuration for interface "Wi-Fi"
DHCP enabled: Yes
IP Address: 192.168.1.101
Subnet Prefix: 192.168.1.0/24 (mask 255.255.255.0)
InterfaceMetric: 55Manage IP Addresses on Windows
At this point, we want to show you some examples of configuring your IP addresses.
Set Static IP Address to a Network Interface
For example, you can assign a static IP Address to a network interface named Ethernet with the command below:
netsh interface ipv4 set address "Ethernet" static 192.168.1.10 255.255.255.0 192.168.1.1In the above example, 192.168.1.1 is the default gateway. The following is the long format of the same command:
netsh interface ipv4 set address name="Ethernet" source=static address=192.168.1.10 mask=255.255.255.0 gateway=192.168.1.1The following example shows how to configure a network interface to receive its IP configuration from the DHCP server:
netsh interface ipv4 set address name="Ethernet" source=dhcpManage Name Servers on Windows
At this point, you can use the nets command to configure your DNS servers.
Check DNS Server Addresses
You can check DNS server addresses with the following two commands for IPV4 and IPv6, respectively:
# netsh interface ipv4 show dnsservers
# netsh interface ipv6 show dnsservers
Configure the NIC (Network Interface Controller) to receive DNS server address assignment from the DHCP server:
netsh interface ipv4 set dnsservers "Ethernet" source=dhcpSet Primary DNS Server Address on NIC
The following example shows how to set the primary DNS server address on the NIC named Ethernet:
netsh interface ipv4 set dnsservers name="Ethernet" static 192.168.1.1 primaryIt will remove any existing DNS server IP addresses.
To add a name server without removing existing IP addresses, you can use the following Netsh command:
netsh interface ipv4 add dnsservers "Ethernet" 192.168.1.1 index=1The above command sets the primary DNS server. If other IP addresses exist, they will move down on the list.
The following command sets the secondary DNS server:
netsh interface ipv4 add dnsservers "Ethernet" 192.168.1.2 index=2
Manage Windows Firewall with Netsh Command
At this point, we will show you how to use Netsh to configure Windows Defender Firewall.
Check Windows Firewall status
First, you can easily use the following command to check your Windows firewall status:
netsh advfirewall show allprofilesThe command will show the status for all Firewall profiles.
To check a specific Firewall profile (public, for example), run the netsh command as follows:
netsh advfirewall show publicprofileThe following command will show you the list of all Firewall profiles.
netsh advfirewall show helpOutput
The following commands are available:
Commands in this context:
show allprofiles - Displays properties for all profiles.
show currentprofile - Displays properties for the active profile.
show domainprofile - Displays properties for the domain properties.
show global - Displays the global properties.
show privateprofile - Displays properties for the private profile.
show publicprofile - Displays properties for the public profile.
show store - Displays the policy store for the current interactive session.Turn on and Turn off the Windows Firewall
You can easily use the netsh command to turn on or off your Windows firewall:
# netsh advfirewall set allprofile state off
# netsh advfirewall set allprofile state on
Open a Port on Windows Firewall
To open a specific port through your Windows firewall, you can use the command below, here we want to open port 80 as an example:
netsh advfirewall firewall add rule name="allow80" dir=in protocol=tcp localport=80 action="allow"Also, you can disable the above rule by using the command below:
netsh advfirewall firewall set rule name="allow80" new enable=noIf you want to open this port to a particular IP address for example 192.168.1.10, you can run the command below:
netsh advfirewall firewall add rule name="allow80" dir=in protocol=tcp localport=80 remoteip="192.168.1.10" action=allowTo block port 80 from the above IP, you can run the command below:
netsh advfirewall firewall add rule name="block80" dir=in protocol=tcp localport=80 remoteip="192.168.1.10" action=blockAllow a Program to Windows Firewall
Here you can use the command below to allow a program instead of a port, for example:
netsh advfirewall firewall add rule name="netcat" dir=in program="C:\program files (x86)\nmap\ncat.exe" action=allowList All Firewall Rules
At this point, you can use the command below to list your all rules through the Windows firewall:
netsh advfirewall firewall show rule allList all inbound rules:
netsh advfirewall firewall show rule all dir=inDisplay all the settings for inbound rules called netcat for example:
netsh advfirewall firewall show rule name="netcat" verboseConclusion
When using the netsh command, always use the help option to see the list of subcommands you can use. The help page also includes examples showing you how to use netsh to manage Windows networking and Firewall.
Hope you enjoy it.
You may like these articles:
How To Display Hidden Files on Windows 10


