Share your love
Best Monitorix Setup on Debian 12 Bookworm
In this guide, you will learn the Monitorix Setup on Debian 12 Bookworm, you can easily install and use Monitorix monitoring software on your server. Monitorix is one of the free and open-source mentoring tools for Linux distributions. The latest packages are available in the default Debian 12 repository. To see how you can install and use it, you can follow the rest of the article on the Orcacore website.
Also, you can check this guide to get more information about Monitoring Tools for Linux:
Best Linux System Monitoring GUI Tools
Table of Contents
Steps To Monitorix Setup on Debian 12 Bookworm
Before you start your Monitorix Setup on Debian 12 Bookworm, you must have access to your Debian 12 as a non-root user with sudo privileges and set up a basic firewall. For this purpose, you can check Debian 12 Initial Server Setup.
Also, you can get more UFW configuration setup by visiting Configure Firewall with UFW on Debian 12 Bookworm.
Now follow the steps below to Monitorix Setup on Debian 12 Bookworm.
Step 1 – Install Required Packages For Monitorix on Debian 12
First, you must run the system update with the following command:
sudo apt updateThen, use the following command to install dependencies for Monitorix installation:
sudo apt install rrdtool perl libwww-perl libmailtools-perl libmime-lite-perl librrds-perl libdbi-perl libxml-simple-perl libhttp-server-simple-perl libconfig-general-perl libio-socket-ssl-perl -yStep 2 – Command To Install Monitorix GUI Tool on Debian 12
At this point, you can easily install your Monitorix app by using the following command:
sudo apt install monitorix -yThen, verify your installation by checking its version:
monitorix -vExample Output:

Step 3 – Manage Monitorix Service From Terminal
At this point, you can start and enable your Monitorix service on Debian 12 Bookworm. To do this, you can run the following command:
sudo systemctl enable --now monitorixExample Output:

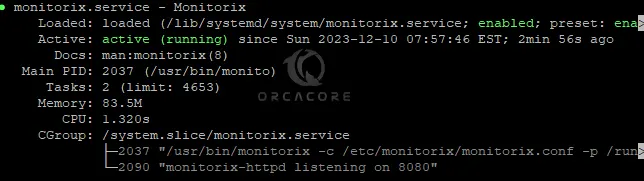
Verify your Monitorix service is active and running:
sudo systemctl status monitorixExample Output:
Step 4 – Monitorix Configuration Setup on Debian 12
The Monitorix configuration file is located in /etc/monitorix/monitorix.conf file. At this point, you need to make configuration changes to this file.
Before you start, it is recommended to make a backup file from this file. To do this, run the command below:
sudo cp /etc/monitorix/monitorix.conf /etc/monitorix/monitorix.conf.backupNow open your Monitorix config file with your desired text editor like Vi editor or Nano editor:
sudo vi /etc/monitorix/monitorix.conf
In the file look for the following lines and make the changes as shown below with your values:
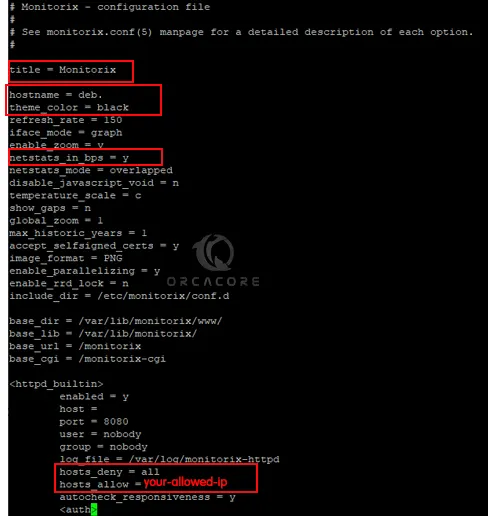
When you are done, save and close the file.
Then, restart Monitorix to apply the changes:
sudo systemctl restart monitorixStep 5 – Configure UFW Firewall Rules For Monitorix
We assumed that you have a running UFW firewall. Now you must allow port 8080 for Monitorix through your firewall. To do this, you can run the command below:
sudo ufw allow 8080/tcpThen, reload the firewall to apply the new rules:
sudo ufw reloadStep 6 – Access Monitorix Dashboard via Web Interface on Debian 12
To access your Monitorix through the web interface, you need to type your server’s IP address in your web browser followed by 8080/monitorix:
http://server-ip-address:8080/monitorixAt this point, you can start to use your Monitorix GUI Tool. The first is to perform a simple monitoring.
Quick Monitoring of Debian 12 with Monitorix Tool
Once you access your Monitorix, you will see the following screen. You can choose the graph and the daily, weekly, monthly, or yearly options and click ok.
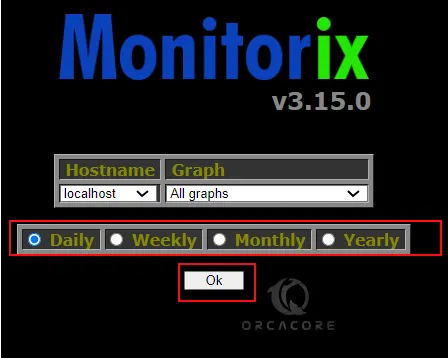
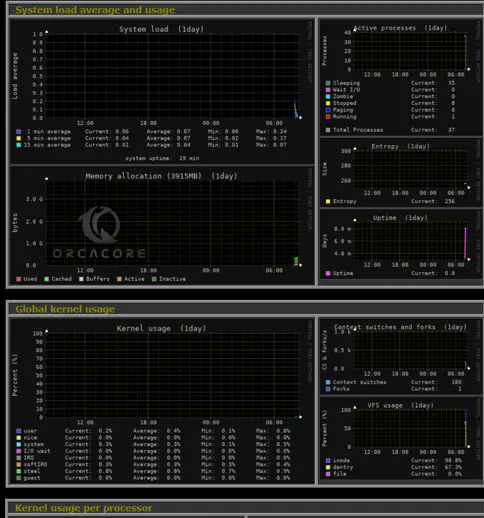
From there, you can see your graphs and monitor your server.
Also, you can enable multi-host monitoring with the Monitorix tool. To do this, you can follow the steps below.
Multi-Host Monitoring with Monitorix on Debian 12
If you plan to configure Monitorix on another node, you must set a monitoring target node in the Monitorix config file. To do this, open the Monitorix config file again:
sudo vi /etc/monitorix/monitorix.confIn the file, search for the section. Make the configuration as shown below:
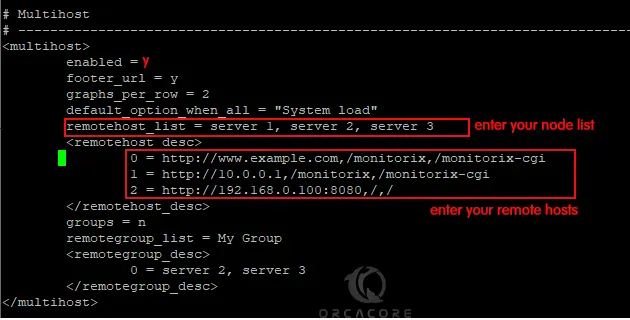
When you are done, save and close the file. Restart your Monitorix service to apply the changes:
sudo systemctl restart monitorixThen, access your Node controller from the web interface, for example, http://node.example.com:8080,/monitorix, and click the [Hostname], then you can select a Node and click ok. From there, you can see your Node graphs.
For more information, you can visit the official website.
Conclusion
At this point, you have learned the Monitorix Setup on Debian 12 Bookworm, configured it, Access it via the Web interface, and started to use it with simple and multi-host monitoring. Hope you enjoy it.
Also, you may like to read the following guides:
Install Monitorix on Debian 11