Share your love
Secure Nginx with Let’s Encrypt on Debian 11
In this article, we want to teach you How To Secure Nginx with Let’s Encrypt on Debian 11. Let’s Encrypt is an open and automated certificate authority that uses the ACME (Automatic Certificate Management Environment ) protocol to provide free TLS/SSL certificates to any compatible client. These certificates can be used to encrypt communication between your web server and your users.
You can now proceed to the guide steps below on the Orcacore website to complete the Nginx setup by generating SSL certificates from Let’s Encrypt.
Table of Contents
How To Secure Nginx with Let’s Encrypt on Debian 11?
To secure your Nginx web server, you need some requirements.
First, you must log in to your server as a non-root user with sudo privileges and set up a basic firewall. To do this, you can follow our guide on the Initial Server Setup with Debian 11.
Then, you need to have Nginx installed on your server. To do this, you can check this guide: How To Install Nginx on Debian 11.
Now, follow the steps below to Secure Nginx with Let’s Encrypt.
Install Certbot on Debian 11
Here you need to install certbot and its Nginx plugin with the following command:
sudo apt install certbot python3-certbot-nginx -yThen, you should check the Nginx configuration file on Debian 11 and check that the server name points to your domain name. Open the file with your favorite text editor here; we use vi:
sudo vi /etc/nginx/sites-available/example.comRemember to replace your domain name in the commands.
Find the server_name line, and it should look like this:
...
server_name example.com www.example.com;
...
When you are done, save and close the file.
Verify your Nginx configuration edits on Ubuntu 20.04 with the following command:
sudo nginx -tIn your output, you will see:
Output
nginx: the configuration file /etc/nginx/nginx.conf syntax is ok
nginx: configuration file /etc/nginx/nginx.conf test is successful
Then, reload Nginx to apply the new changes:
sudo systemctl reload nginxAt this point, you should allow HTTPS through the firewall to secure your Nginx on Debian 11. First, check your firewall status with the following command:
sudo ufw statusIn your output, you will see:
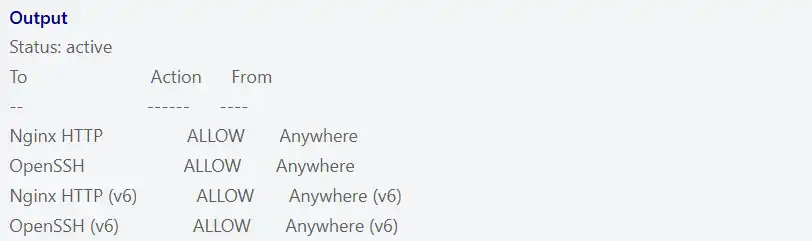
You should allow Nginx Full through the firewall and delete the Nginx HTTP with the following commands on Ubuntu Debian 11:
$ sudo ufw allow 'Nginx Full'
$ sudo ufw delete allow 'Nginx HTTP'
Now you can start to run certbot and get your SSL certificate. Let’s see how to secure Nginx with Let’s Encrypt on Debian 11:
Get an SSL certificate with Let’s Encrypt on Debian 11
Certbot provides different ways to get SSL certificates through plugins. The Nginx plugin will take care of reconfiguring Nginx and reloading the config whenever necessary on Debian 11. To use this plugin, run the following command:
sudo certbot --nginx -d example.comThe above command will be used for a single domain. If you have multiple domains, you can use the following command:
sudo certbot --nginx -d example.com -d www.example.comYou will be asked some questions. The first is to enter your email address and agree to the terms of service. Then, you will be asked if you would be willing to share your email address with the Electronic Frontier Foundation. Answer it by your choice. Also, certbot will ask you how you’d like to configure your HTTPS settings. Select your choice and hit Enter.
In your output, you will see:
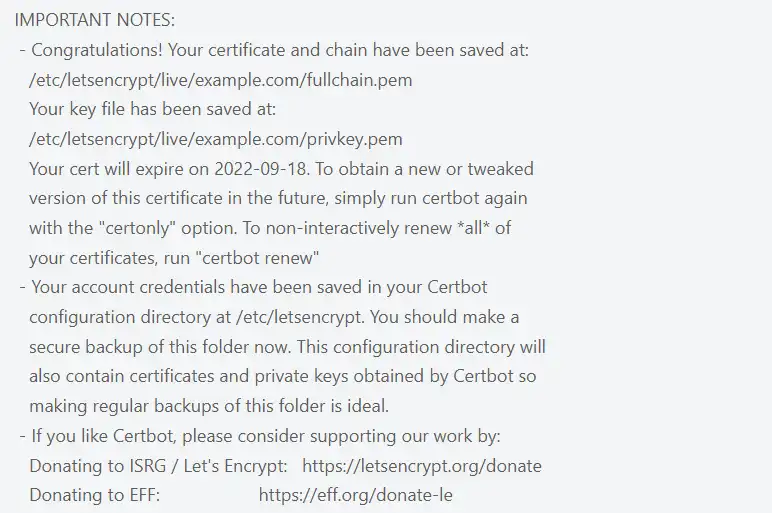
Here, your SSL certificates are downloaded, installed, and loaded. You have learned to secure Nginx with Let’s Encrypt on Debian 11. Now you can load your website by https:// and notice your browser’s security indicator.
Also, you can test your server by using the SSL Labs Server Test. You will get an A grade from there.
Set up Auto Renewal SSL Certificates
Let’s Encrypt certificates are only valid for 90 days. You can run a script to /etc/cron.d. This will run twice a day and will automatically renew any certificate that’s within thirty days of expiration.
Run the command below to test the renewal process:
sudo certbot renew --dry-runConclusion
At this point, you have learned to secure Nginx with Let’s Encrypt on Debian 11 and set up the SSL certificates. Hope you enjoy it. Also, you may like to read the following articles: