Share your love
Add Users to Virtualizor Panel

Add Users to Virtualizor Panel is another article about Virtualizor details and configuration. Here we want to learn about the type of users and how to add users or admin to our Virtualizor panel. Any user has specific options and levels of access. You can read our other tutorials about Virtualizor on the Virtualizor Tutorials page
How to Add Users to Virtualizor Panel?
Virtualizor like many control panels has its own user manager section where you can add users and set access levels for them. Therefore let’s go to see which items are available in this section. Please follow the below steps.
Adding users to a Virtualizor (VPS Users)
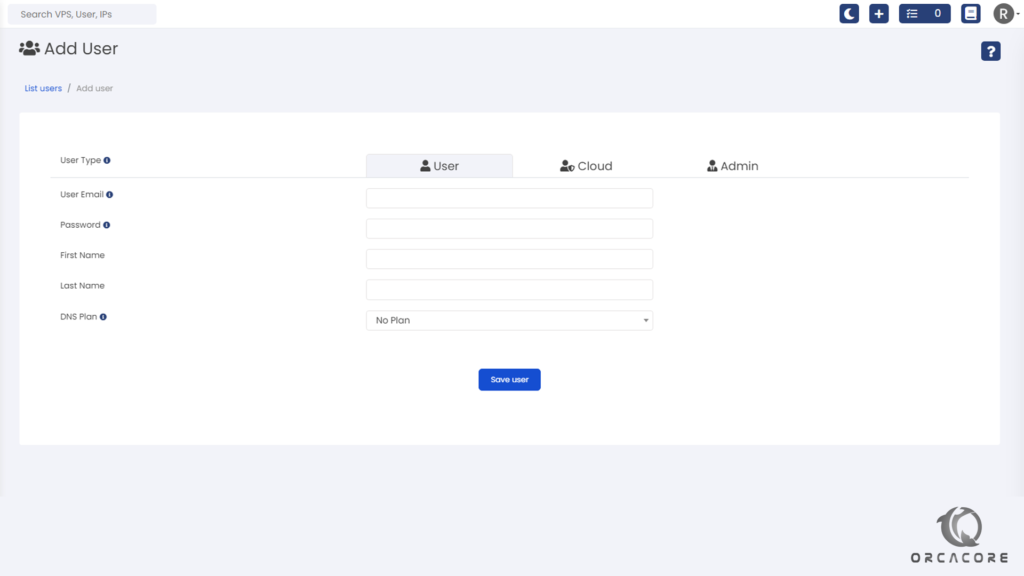
Please login to your Virtualizor panel by entering the serverIP:4085 on a browser, Then complete login credentials and login to the panel. Navigate to the “Users” menu and select the “Add user” sub-menu from the left side menu. You can see the opened page in the below image. We have 3 types of users: User, Cloud, and Admin.

Items on the User Tab
We want to describe the items you see on this page. Therefore, please follow the descriptions of the items below and complete the fields to add users.
User Email: Email Address of the User
Password: The Password for the new user
First Name: The first name of the new user
Last Name: The last name Of the new user
DNS Plan: The DNS plan for the user
After you enter information in these fields, click on Save User to create the user.
How to add Cloud users to the Virtualizor panel? (Reseller Users)
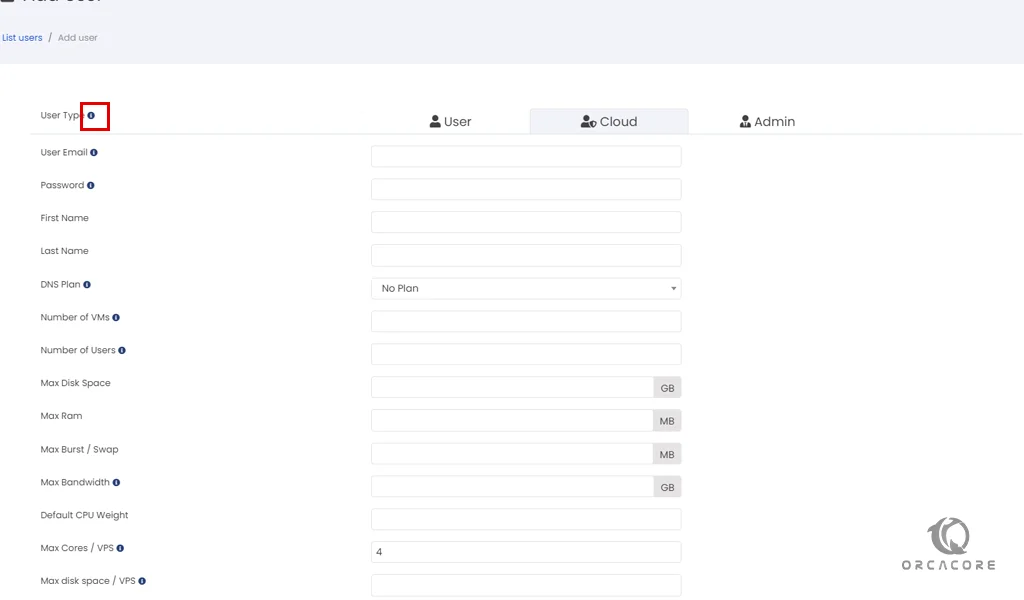
Through this section, You can add some resellers for your services and servers. Also, you will see some configuration fields like Max Number of VMs, Number of Users, Max Disk space, Allowing Virtualization and etc. With this configuration, you can set limitations for your resellers.
If you need more explanations for each field, you can click on the icon “i” and see more explanations about each field in this section.

How to add Admin users to the Virtualizor panel? (Admin Users)
If you want to add admin users and give it an access level for managing users and VPSs, you can use this tab. This tab is like “Adding users to a Virtualizor“, but it has one more drop-down list named “Access Control“.
From this List, you can select the access level of the new admin user. Please note that you should add some administrator access level (ACL) before.
Finally, you can click on “Save user” to create a new user.
Conclusion
In this tutorial, we learned how to Add Users to Virtualizor Panel. Also, we found any types of users and levels.
Thanks for reading and following our posts. Please don’t hesitate to contact us by commenting on the post.
You may be interested in other posts on our Virtualizor Tutorial tag:
Migrate VPS Storage on Virtualizor


