Share your love
Migrate VPS Storage on Virtualizor Panel without Data Loss: Easy Steps
Migrate VPS Storage on Virtualizor tutorial from the Virtualizor tutorials series, we want to teach you how to migrate VPS storage without data loss.
Sometimes, in a server, you need to transfer your virtual server disk from one storage to another storage. Of course, this is when your server has two storages and you only need to move its disk without reinstalling the virtual server.
Note: If you need to transfer the virtual server completely between two servers. You can use the Migrate VPS on Virtualizor between two servers guide.
Table of Contents
Steps to Migrate VPS Storage on Virtualizor panel
1- Login to Virtualizor Panel and from the left menu, go to Virtual Server and Select Migrate Disk.
2- Then you will see a page, like below image.
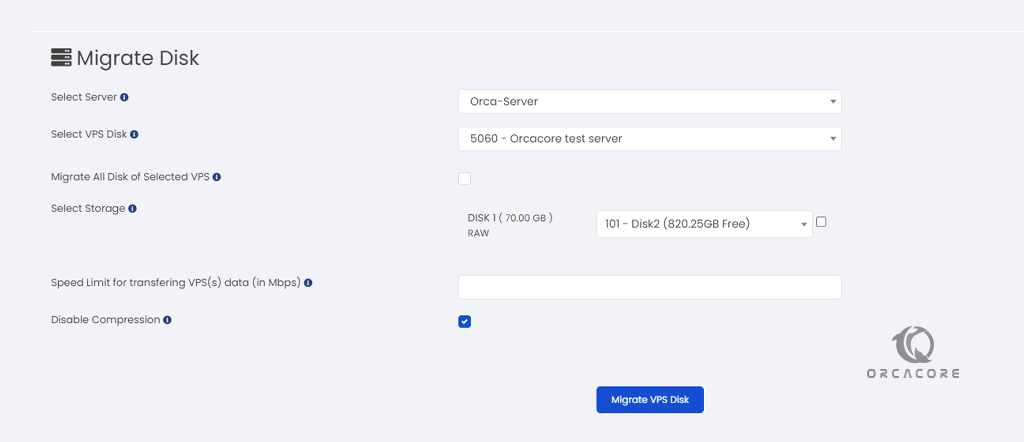
3- Select your Server and VPS, set the option you want, and then click on the Migrate VPS Disk button.
For more information about Migrate VPS Storage on Virtualizor migration page, we will continue to explain all the options on this page
Select Server: Select the server on which your virtual server is installed.
Select VPS Disk: Select the virtual server whose disk you want to transfer.
Migrate All Disk of Selected VPS: If your selected VPS has more than one Disk and you want to transfer all Disk, then check this option.
Select Storage: Select the destination storage.
Speed Limit for transferring VPS(s) data (in Mbps): If you want to limit the transfer speed, enter the desired speed based on Mbps.
Disable Compression: If you want to compress the disk before transferring the disk, then uncheck this option, If not, check this option to transfer begin without compression.
Conclusion
With this tutorial, you learned how to Migrate VPS Storage on Virtualizor panel without any data loss. before this option was added to Virtualizor, you had to transfer VPS handly from SSH with commands, but now you can transfer VPS disk simply with just A few clicks.
If you have any questions about this tutorial, leave us a comment.
Also, you may be interested in other articles about Virtualizor, which are linked below:
Add Administrator ACL on Virtualizor
Email Settings in Virtualizor step-by-step