Share your love
Migrate VPS on Virtualizor between two servers: Easy Steps

In this tutorial from the Virtualizor Tutorials series, we want to teach you how to migrate VPS on Virtualizor between two servers.
As you know, Virtualizor is a VPS management panel that supports various Linux hypervisors. In the article on how to install the virtualizer in Almalinux, we talked about it in general.
Now, from the series of features that this panel has, in this article, we are going to transfer the VPS between two servers so that you can get to know more about this feature.
Table of Contents
Migrate VPS on Virtualizor Panel
First of all, you should pay attention to the following two points:
- Both servers that you want to transfer between must be controlled by a master server.
- Both servers must use the same type of hypervisor.
Let’s start to migrate VPS on Virtualizor step-by-step
- login to the Virtualizor Master Server.
- From the left menu, Go to Virtual Server and then select Migrate VPS.
- Select the source server from the From server, and then select the desired VPS.
- After selecting the desired VPS, select the destination server from the to Server.
As you see, there are several options to choose from on the page, each of which is as follows:
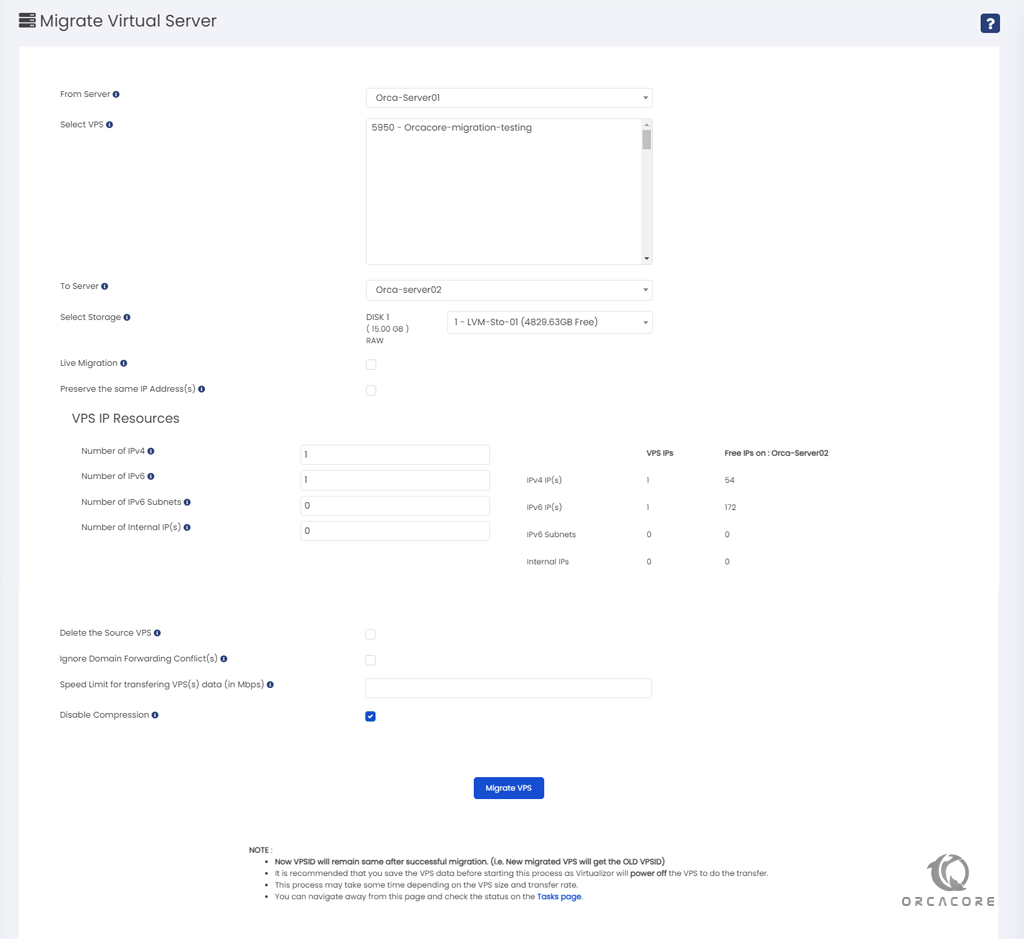
Description of VPS migration options on Virtualizor
Select Storage: You can choose the storage space on the destination server.
Live Migration: If you check this option, the KVM VPS will be live migrated to another node.
Note: This option will be displayed to you when you use the KVM hypervisor for Migrate VPS on Virtualizor
Preserve the same IP Address(s): If you set this option, VPS migrate with the same IP Address(s) to the destination server, If you want to the VPS get a new IP address from the destination server, do not use this option.
Note: You can change the number of IP addresses for this VPS.
Delete the Source VPS: Set this option if you want to delete VPS from the source server after the migration is completed.
Ignore Domain Forwarding Conflict(s): With this option, the migration process, Ignores HAProxy VPS Domain Forwarding records if a conflict is found with records on the destination server.
Speed Limit for transferring VPS(s) data (in Mbps): Through this section, you can limit the transfer speed. The number you enter will be based on Mbps.
Disable Compression: If you set this option, VPS compression has been disable. remember if you need to migrate a huge VPS, do not select this option, but if you need to migrate a VPS with small storage and your network speed is good, set this option.
Note: Some of the features like IP address and storage will be shown after you select the VPS and the destination server.
Conclusion
In this article, we showed you how to Migrate VPS on Virtualizor between two servers step by step. but remember if you want to use this option, You must have two identical servers in type of hypervisor and both servers must be controlled by a master server.
Feel free to leave us any questions or comments in the below.
You may also find the following topics interesting: