Share your love
2 Best Ways To Disable Real-time Protection on Windows 11
This guide intends to teach you to Disable Real-time Protection on Windows 11. Real-time protection is a security feature that actively monitors and safeguards your system against various types of malware and threats in real-time.
Real-time Protection is a component of Windows Defender Antivirus. You can check this guide on Activate and Use Defender Firewall on Windows 11 for more information about Defender Firewall.
It is not recommended to disable real-time protection on Windows 11. It makes your system vulnerable to malware, viruses, and other security threats. However, users may consider temporarily disabling real-time protection for specific reasons, such as:
- Installation of Third-Party Antivirus Software
- System Performance Issues
- Application Compatibility
Now you can proceed to the next steps on the Orcacore website to see how you can disable Real-time Protection on Windows 11.
Table of Contents
2 Ways To Disable Real-time Protection on Windows 11
At this point, you can log in to your Windows Client and use one of the following methods to turn off Real-time protection:
- Using Windows Security
- Using PowerShell
Method 1 – Turn Off Real-time Protection From Windows Security
To turn off your defender protection from Windows Security, follow the steps below.
First, search for Windows Security and open the app. From there, click on Virus and Threat Protection. Under the “Virus & threat protection settings” section, click the Manage settings option.

Then, you can simply turn off the real-time protection. This will temporarily disable your defender protection.
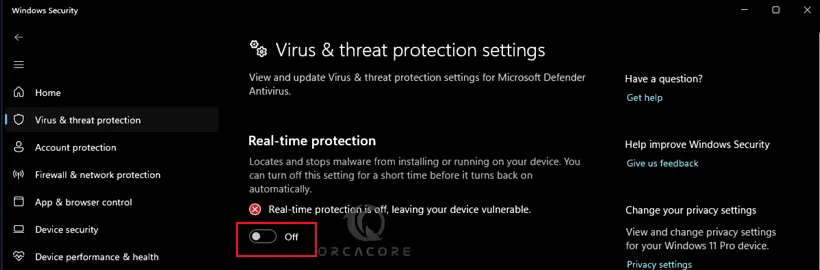
Once you restart your system, it will be enabled and back to default. Or you can turn it on like the above steps.
Method 2 – Turn Off Real-time Protection From PowerShell
If you are interested in using the command line interface, you can open PowerShell as administrator, and use the following command to disable defender protection:
Set-MpPreference -DisableRealtimeMonitoring $true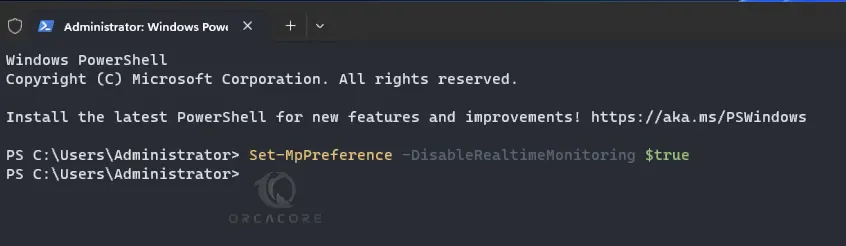
This will turn off your Defender protection on Windows 11 until you restart your system. Or you can enable it again by using the following command:
Set-MpPreference -DisableRealtimeMonitoring $false
Note: Remember to re-enable real-time protection after disabling it. Keeping real-time protection enabled is essential for maintaining a secure computing environment.
Conclusion
At this point, you have learned 2 Ways To Disable Real-time Protection on Windows 11 including Windows Security and PowerShell. Just keep in mind to re-enable it after you are done with your tasks. Hope you enjoy it.
Also, you may like to read the following articles:
Enable Group Policy Editor in Windows 11 Home Edition
2 Methods To Enable and Disable IIS on Windows 11
Find Windows Public IP Address From PowerShell and CMD
FAQs
What is Real-time Protection in Windows 11?
Real-time Protection is a feature in Windows Security (formerly known as Windows Defender) that continuously scans files and applications for malware and other threats as you use them.
Why would I need to disable Real-time Protection on Windows 11?
Disabling Real-time Protection might be necessary for specific scenarios, such as installing certain software that conflicts with antivirus scanning, improving performance temporarily, or troubleshooting system issues.
Is it safe to disable Real-time Protection on Windows 11?
Generally, it is not recommended to disable Real-time Protection because it leaves your system vulnerable to threats. Only disable it temporarily and ensure it’s re-enabled when the specific task is complete.