Share your love
Install Froxlor Control Panel on RHEL 8: Easy Control Panel

In this guide, we want to show you how to Install Froxlor Control Panel on RHEL 8 like Centos 8, AlmaLinux 8, and Rocky Linux 8. Froxlor is an open-source and easy-to-use control panel that you can use for managing web hosting, domain names, FTP accounts, email accounts, etc. You can use the Froxlor tarball archive with LAMP stack to install the latest version on your RHEL 8 and start using it. To Install Froxlor Control Panel on RHEL 8, you can follow the steps below provided by the Orcacore website.
Table of Contents
Ultimate Guide To Install Froxlor Control Panel on RHEL 8 with Lamp Stack
To Install Froxlor Control Panel on RHEL 8, you must have access to your RHEL 8 server as a non-root user with sudo privileges and set up a basic firewall. In this guide, to show the installation steps we use Roccky Linux 8. To make an initial setup and install LAMP Stack, you can visit the following guides:
Initial Server Setup with Rocky Linux 8
Install LAMP Stack on Rocky Linux 8
Now you can follow the steps below to Install Froxlor Control Panel on RHEL 8.
Step 1 – Manually Download Froxlor Tarball Archive on RHEL 8
To start, you need to install the PHP extensions that are required for your installation. To do this, you can run the command below:
sudo dnf install php-process php-gmp php-bcmath php-zip php-mysqlFirst, you need to navigate to your /var/www/html/ directory. To do this, you can use the command below:
cd /var/www/html/Then, use the following command to download the latest version of Froxlor:
sudo wget https://files.froxlor.org/releases/froxlor-latest.tar.gzExtract your downloaded file by using the following command:
sudo tar xvfz froxlor-latest.tar.gzNow the Froxlor folder is available in the /var/www/html/ directory. You can remove the archive with the command below:
sudo rm froxlor-latest.tar.gzNext, set the correct ownership for the Froxlor directory with the Apache user:
sudo chown -R apache:apache /var/www/html/froxlorStep 2 – Create a New Privileged Database User for Froxlor on RHEL 8
To Install Froxlor Control Panel on RHEL 8, a privileged user database is required for Froxlor to manage MySQL users and databases. Log in to your MariaDB shell with the command below:
sudo mysql -u root -pThen, create a new user for the Froxlor control panel with a strong password on RHEL 8:
MariaDB [(none)]> CREATE USER 'froxloruser'@'localhost' IDENTIFIED BY 'password';Grant all the privileges to the Froxlor user with the following command:
MariaDB [(none)]> GRANT ALL PRIVILEGES ON *.* TO 'froxloruser'@'localhost' WITH GRANT OPTION;Next, flush the privileges and exit from MariaDB:
MariaDB [(none)]> FLUSH PRIVILEGES;
MariaDB [(none)]> EXIT;
Step 3 – Configure Firewall For Froxlor Control Panel on RHEL 8
Before you can access your Froxlor control panel from the web interface, you need to allow ports 80 and 443 through the firewall. To do this, you can run the commands below:
# sudo firewall-cmd --zone=public --add-service=http --permanent
# sudo firewall-cmd --zone=public --add-service=https --permanent
Reload the firewall to apply the new rules on Rocky Linux 8:
sudo firewall-cmd --reloadStep 5 – Complete Froxlor Installation via Web Interface
At this point, you can complete your installation through the web interface by typing your server’s IP address in your web browser followed by froxlor:
http://server-ip-address/froxlorNote: Your default web root directory may differ from /var/www/html/. To access froxlor, you need to adjust the default virtual host to set /var/www/html/ as document-root. To do this, you can edit the following file:
sudo vi /etc/httpd/conf/httpd.confAnd set the DocumentRoot to:
DocumentRoot /var/www/html/Then, restart Apache to apply the changes:
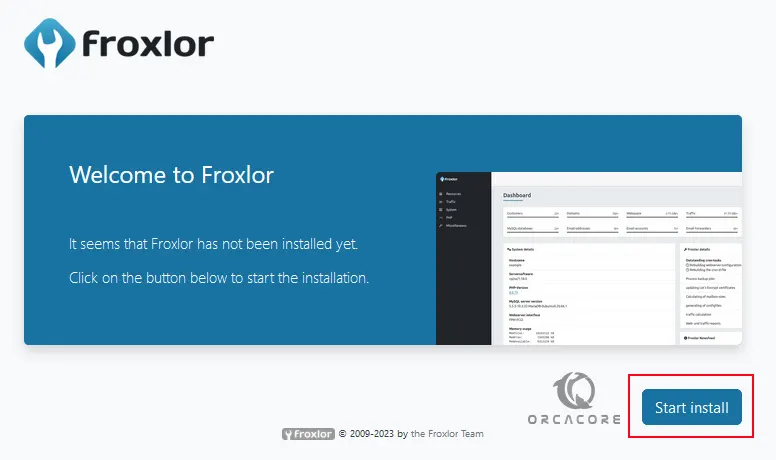
sudo systemctl restart httpdWhen you access your Froxlor welcome screen, click Start Install.
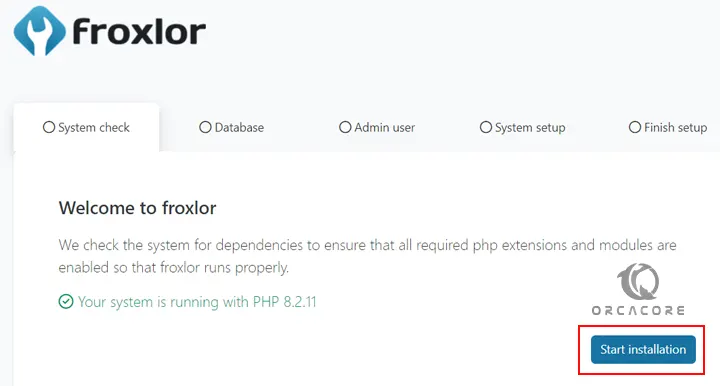
Then, you need to ensure that all required php extensions and modules are enabled so that froxlor runs correctly. Click start installation.
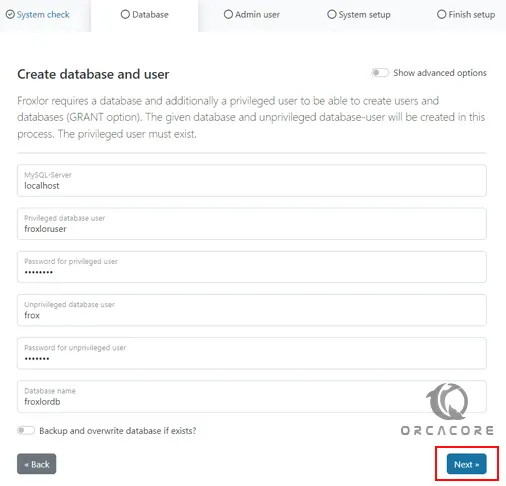
At this point, you must enter your Froxlor privileged user that you have created in step 2. Also, the given database and unprivileged user will be created here. When you are done, click Next.
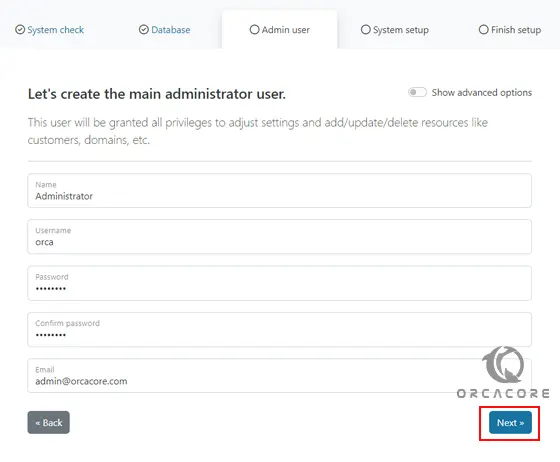
Next, you must create an admin user to access your Froxlor dashboard on RHEL 8 and click Next.
Here you need to enter your server details like the server’s IP address and hostname. For the distribution, you can choose Debian 12 because it doesn’t have RHEL 8 in the list.

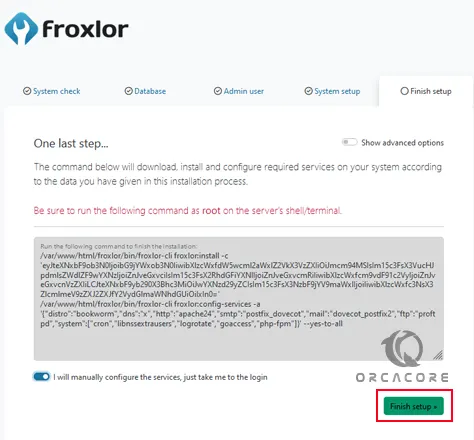
Now you will see a command. You can wait to automatically finish or do it manually and click Finish setup.
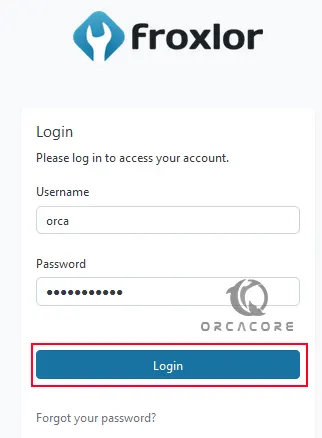
Then, you will see your Froxlor server management login screen. Enter your Admin user and password and click Login.
Finally, you will see your Froxlor dashboard on RHEL 8.

From here you can easily manage your server via the Froxlor web control panel dashboard.
You can use Froxlor as an alternative to cPanel. If you are looking for cPanel guides, you can visit the cPanel Tutorials.
Conclusion
At this point, you have learned to Install the Froxlor Control Panel by using the tarball archive and LAMP stack on RHEL 8 like Centos 8, AlmaLinux 8, and Rocky Linux 8. Then, you have accessed your Froxlor dashboard and from there you can easily start to manage your server. Hope you enjoy using it.
Also, you may like these articles: