Share your love
Easy Steps To Install GlassFish on Rocky Linux 9

This guide on the Orcacore website intends to show you How To Install GlassFish on Rocky Linux 9. GlassFish is an open-source, freely available, Java EE (called J2EE formerly) application server.
Like all Java EE-compliant application servers, GlassFish provides the necessary libraries to develop and deploy Java applications compliant with Java EE specifications. Java EE technologies include Servlets, JavaServer Pages (JSPs), JavaServer Faces (JSF), Enterprise JavaBeans (EJBs), and the Java Messaging Service (JMS).
Table of Contents
Steps To Install and Configure GlassFish on Rocky Linux 9
To complete this guide, you must log in to your server as a non-root user with sudo privileges and set up a basic firewall. To do this, you can follow our guide the Initial Server Setup with Rocky Linux 9.
1. Install Java For GlassFish Setup
To set up GlassFish on Rocky Linux 9, you need Java installed on your server. First, update your local package index with the following command:
sudo dnf updateThen, you need to install the Epel release on your server with the command below:
sudo dnf install epel-release -yNow install Java on Rocky Linux 9 with the following command:
sudo dnf install java-11-openjdk-devel -yWhen your installation is completed, verify your Java installation by checking its version:
java -versionIn your output you will see:
Output
openjdk version "11.0.16.1" 2022-08-12 LTS
OpenJDK Runtime Environment (Red_Hat-11.0.16.1.1-1.el9_0) (build 11.0.16.1+1-LTS)
OpenJDK 64-Bit Server VM (Red_Hat-11.0.16.1.1-1.el9_0) (build 11.0.16.1+1-LTS, mixed mode, sharing)
2. Install GlassFish on Rocky Linux 9
To install GlassFish, you need to create a user for your GlassFish with the following command:
sudo useradd -s /sbin/nologin glassfishDownload GlassFish
Now check the latest version of GlassFish from the GlassFish Downloads Page.
Then, you need to download the GlassFish installer with the following command:
sudo wget https://download.eclipse.org/ee4j/glassfish/glassfish-6.2.5.zipRemember to replace the version of GlassFish that you have checked in the above command.
Extract your downloaded file with the command below:
sudo unzip -d /opt/ glassfish-6.2.5.zipHere you need to set the correct permissions for the GlassFish user with the following command:
sudo chown -R glassfish:glassfish /opt/glassfish6/Create Systemd Unit File For GlassFish
Next, you need to create a systemd unit file for GlassFish. Create and open the file with your favorite text editor, here we use vi editor:
sudo vi /usr/lib/systemd/system/glassfish.serviceAdd the following contents to the file:
[Unit]
Description = GlassFish Server v6.2.5
After = syslog.target network.target

[Service]
User = glassfish
ExecStart = /usr/bin/java -jar /opt/glassfish6/glassfish/lib/client/appserver-cli.jar start-domain
ExecStop = /usr/bin/java -jar /opt/glassfish6/glassfish/lib/client/appserver-cli.jar stop-domain
ExecReload = /usr/bin/java -jar /opt/glassfish6/glassfish/lib/client/appserver-cli.jar restart-domain
Type = forking

[Install]
WantedBy = multi-user.target
When you are done, save and close the file.
reload the systemd daemon to apply the new changes with the following command:
sudo systemctl daemon-reloadStart and Enable GlassFish Service
Then, start your GlassFish service on Rocky Linux 9 with the following command:
sudo systemctl start glassfishTo enable GlassFish to start at boot run the following command:
sudo systemctl enable glassfishNow you can check that your GlassFish service is active and running on Rocky Linux 9 with the command below:
sudo systemctl status glassfishIn your output you will see:
Output
● glassfish.service - GlassFish Server v6.2.5
     Loaded: loaded (/usr/lib/systemd/system/glassfish.service; enabled; vendor>
     Active: active (running) since Sat 2023-01-06 06:48:24 EDT; 16s ago
   Main PID: 16744 (java)
      Tasks: 98 (limit: 23609)
     Memory: 383.2M
        CPU: 16.098s
     CGroup: /system.slice/glassfish.service
...
3. Configure Firewall For GlassFish
We assumed that you have enabled firewalld from the requirements. At this point, you need to allow GlassFish ports on the Rocky Linux firewall with the command below:
sudo firewall-cmd --add-port={4848,8080,8181}/tcp --permanent Then, reload the firewall to apply the new rules:
sudo firewall-cmd --reload4. Configure GlassFish on Rocky Linux 9
By default, GlassFish has no password. For more security, you need to set a password for the GlassFish admin user. To do this, run the following command:
sudo /opt/glassfish6/bin/asadmin --port 4848 change-admin-passwordYou will be asked to set the admin username as shown below:
Enter admin user name [default: admin]>adminNext, you will be asked to enter the existing admin password, just press enter to continue:
Enter the admin password>Here you will be asked to enter the new admin password. Enter your password and press enter. In your output you will see:
Output
Command change-admin-password executed successfully.
It’s recommended to enable secure login for the GlassFish admin console with the following command:
sudo /opt/glassfish6/bin/asadmin --port 4848 enable-secure-adminYou need to enter your username and password, in your output, you will see:
Output
Command enable-secure-admin executed successfully.
Restart your GlassFish on Rocky Linux 9 to apply the changes:
sudo systemctl restart glassfish5. Access GlasFish Admin Web Console
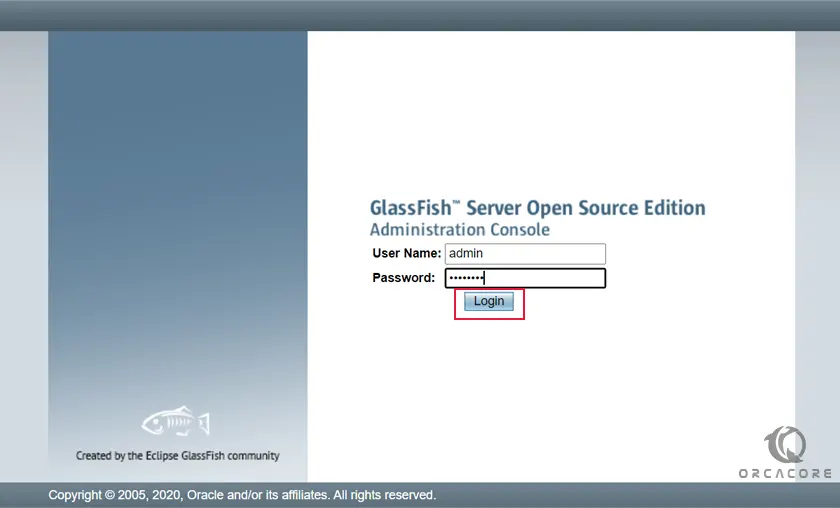
At this point, you can access the GlasFish Admin Web Console by typing your server’s IP address in your web browser followed by 4848:
http://your-server-ip-address:4848You will see the GlasFish Admin Web Console login screen. Enter your GLassFish admin username and password and click Login.
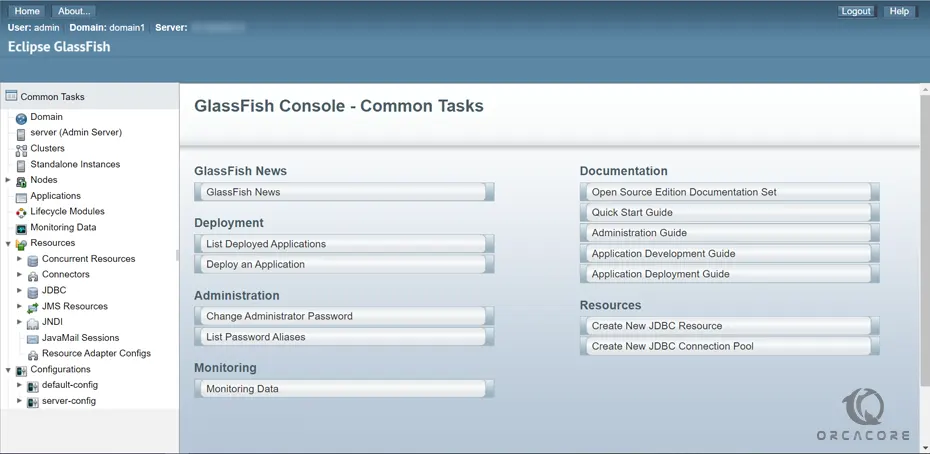
Now you can see your GlassFish Admin console on Rocky Linux 9.
That’s it, you are done.
Conclusion
At this point, you have learned to Install and Configure GlassFish on Rocky Linux 9 and Access GlasFish Admin Web Console. GlassFish in Rocky Linux 9 is a free and open program that helps run Java applications on a server. It is used to build and manage big business applications and supports modern Java technologies.
Hope you enjoy it. You may also interested in these articles:
Install Python 3.11 on Rocky Linux 9
How To Install PHP 8.2 on Rocky Linux 9