Share your love
Easy Steps to Install ownCloud on Ubuntu 22.04
In this guide, you will learn to Install ownCloud on Ubuntu 22.04 Jammy Jellyfish LTS with LAMP Stack. ownCloud is a cloud storage software that you can use to set up your cloud storage so that you can access your files via the web interface.
You can easily start your ownCloud installation by using the LAMP Stack (Apache, MariaDB, and PHP) on Ubuntu 22.04 LTS. To do this, you can follow the rest of the article on the Orcacore website.
Table of Contents
Steps To Install ownCloud on Ubuntu 22.04 with LAMP Stack
Before you start to Install ownCloud on Ubuntu 22.04, you need some requirements. Let’s see what we need.
Requirements
First, you must log in to your server as a non-root user with sudo privileges. You can check this guide on Initial Server Setup with Ubuntu 22.04.
Then, you must have LAMP Stack (Apache, MariaDB, and PHP) on your server. For this purpose, you check the LAMP Stack Installation on Ubuntu 22.04.
Also, you need a valid domain name that is pointed to your server’s IP address.
Now you can proceed to the following steps to Install ownCloud on Ubuntu 22.04.
Step 1 – Install Required PHP extensions For ownCloud
Here we assumed that you have installed LAMP Stack on your Ubuntu server. The default PHP version on Ubuntu is PHP 8.1. But ownCloud only supports PHP 7.4. So you must remove the default PHP version and install PHP 7.4. To do this, you can use the following commands:
# sudo apt remove php*
# sudo add-apt-repository ppa:ondrej/php
# sudo apt update
Now you need to install PHP and some required extensions for ownCloud installation. To do this, you can run the command below:
sudo apt install php7.4 php7.4-{opcache,gd,curl,mysqlnd,intl,json,ldap,mbstring,mysqlnd,xml,zip}
 -y
Then, proceed to the next step to create your ownCloud database and user.
Step 2 – Create ownCloud Database and User on Ubuntu 22.04
At this point, you must log in to your MariaDB shell and create your ownCloud database and user. To log in to your MariaDB shell, run the command below:
sudo mysql -u root -pFirst, create an ownCloud database with the following command:
MariaDB [(none)]> CREATE DATABASE owndb;Then, create a user database with a strong password:
MariaDB [(none)]> CREATE USER 'ownuser'@'localhost' IDENTIFIED BY 'password';Next, Grant all the privileges to the user database, flush the privileges, and exit from your MariaDB shell:
MariaDB [(none)]> GRANT ALL PRIVILEGES ON owndb.* TO 'ownuser'@'localhost';
MariaDB [(none)]> FLUSH PRIVILEGES;
MariaDB [(none)]> EXIT;
Step 3 – Download the Latest ownCloud on Ubuntu 22.04
At this point, you can get the latest TAR package of ownCloud from the Official website. To do this, you can navigate to your /tmp directory and run the following wget command:
# cd /tmp
# sudo wget https://download.owncloud.com/server/stable/owncloud-complete-latest.tar.bz2
When your download is completed, extract your file with the following command:
sudo tar -xvf owncloud-complete-latest.tar.bz2Next, you must move your ownCloud directory to the web root directory on Ubuntu 22.04. To do this, run the command below:
sudo mv owncloud /var/www/html/Then, set the correct permissions for your ownCloud directory:
sudo chown -R www-data: /var/www/html/owncloudStep 4 – Configure Apache Virtual Host File for ownCloud
At this step, you must create an Apache virtual host file for your ownCloud. To do this, you can use your favorite text editor like Vi editor or Nano editor:
sudo vi /etc/apache2/sites-available/owncloud.confAdd the following configuration content to the file with your Domain name:
<VirtualHost \*:80>

ServerAdmin admin@example.com
DocumentRoot /var/www/html/owncloud
ServerName example.com

<Directory /var/www/html/owncloud>
Options FollowSymlinks
AllowOverride All
Require all granted
</Directory>

ErrorLog ${APACHE_LOG_DIR}/example.com_error.log
CustomLog ${APACHE_LOG_DIR}/example.com_access.log combined

</VirtualHost>
When you are done, save and close the file.
Then, restart Apache to apply the changes:
sudo systemctl restart apache2Step 5 – Install and Access ownCloud Dashboard via Web Interface
At this point, you can continue your ownCloud installation and access the dashboard from the Web interface by typing your Server’s IP address or Domain name followed by ownCloud in your web browser:
http://server-ip/owncloud
or
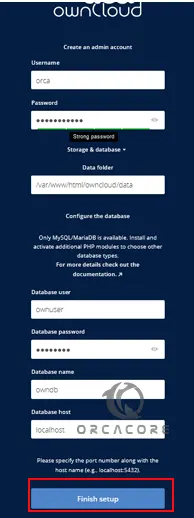
http://domain.com/owncloudIn the first screen, you need to create an Admin account for ownCloud, enter your database credentials, and click Finish Setup.
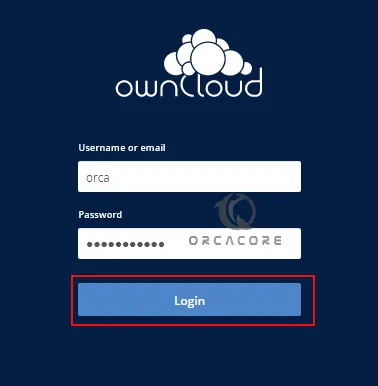
Then, you will see your ownCloud login screen. Enter the admin username and password and click Login.
Now you will see your ownCloud dashboard on Ubuntu 22.04. From there you can upload your files and share them with others.

Also, there are alternatives that you can use instead of ownCloud including:
Install and Configure Nextcloud on Ubuntu 22.04
Complete Guide To Install Seafile Server on Ubuntu 22.04
Conclusion
At this point, you have learned to download the latest package and Install ownCloud on Ubuntu 22.04 with LAMP Stack. Hope you enjoy using it.
Also, you may like to read the following articles:
Install and Configure Cloudron on Ubuntu 22.04